
Achieving shallow depth of field is something that many folks want to do with their photographs. While some people may associate full frame cameras with shallow depth of field, it is also possible to achieve this with smaller sensor cameras. This article discusses some simple techniques that can be used when applying this creative approach to flower photography. All of the photographs in this article were captured with M4/3 camera equipment.
There are four simple factors to consider when achieving shallow depth of field in our photographs.
- Aperture
- Subject distance from camera
- Subject distance from background
- Lens focal length
NOTE: Click on images to enlarge. All of the photographs in this article were captured on Monday morning in less than 30 minutes walking around the flower gardens at my home. One thistle blossom was thrown in for good measure.

The first thing to keep in mind is that the more wide open the aperture … the more shallow the depth of field will be. The image above, like all of the photographs in this article, was captured using an aperture of f/2.8.

The next factor to remember is that the closer that we get to our subject, the more shallow the depth of field will be. In the photograph above I was less than one metre (~ 3 feet) away from the subject flower.

Getting in close to our subject will help create shallow depth of field. We also should look for opportunities where the background is off in the distance. We can get quite shallow depth of field and good subject separation when we combine both of these factors.

If you have been looking at the EXIF data on the previous images you will have noticed that all of the photographs were captured using a focal length of 150 mm (efov 300 mm).

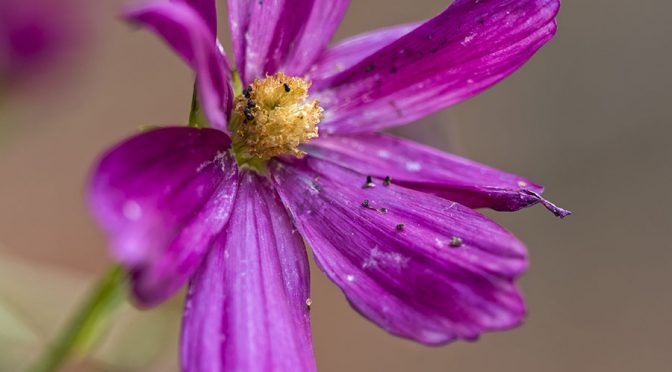
The longer the focal length we use, the shallower the depth of field will be. In the image above you can see that the emerging flower petals on the front edge of the blossom are in focus. The emerging petals on the rear side of the blossom, and the insect that landed on one of them, are out of focus. If I would have used a more wide angle focal length, i.e. 40 mm (efov 80 mm) the entire blossom would likely have been in focus. Overall there would have been deeper depth of field in the photograph, rather than the soft, dreamy look in the image above.

Some flower subjects may be difficult to separate from their backgrounds, as we can see in the photograph above.

In these instances it can be helpful to look for a different blossom or a different shooting angle to help frame your subject with a background that is further away from it.

Our choice of a focusing point will also affect our compositions. In the image above, I focused on the centre of the flower. Given the aperture, focal length, and distance from the subject, this created a composition where the front and rear edges of the petals are out of focus.

The photograph above is another example of the importance of choosing your focusing point. In this case I used the front edge of the tallest leaf cluster. You can see that elements on either side of it, in the foreground and in the background, are out of focus. This helps with achieving shallow depth of field and subject separation.

It can be critical to look for important details in a composition and plan your shooting angle accordingly. The water droplet on the drooping petal is a detail of note. I used the front edge of the flower’s centre section as my focusing point.
I made sure that the water droplet hanging from a drooping petal was positioned on the side of the composition. This helped ensure that the water droplet would also be in focus as both elements were on the same focal plane. If the drooping petal was positioned in centre frame, the water droplet would have been noticeably out of focus. A key detail in the composition would have been lost.

When photographing a subject that has multiple elements you need to decide how you want to guide a viewer’s eye flow in the image. In this instance I selected the leaf at the end of the stem. This helps to logically lead the viewer’s eye to it and away from the out of focus elements in the foreground.

Subject positioning in the composition is also critical to achieve shallow depth of field. Often by placing the subject on one side of our photograph we can accentuate its distance from the background. We can also use high colour contrast to help achieve subject separation as we can see in the photograph above. High contrast can be accentuated in post.

Be creative when looking for monochromatic backgrounds against which you can position your subject. I used the white door at the front of my house (which was still in early morning shade) as the background for the above image.

Envision how background elements will appear as out of focus areas of colour. Position your subject to achieve a pleasing colour mix with your composition.
The final image in this article falls into the category of ‘things always aren’t as they appear’.

When first looking at the above image you may be assuming that the pink flower was in the background. Actually the opposite was true. The pink flower was positioned about 75 mm (~3 inches) in front of the dried up blossom. By choosing the dried up blossom as my focusing point, the pink blossom went out of focus as a foreground element. By making sure that the two elements did not intersect in the composition, I was able to create the illusion that the pink flower was in the background.
As you can see from the samples in this article, achieving shallow depth of field can be done with smaller sensor cameras.
In case you were wondering, I chose the M.Zuiko 40-150 mm f/2.8 zoom as part of my Olympus Loaner Gear lens selection because I knew it would be an outstanding lens for flower photography.
Technical Note:
All photographs in this article were captured hand-held using camera gear as noted in the EXIF data. All of the photographs displayed in this article were produced from RAW files using my standard post processing approach. Most of the images in this article are displayed as 100% captures without any cropping. A small number of photographs were subject to minor crops.
Use of Olympus Loaner Equipment
All of the photographs in this article were captured using Olympus Loaner Gear which was supplied by Olympus Americas Inc. on a no-charge basis. We are under no obligation what-so-ever to Olympus Americas Inc. in terms of our use of this loaner Olympus camera equipment. There is no expectation or agreement of any kind with Olympus Americas Inc. that we will create and share with readers any images, articles or videos, or on what that content may be.
Word of mouth is the best form of advertising. If you like our website please let your friends and associates know about our work. Linking to this site or to specific articles is allowed with proper acknowledgement. Reproducing articles, or any of the images contained in them, on another website or in any social media posting is a Copyright infringement.
My intent is to keep this photography blog advertising free. If you enjoyed this article and/or my website and would like to support my work, you can purchase an eBook, or make a modest $10 donation through PayPal. Both are most appreciated. You can use the Donate button below. Larger donations can be made to tom@tomstirr.com through PayPal.
Article and all images are Copyright 2019 Thomas Stirr. All rights reserved. No use, duplication or adaptation of any kind is allowed without written consent. If you see this article reproduced anywhere else it is an unauthorized and illegal use. Posting comments on offending websites and calling out individuals who steal intellectual property is always appreciated!
Wonderful images, Thomas! Quite an inspiring post!
Given that the 40-150 gives a magnification of 0.21x, do you have to crop down the images, if so, how much is the typical crop one may need?
Thanks again,
Randy
Hi Randy,
My approach to the work I do has always been to capture an image without the need to crop it at all whenever possible. Other than for birds-in-flight, the vast majority of photographs used in my articles are 100% captures without any cropping. If I do need to get in closer for a photo of a blossom, I’d rather put on an extension tube, or use the MC-20 teleconverter, than have to crop an image.
Tom
Great illustrative article! Since you have the M1X, I’m hoping for a future article where you explore it’s focus stacking features and capabilities as a way, e.g. to expand the depth of field to a whole bloom yet still maintain an out of focus background .
Hi Colin,
The Olympus Loaner Gear will be going back no later than Monday next week. I’m not sure if I will have time to explore many more features before that time as I have some client related priorities on which I need to focus.
Does the focus stacking produce a jpeg file… or can a RAW file be created through focus stacking? If my memory serves with my TG-5 focus stacking is a jpeg only function. As such I would likely almost never use it.
Tom
I don’t use the in camera software to combine the frames, just to acquire a series of Raw images which I select from and move to Photoshop for alignment and blending together. When selected, focus on the nearest point you want in focus, push the shutter button and the camera takes a series of images adjusting the focus point for each image. You can set up for different numbers of images and the amount of focus change between images. I’ve had great results hand held with this feature. Colin
Hi Colin,
Ah…OK. You just jogged my old, feeble brain! I haven’t done that in post for quite a few years. I think I actually have some specialized software outside of Photoshop that does that specifically. I will need to search on my hard drive to see if I can find it again.
Sometimes ‘old dogs’ like me need to relearn ‘old tricks’ that they once knew.
Tom
Hi Colin,
Should I move forward and acquire an E-M1X I will experiment with this technique… will keep you posted.
Tom
I’m an Olympus user myself — and have the lens you’ve been using in this series — but I was wondering if you might try the Panasonic Lumix G9 for another point of reference for Micro 4/3rds.
Hi Bill,
I won’t being doing any testing with Panasonic gear as I don’t have any interest in buying that brand of equipment again. I had a GH4 and a couple of Panasonic f/2.8 Pro zoom lenses for a short period of time. The first few days I used the GH4 mainly for video and things were OK. Once I started using the Panasonic gear for still photography my interest in it quickly disappeared. I ended up returning it within 2 weeks and luckily only had to pay a small restocking charge. It just didn’t work for me at all on the still photography side of things. I won’t go into details as I do not want to disparage the brand.
Tom