
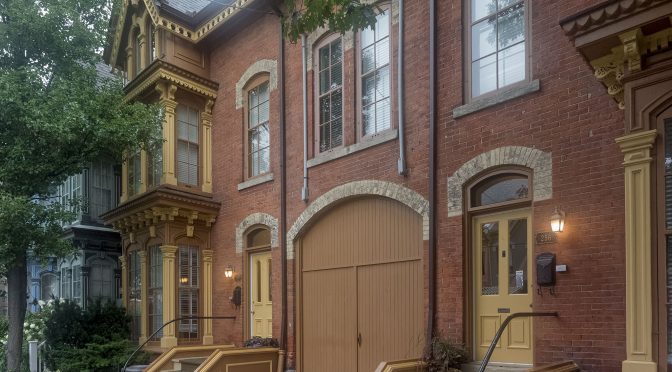
I recently had the opportunity to work with the owners of the MacNab Terrace Guest House, located in Hamilton Ontario. This property was built in 1879 and designed by noted Hamilton architect James Balfour. It combines two centre residences in a longer-term rental property. One of its unique features is the original horse carriage centre entrance through which the rear parking area is accessed. This article features a selection of images that capture some of the character at MacNab Terrace Guest House.
NOTE: Click on images to enlarge.

The MacNab Terrace building has been through a few transitions over the years. The current owners lovingly restored the property and used it as their residence for a number of years after converting it from a rooming house. It is now fully dedicated to a long-term rental property.

The facility houses guests on its three floors in a range of various accommodations, most featuring private baths and eating areas. Most guests stay for periods from a few weeks to several months or more.

Since the MacNab Terrace Guest House caters to visiting professionals in the educational and health care fields each of the accommodations has a work/study area.

A range of eclectic details can be found throughout the property which adds to its unique character. These include tooled, leather seat coverings…

Family heirlooms…

Interesting bedding…

Original fireplaces…

Ceiling fans…

Stained glass windows…

Mini libraries…

Antique mirrors…

A bit of whimsy…

And some touches of elegance…

Mixed in with some modern decorations…

There is a communal kitchen which has a fun, funky 50’s charm…

Bathroom facilities combine modern conveniences with some of the charm of yesteryear.

Everything comes together to create a comfortable and welcoming feeling, and a high percentage of repeat clientele.

Technical Notes:
You will be able to tell from the shutter speeds noted in the EXIF data that the lighting in many areas of the facility was a bit challenging. As a result all interior images were shot with the aid of either a Benro A48FD monopod equipped with a Manfrotto 391RC2 head, or a Manfrotto 055CSPRO3 tripod fitted with a Manfrotto 327RC2 pistol grip. I also used some exposure compensation for some of the photographs.
I maintained base ISO-160 for all interior images to utilize as much dynamic range and colour depth as possible from my camera’s sensor. I chose to use the Nikon 1 V3 as the potential of needing an EVF equipped camera existed.
I shot in Aperture Priority using AF-S single AF, with Single Point AF Area Mode. I utilized matrix metering with Auto White Balance for most of the images. Depending on light source, I did set custom white balances on occasion, using a Lastolite Professional EsyBalance Calibration Card.
All photographs were captured in available light using Nikon 1 gear as per the EXIF data. All images were produced from RAW files using my standard process of DxO PhotoLab, CS6 and the Nik Collection.
Word of mouth is the best form of advertising. If you like our website please let your friends and associates know about our work. Linking to this site or to specific articles is allowed with proper acknowledgement. Reproducing articles or any of the images contained in them on another website is a Copyright infringement.
My intent is to keep this photography blog advertising free. If you enjoyed this article and/or my website and would like to support my work you can purchase an eBook, or make a modest $10 donation through PayPal, both are most appreciated. You can use the Donate button below. Larger donations can be made to tom@tomstirr.com through PayPal.
Article and all images are Copyright 2018 Thomas Stirr. All rights reserved. No use, duplication or adaptation of any kind is allowed without written consent. If you see this article reproduced anywhere else it is an unauthorized and illegal use. Posting comments on offending web sites and calling out individuals who steal intellectual property is always appreciated!
I recently did a couple of projects photographing historic properties with some other volunteers from our camera club. The “clients” were a preservation non profit and our city historic districts commission. The interior shots were a lot more challenging than I expected due to the less than ideal lighting conditions. So I am impressed by the results you achieved here. I was wondering if you used local adjustments in your processing to mitigate the high contrast created by the bright light coming through the windows compared to the relatively dark interiors.
Hi Kevin,
I used the Spot Weighted DxO Smart Lighting adjustment for all of the images in the article. I’ve found that this helps to balance the overall dynamic range in an image. Depending on where the Spot Weighted adjustment box is placed, and its size, it also can be quite effective for the situation described in your comment. Other than the Spot Weighted DxO Smart Lighting adjustment I did not use any other local adjustments in any of the images.
Another technique that I used for the photographs in this article is to ‘double bump’ the shadows and highlights. This is something that I do with all of my Nikon 1 files, i.e. I do some initial adjustment to the highlights and shadows in DxO PhotoLab, then adjust them a second time in CS6. Typically I don’t go past -20 on highlights in PhotoLab, and shadows are usually adjusted between +10 to +20 in PhotoLab. After exporting a DNG file into CS6 I can be quite aggressive with further highlight and shadow adjustments. There are occasions when I may take highlights to -100 and shadows to +100 in CS6. On very rare occasions I may adjust shadows slightly in the Nik Collection when I do my final tweaks. I do not recall having to be this aggressive in CS6 or use the Nik Collection for any shadow adjustments to the images in this article.
Tom
I just discovered your argument: the possible need for an EVF…..
Sorry about my sloppy reading…
Rudolf
No problem Rudolf!
Tom
Hi Tom,
I was somewhat surprised that for the photos within the Macnab Terrace guest house you used the Nikon 1 V3, rather than the J5. You usually seem to use the V3 for action like birds or insects in flight, while for landscape, architecture and interiors you appear to prefer the J5. Can you tell us why the V3 this time?
Rudolf
Hi Rudolf,
The decision really came down to possibly needing to use an EVF equipped camera for parts of the photo shoot.
Tom
Hello Thomas and thank you for continuing with your wonderful website. I had inherited from my ‘other half’ a complete Nikon 1 system based around the V3 some time back and had loved it at first but then began to experience more and more disappointment with the ISO problem. Then recently I came back to your site and purchased your e-book and it inspired me to fully understand the true capabilities of this amazing little camera. The watershed for me is the use of the DXO Prime software. I now process all of my chosen photos with varying degrees of ISO correction using the LR to DXO linkage. My ‘keeper’ rate has now risen enormously. So I thank you most sincerely for your encouraging support for this misunderstood system.
On this particular thread I would have liked to have seen a few comparison photos showing what you can achieve with and without the monopod. The reason I love the Nikon 1 system is its lightness and compactness. I can carry the camera, flash and trigger plus 3 zooms (including the 70-300) and three primes in a small ‘Kipling’ back pack. I can carry this all day without too much fatigue which is a prime requirement for me as I approach 70 years of age! So using a monopod would always be a step too far for me.
So, would it be possible for you to feature a thread on this subject? i.e quality achievable with and without external support for the camera in low light conditions. The reason I would really value this as YOUR photos inspire me. It puts the seed of the idea in my mind that ‘if Tom can do it, then just maybe I might get close enough to be happy with the result’
Best wishes and thankyou if you could consider this topic for a future post
Effie
Hi Effie,
Thanks for your supportive comment – most appreciated!
Here is a link to an article that features photographs captured at slower shutter speeds: https://smallsensorphotography.com/shooting-hand-held-slow-shutter-speeds-non-evf-camera-photography-life
I almost never use any kind of support when I shoot still images. This latest article was a client project, which is one of the reasons why I used base ISO-160 for all of the photographs. Many of the images were captured using very slow shutter speeds such at 2 to 4 seconds so not using a camera support of some kind was not a possibility. Unless specifically noted in my articles that a monopod or tripod was used, the safe assumption is that I shot hand-held.
I’ve found that I can comfortably shoot my Nikon 1 bodies at 1/10th of a second handheld, assuming that a wide angle focal length is used. When shooting with the 1 Nikkor CX 70-300 mm zoom, my ‘never hesitate’ shutter speed is 1/30th with that lens fully extended. I have shot as slow as 1/6th, but that does take a fair amount of additional concentration.
In terms of dealing with noise in post, I use DxO PhotoLab as my main RAW processor. I run all of my files through DxO using the automatic lens corrections, as well as applying PRIME noise reduction to all of my images. After that, I export a DNG file into CS6, then finish my images off using the Nik Collection. Since you have a copy of The Little Camera That Could, you’ve likely read about how I ‘double bump’ highlights and shadows in post.
Tom