
As photographers we understand that completing the vision involves doing some work with our images in post processing. Each of us has our own skill level and approach when it comes to post processing, as well as our preferred software programs. We have a very specific vision in our minds for how we want our finished photograph to appear and often capture an image as an interim step towards that vision.
I was out at the Royal Botanical Gardens yesterday capturing some handheld in-camera focused stacked macro images of flowers with my E-M1X and M.Zuiko 60 mm f/2.8 macro lens. I had my E-M1X’s in-camera focus stacking set for 10 focus stacked images, using a focus differential of 4. I used my short stool when capturing all of the handheld macro images in this article.
The completed output from this in-camera focus stacking technology is an jpeg file. Some folks use the supporting RAW files to combine in post. As regular readers know I hate spending time in post so the first thing that I do is delete all of those supporting RAW files.
This article features seven pairs of photographs. The first image is an out-of-camera jpeg with absolutely no corrections done to it. The second image is my ‘completing the vision’ version after doing some quick adjustments in post. These adjustments typically would involve running my out-of-camera jpegs through DxO PhotoLab 4, then exporting a jpeg into PhotoShop CS6, and finishing them with Topaz if needed.
I never do any masking, and all of my adjustments towards completing the vision are very simple. In DxO I make some Selective Tone adjustments, apply DxO Smart Lighting, and often use a small amount of Microcontrast.
Completing the vision in CS6 is also pretty simple. I often use the Lasso Tool to remove distracting elements. For the images in this article I used the Burn Tool, and for some of them the Levels adjustment was utilized. Completing the vision with these specific images took a little bit longer than usual… about 3-5 minutes per image including computer processing time.
NOTE: Click on images to enlarge


As we can see with our first pair of images I did very little work to this particular photograph. I used the Lasso Tool to take out some distracting details, then made some adjustments as noted earlier in the article.


Our second pair of images required very little work in post… mainly just some burning.


A slight crop to 3535 pixels on the width was required for our third sample image. I used some quick burning to darken the background. The brightness of the flowers was enhanced using the DxO Smart Lighting Spot Adjustment Tool and the Levels Tool in CS6.


I often will underexpose a macro flower image to get the base file closer to the end result that I want to achieve. I seldom worry about how the out-of-camera jpeg is going to look as I can usually get it to where it needs to be with some quick adjustments in post.
You’ll notice that I used an aperture of f/8 with this particular image, even though it really wasn’t needed from a depth-of-field perspective. This aperture was used so I could slow my shutter speed down to 1/13 of a second. I like to push myself and my camera gear in terms of my handheld limitations .


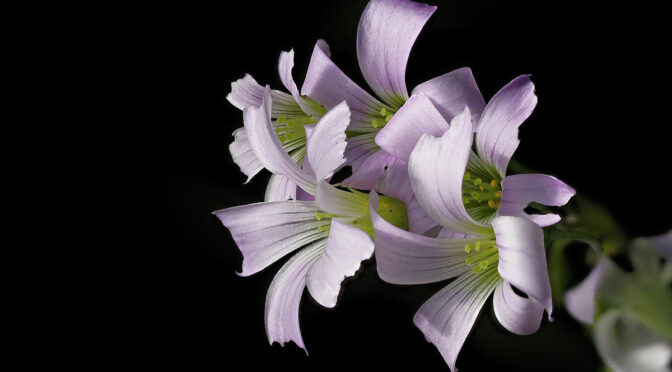
From a creative standpoint I love to play around with using a ‘flowers floating in blackness’ approach. The image above required a slight crop to 3557 pixels on the width so I could better position the blossom in the frame. In this case I used an aperture of f/8 as I had to deal with flower petals pointed directly at my camera.


A trip out with my camera would not be complete unless I try something that I’m expecting will fail. In this case I used a handheld shutter speed of 1/6 of a second. Since my E-M1X was capturing 10 consecutive images, then combining them in post, I wasn’t expecting this test photograph to have any success. Who says IBIS performance isn’t important?
I actually prefer the original out-of-camera jpeg of this particular photograph… but processed it in keeping with the overall theme of this article.


Our final sample photograph required a slight crop to 3692 pixels on the width. When using in-camera focus stacking with an Olympus/OM System camera there is a slight internal crop that occurs. As a result it can be prudent to leave a bit of room in a composition. The completing the vision version of this last photograph was one of my favourites of the day.
Having a clear vision of how we want a photograph to end up is a key factor when we’re out with our cameras. While completing the vision is done in post… we need to begin with how we choose to capture our photographs.
Technical Note:
Photographs were captured handheld using camera gear as noted in the EXIF data. Images were produced from out-of-camera jpeg files using my standard approach in post. This is the 1,242 article published on this website since its original inception in 2015.
How you can help keep this site advertising free
My intent is to keep this photography blog advertising free. If you enjoyed this article and/or my website and would like to support my work, you can purchase an eBook, or make a donation through PayPal. Both are most appreciated.
Our eBooks include Images of Ireland, New Zealand Tip-to-Tip, Nikon 1: The Little Camera That Could, Desert & Mountain Memories, Images of Greece, Nova Scotia Photography Tour, and a business leadership parable… Balancing Eggs.
If you click on the Donate button below you will find that there are three donation options: $7.50, $10.00 and $20.00. All are in Canadian funds. Plus, you can choose a different amount if you want. You can also increase your donation amount to help offset our costs associated with accepting your donation through PayPal. An ongoing, monthly contribution to support our work can also be done through the PayPal Donate button below.
You can make your donation through your PayPal account, or by using a number of credit card options.
Word of mouth is the best form of endorsement. If you like our website please let your friends and associates know about our work. Linking to this site or to specific articles is allowed with proper acknowledgement. Reproducing articles, or any of the images contained in them, on another website or in any social media posting is a Copyright infringement.
Article and images are Copyright 2023 Thomas Stirr. All rights reserved. No use, duplication or adaptation of any kind is allowed without written consent. If you see this article reproduced anywhere else it is an unauthorized and illegal use. Posting comments on offending websites and calling out individuals who steal intellectual property is always appreciated!
I recall reading in one of your articles that you start by adjusting the Highlights and Shadows sliders to their extreme values, which at the time I thought was an interesting approach. Since I don’t recall which article I was reading perhaps you could clarify or add qualifications?
Thank you very much for your excellent writing.
Damian
Q. Roo MX
Hi Damian,
I use a number of software programs with my post processing (DxO PhotoLab 4, PhotoShop CS6, the Nik Collection, and Topaz Denoise or Sharpen AI) and I would never start by making extreme adjustments with Highlights and Shadows sliders. If an particular image needs these types of extreme adjustments they would be done in the second step of my process when I use PhotoShop CS6.
My first step is to use DxO PhotoLab 4 as my basic processor. I would start with one of the custom pre-sets that I programmed in PhotoLab. These are typically camera, lens and subject matter specific. Sometimes they may include lighting considerations. For example, “Nikon 1 V3, Nikon 1 70-300, white bird in flight, bright light”. In PhotoLab I would apply one of my pre-sets, make a Smart Lighting adjustment, and Microcontrast if needed. I don’t often make tonal corrections with RAW files in PhotoLab as my pre-set would already have that included. With out-of-camera jpegs I will make tonal adjustments in PhotoLab.
When working with RAW files I then export a DNG file into PhotoShop. This is the step where I may be very aggressive with Highlights and Shadows sliders. This is most often done with landscape images captured in brighter light as I want to maximize the available dynamic range in the RAW file. If needed, I then make corrections in the Nik Collect and Topaz Denoise or Sharpen. I should note that when I’m using extreme Highlights and Shadows adjustments, I will also pay a lot of attention to Black and White sliders to help create the overall contrast that I am looking to achieve.
When using the in-camera focusing stacking feature in my E-M1X the output is a jpeg so it is very important that I get my exposure as close as possible to what is in my mind. As noted in this article I often purposely underexpose images, then use Levels in CS6, as well as burning to create my final image.
Hope this has helped.
Tom
Thanks for this séries of photos.
How exactly do you vêt à black photo background? Do you use DxO or Lightroom?
Hi Dominique,
My standard process includes 4 programs. I run all of my files through DxO PhotoLab 4 and PhotoShop CS6. I regularly use the Nik Collection and Topaz AI (Denoise, Sharpening) as needed.
The images in this article did not follow a standardized step-by-step process as I use various various functions depending on the needs of an individual image. The general approach is outlined in the article.
I begin my process in DxO and use the Smart Lighting Spot Adjustment tool to balance out the dynamic range. I use the basic sliders in DxO to darken the background to some degree. Since I’m working with the out-of-camera jpeg there are limits to what is possible throughout the process, so it is important to try to anticipate when certain aspects of an image can be adjusted.
Once my file is in CS6 I use the Lasso tool to remove unwanted elements as best I can. After that it comes down to using the Burn tool, usually shadows at 100, but sometimes burning with highlights and/or mid-tones is sometimes required before shadows can be burned. The final adjustment is typically done with the Levels tool in CS6. Hope this has helped.
Tom
Hi Thomas,
Thank you very much for your answer, which will help me.
Dominique
Thanks for the information Tom. As usual, you provide great insight into your thinking and developing processes.
Hi John,
I’m glad that the article was of benefit!
Tom