
This somewhat detailed article discusses some of the considerations when composing with wire fences, and provides some sample photographs.
NOTE: Click on images to enlarge.

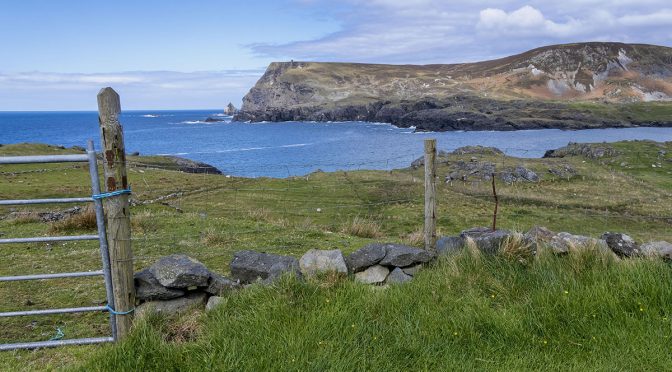
The image above is a very typical way that we could incorporate a wire fence into a landscape composition. This gently curving line helps to create a feeling of additional depth in the composition by acting as a foreground element and a bit of a leading line.
You’ll notice that the lead post is positioned roughly 1/3 of the way in from the left side of the composition. I purposely did not want another post visible on the left hand side of the photograph as it would have obstructed eye flow. Hold up a pen or pencil and position it on the left hand edge of the image as if it was another fence post. Then, move it slowly in a horizontal direction. You will quickly see how an additional post would have ‘closed in’ the visual flow of the photograph and stopped a viewer’s eye from flowing easily into the centre of the image.
There are two additional small details about the positioning of the fence posts that are worth mentioning.
The first is that the lead post is pointing directly up at the widest point of the body of water in the image, and splits it in two. This was done intentionally to help direct a viewer’s eye into the centre of the composition. It also helps to create balance.
If you look at the extreme right hand side you’ll notice that the last post in the fence is fully visible and is not overly close to the edge of the composition. We need to be careful not to create visual confusion in a photograph. By leaving an appropriate amount of space around the last fence post on the right side, a viewer’s eye can easily flow past it.
Take a piece of paper and line it up with the right hand edge. Then, begin to crop the right hand side of the image as you move your paper horizontally to the left. You will quickly see how bringing that last post in too tightly to the right hand side of the composition can hurt eye flow.

In the image above, the wire fence is acting as a supporting element for the road which is the leading line in the composition. There are two details worth noting in terms of how the fence posts are positioned in this photograph.
The first is that the double fence posts on the right hand side of the composition follow classic ‘rule of thirds’ guidelines. This helps create balance in the image… as does the horizon.
The other detail is a bit harder to notice. If you look in the bottom right hand corner you will see that I purposely cropped part of the post off so there is nothing to the right of it. This is a small example of a subject bleed.
When we incorporate a subject bleed into a composition it is usually to guide a viewer’s eye toward the opposite direction of the bleed. This right hand subject bleed helps to direct the viewer’s eye to the left, and into the composition towards the leading line.
Hold the tip of your index finger away from your computer screen, but use it to block off that corner bleed. As you look at the image you will experience how your eye wants to be pulled towards the right hand side of the composition (you may need to close one eye). It would then flow past the first set of double fence posts and towards the water on the right hand side.
Leaving in a small portion of the fence post in the bottom right hand corner, but cropping off part of it, helps push your eye to the left.

Our third sample image illustrates the importance of how we choose to overlap elements in a composition.
Let’s look at the fence post on the left hand side. The first thing that you may notice is that a good portion of the gate is visible. This acts as a bit of a leading line, but also as a corner bleed, pushing the viewer’s eye to the right.
Notice how the top of that fence post overlaps the horizon on the left hand side of the image. This helps create a 3-D effect which adds some depth to the composition. You’ll also notice how that post divides the horizon line in two. This helps to create balance in the composition.
If you take a piece of paper and align it on the left hand side, then slowly move it horizontally, you will quickly see how the balance of the image falls apart when the horizon line is no longer equally split.
Another important detail in this image is how the second post towards mid-frame, is positioned. You’ll notice how I purposely allowed the blue water to flow around the post. This allows a viewer’s eye to smoothly exit the image on the right hand side.
If that post would have overlapped onto the shoreline it would have created visual confusion and damaged the eye flow of the composition. Put a pen or pencil directly over that fence post and slowly move it upward until it overlaps onto the shoreline. You will quickly see how the eye flow of the image abruptly stops once the blue of the water is interrupted.

Our last sample image illustrates how we can use a single fence post to create perspective and depth with a ‘grand vista’ type of scene.
If the fence post on the right hand side of the photograph wasn’t there, this image would simply fall apart. There would be no reference point with which we could establish visual depth, or a feeling of intimacy… of ‘being there’ in the moment.
The position of the single fence post was very carefully done. First, you’ll notice that it overlaps the horizon. This creates a 3-D effect as well as visual depth.
The second important issue is that I used equidistant composition, allowing the same amount of visual space on the top of the post and down its right hand side. This creates smooth eye flow and provides a sense of balance to the composition, even though the fence post is pulled to the right hand side.
Get your piece of paper again, and line it up along the right hand edge of the image. Now, slowly move it horizontally to the left so the amount of visual space on the right hand side of the fence post decreases. You will quickly see how the eye flow disappears as well as balance, and the feeling of intimacy.
Composing with wire fence posts can add eye flow, image depth, and balance to our photographs if we position them with some care.
Technical Note:
Photographs were captured hand-held using camera gear as noted in the EXIF data. All images were produced from RAW files using my standard process.
How you can help keep this site advertising free
My intent is to keep this photography blog advertising free. If you enjoyed this article and/or my website and would like to support my work, you can purchase an eBook, or make a modest $10 donation through PayPal. Both are most appreciated. You can use the Donate button below. Larger donations can be made to tom@tomstirr.com through PayPal.
Word of mouth is the best form of endorsement. If you like our website please let your friends and associates know about our work. Linking to this site or to specific articles is allowed with proper acknowledgement. Reproducing articles, or any of the images contained in them, on another website or in any social media posting is a Copyright infringement.
Article is Copyright 2020 Thomas Stirr. Images are Copyright 2019 Thomas Stirr. All rights reserved. No use, duplication or adaptation of any kind is allowed without written consent. If you see this article reproduced anywhere else it is an unauthorized and illegal use. Posting comments on offending websites and calling out individuals who steal intellectual property is always appreciated!
Fascinating, Tom !
Thanks John!
Tom
For those of us who are not professional photographers or trained artists, this kind of information is most helpful and appreciated. It allows us to get beyond the camera and into what makes a better photo. Thanks very much.
Joel
I’m glad the article was helpful Joel!
Tom