
My thanks to a couple of our readers (Oggie Ramos and JohnTheKeenAmateur) for their comments on a recent article, Working with High Contrast Interior Architectural Images. Both have raised some interesting points to consider, and both provided some inspiration for this article, Considering Creative Options in Post.
As photographers our creative options abound in terms of the subjects we choose to photograph. The camera gear we use to create our images. The camera settings we choose. And… how we work with our photographs in post.
There is plenty of healthy debate about what is deemed to be ‘acceptable’ in post. Or, if we should even care about that notion at all, and simply let our creativity flow in whatever direction we choose. Client-paid work obviously comes with the absolute objective of meeting our client’s needs to the best of our individual abilities.
When it comes to each of us expressing our creativity with our own work, I’ve always believed that we should follow our instincts and inspiration, wherever that may lead us. Sometimes other folks will like what we do, and sometimes not. C’est la vie!
When it comes to nurturing our personal creativity, worrying about what other people may think becomes a self-limiting factor.
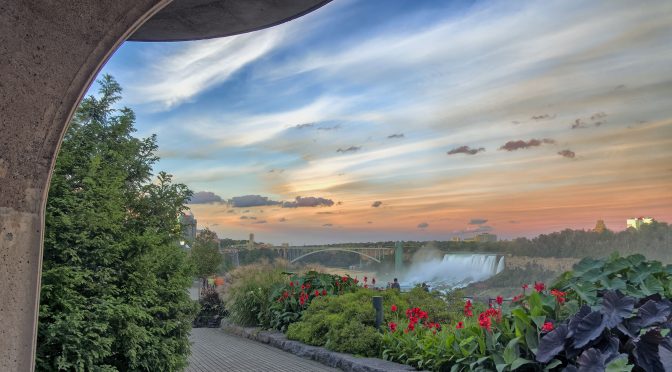
Last week I went to Niagara Falls with a friend to create some late day and evening images. The past few days I’ve been mucking about with some of those images, and I’m still not sure if I will end up doing anything with them… other than the one image used in this particular article. The objective of this posting is simply to discuss some of the creative options that we all face when working in post with our images.
NOTE: Click on images to enlarge.

I know many folks shoot jpegs and are adept at making adjustments to their camera settings, and also working with their jpegs in post. I’m not one of those shooters. I do like to shoot in RAW + jpeg fine as I find that looking at an out-of-camera jpeg gives me a quick way of assessing an image. For example, in the jpeg above we can see lots of potential colours and detail in the sky. This indicated to me that this was an image to consider doing some work on in post.

As a comparison the jpeg above was made from the corresponding RAW file. Only the automatic adjustments in DxO PhotoLab were done to this version of the image. I have a few custom presets that I created for landscape images captured with a Nikon 1 J5, one of which includes a DxO ClearView adjustment. The following jpeg shows the impact of that custom preset.

You can see that the custom preset has revealed more shadow and highlight details. I decided to work with this approach in post for a while, but ended up not being happy with the results. DxO PhotoLab also has some pre-made presents which I only occasionally use. I decided to play around with the High Dynamic Range Single Shot presets, deciding to use the Realistic version.

The resulting image looks a little ‘thin’ at this point, but the DxO HDR preset did reveal a lot more of the shadow details so I decided on this route.
If you’re like me, there are always plenty of thoughts in my head about which adjustments to use and to what extent to bring a photograph to what I see in my mind. Since I liked the sky and other elements in the composition I spent more time in post than I typically would with this photograph.
I ended up being quite aggressive in CS6 and used a number of different adjustment in the Nik Collection and eventually ended up with the image below.

I still wasn’t happy with this result, so I went back into the Nik Collection and did some work with Pro Contrast.

If nothing else, the image above demonstrates that even when using a camera that has a small 1″ CX sensor like the Nikon 1 J5, there is quite a bit of digital information in the RAW file with which to work. Still feeling somewhat ambivalent about the results I decided to change course completely and decided to take the image into Topaz to experiment with a photo art treatment.
Sometimes I choose filters I know likely won’t work just for the heck of it. The image below was created using the Paint Daub filter with the Sparkle setting.

I then tried another approach using the Plastic Wrap filter.

At this point I made the decision that the image had too many details and colours to be able to work that well in most of the photo art settings. I decided to try a couple of monochromatic versions instead. The first one used the Bas Relief filter.

I actually like this quite a bit but still found it a bit too busy. I decided on one further version using the Plaster filter.

I like the simplicity and elegance of this particular filter treatment. As mentioned at the start of the article, I am still undecided on what to do with the images I captured at Niagara Falls last week. At least the photograph in this article proved to be useful.
The key point in all of this is simply to let your creativity flow wherever it needs to go. Experiment. Have fun, and never worry about what other folks think about what you create. Remember, some folks may like what you do, others may not. C’est la vie!
Technical Note:
The photograph in this article was captured using Nikon 1 gear with tripod support as noted in the EXIF data. All versions of the image were produced from RAW files using my standard process of DxO PhotoLab, CS6 and the Nik Collection. Some images also included the use of Topaz.
Word of mouth is the best form of advertising. If you like our website please let your friends and associates know about our work. Linking to this site or to specific articles is allowed with proper acknowledgement. Reproducing articles or any of the images contained in them on another website is a Copyright infringement.
My intent is to keep this photography blog advertising free. If you enjoyed this article and/or my website and would like to support my work you can purchase an eBook, or make a modest $10 donation through PayPal, both are most appreciated. You can use the Donate button below. Larger donations can be made to tom@tomstirr.com through PayPal.
Article and all images are Copyright 2018 Thomas Stirr. All rights reserved. No use, duplication or adaptation of any kind is allowed without written consent. If you see this article reproduced anywhere else it is an unauthorized and illegal use. Posting comments on offending web sites and calling out individuals who steal intellectual property is always appreciated!
It’s always enlightening to read about your processing process, Tom – Thank you once again.
A DxO user recently posted a PhotoLab preset on the forum, here: https://feedback.dxo.com/t/a-thread-for-us-to-share-presets/4900/3
You may find it relevant for your example image (?)
Regards, John – TKA
Hi John,
Thanks for the link – it may also be of interest to other readers. As far as my sample image in the article goes… I’ve spent more than enough time on that one! Time to get on to other projects and priorities!
Tom
FWIW: I like # 6. Looks good to me.
Thanks William. Without spending even more time on the photograph, #6 was the best I could do.
Tom