
Many photographers look for ways to save time in post, while also creating images with a consistent ‘look’ that they prefer. This short article provides simple instructions on how to create a preset in DxO PhotoLab or OpticsPro.
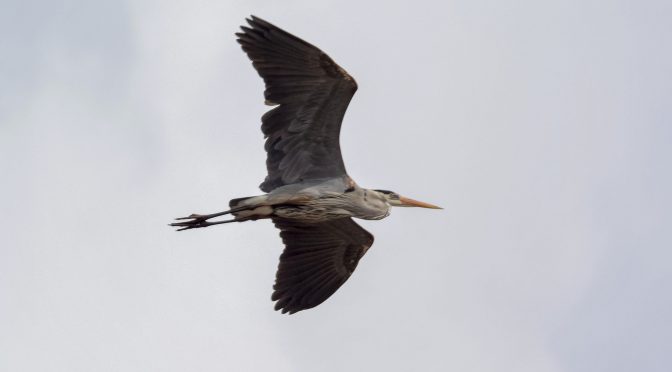
The photographs used in this article were captured yesterday afternoon during a very short visit to Hendrie Valley. All of the Great Blue Heron images are from a single AFC run captured at 10 fps, shooting in Manual mode with Auto ISO 160-3200, using Continuous Auto Focus with Subject Tracking, and Vibration Reduction turned off.
NOTE: Click on images to enlarge.

The first step in setting up a preset is to determine if you plan to finish your image in PhotoLab/OpticsPro, or if you will be exporting it into another program like Lightroom or Photoshop for additional corrections. Working with additional programs will likely affect how you set up your preset.
The next step is to open up a RAW file in DxO PhotoLab (or OpticsPro). I always allow the program to make its typical ‘auto adjustments’ based on the camera body and lens used to capture the image as this automatically takes care of things like lens distortions.

Using the various sliders execute the adjustments to the photograph that you want to make ‘standard’ with that particular preset you are creating. For example, I set up a ‘V3 standard bird preset’, which I used for all of the images in this article.
My ‘V3 standard bird preset’ includes: Highlights -20, Shadows +10, auto Micro-Contrast, PRIME noise reduction, Lens Sharpness Global 1.20, and Lens Sharpness Detail 70. These adjustments are designed to bring typical bird images close to where they need to be so I can make final adjustments to them in CS6 and the Nik Collection.
If you plan on finishing your images in PhotoLab or OpticsPro you would fine tune your presets beyond what I typically do with mine.

After you have all of the settings in DxO PhotoLab or OpticsPro completed for the sample image, click on “Image” in the menu across the top of the page, then click on “Create preset from current settings”. Once you do that a window will open that will allow you to name that specific preset.

After you name the preset, save it, and then it will be ready for future use. It really is that simple. As you become more familiar with the adjustments available in DxO PhotoLab or OpticsPro you may decide to create multiple presets based on subject matter, lighting, camera body or lens used. It takes a bit of effort to initially set up your presets but they will save you hours down the road when working in post.

The gull image below was processed using the same ‘V3 standard bird preset’ that was applied to the Great Blue Heron Images. An important difference between the images was that the heron images needed some fairly aggressive crops compared to the gull photograph.

Technical Note:
All photographs were captured hand-held in available light using Nikon 1 gear as per the EXIF data. All images in the article were produced from RAW files using my standard process of DxO PhotoLab, CS6 and the Nik Collection.
My intent is to keep this photography blog advertising free. If you enjoyed this article and/or my website and would like to support my work you can purchase an eBook, or make a modest $10 donation through PayPal, both are most appreciated. You can use the Donate button below. Larger donations can be made to tom@tomstirr.com through PayPal.
Article and images are Copyright 2018 Thomas Stirr. All rights reserved. No use, duplication or adaptation of any kind is allowed without written consent. If you see this article reproduced anywhere else it is an unauthorized and illegal use. Posting comments on offending web sites and calling out individuals who steal intellectual property is always appreciated!
Thomas
Can I suggest that you consider making an e-book around your post processing techniques as I find that you manage to achieve results that many photographers would be willing to pay to learn to do similarly. I know that you have many articles covering aspects of post processing already on the site for free but pulling them all together updating them with your excellent examples would surely be something that your readers and the wider photographic market would be willing to pay for.
Bernie
Thank you for your most generous comment Bernie – it is most appreciated!
I’ve never considered myself even close to being any kind of an ‘expert’ when it comes to post processing, so the thought of writing an eBook on the subject has never crossed my mind. I must confess that I’m very lazy when it comes to post processing. The reality is that I don’t like working with post processing and I really don’t spend very much time working on my photographs. For the vast majority of my images I usually only spend about 3-5 minutes on each image including computer processing time. If an image starts to consume an inordinate amount of my time (i.e. more than 10 minutes), I get bored working with it and I move on to a different image.
What I’ve learned about post processing has really come about through experimenting and ‘mucking around’ with the programs that I have. As a result I’m not sure that my skill set is strong enough that I could actually write an entire eBook on this subject. If I did, it would likely be the shortest eBook ever written on the subject! 🙂
Also, since I use a somewhat unorthodox approach using specific functions from three software programs (DxO PhotoLab/OpticsPro, CS6 and the Nik Collection) I’m not sure how well my approach would resonate with most readers. Whatever success I have working with post processing has more to do with the combination of programs that I use rather than the breadth of my skill set in this area.
I do have a number of other subjects planned for Phase 2 of our eBook program. Some of the future eBooks include bird photography, landscape photography and garden/flower photography. I do plan on including some general ideas about post processing ‘shortcuts’ in those specific eBooks since they will be subject matter specific. Do you think that would be helpful?
Tom
Hi Bernie,
I mentioned your comment to my wife this morning and we discussed your idea about us producing an eBook on post processing. After some discussion we think there may be some potential for this subject if done from a very specific perspective. Thanks again for the suggestion – we will keep you posted.
Tom
Hi again Thomas
I certainly think that you have a talent there and if it takes only 2-3 minutes work to get excellent results then isn’t that another selling point?
I am sure you know that DXO are planning to incorporate more of the Nik suite in their software later this year so that might help you spend less time on post processing.
Good luck with whatever you decide.
Bernie
Hi Bernie,
I think it is very likely that we will at least develop a content outline to see if we have enough ‘meat’ with which to build an eBook. My wife and I chatted about a few different approaches that we could take with an eBook about post processing and we think we have one that could make sense for us.
Tom
I make extensive use of Presets in PhotoLab. I have created different Presets for each Camera + Lens combo. Most of them are similar, with minor tweaks in Selective Tone, Clearview, Color accentuation and/or Smart Lighting. When adding a lens, I use one of these as a starting point, work several photos to see what final settings I use, and then create the new Preset for that combo. This helps to keep me from forgetting to set auto options like Chromatic aberration or Moire (among others).
I also like that PhotoLab lets me create my own Workspace.
Hi William,
Thanks for sharing your experiences using Presets in PhotoLab – it is always helpful when a reader adds their personal insights! I’d also like thank you for sharing your experiences with me on a one-to-one basis a couple of years ago that contributed to my extensive use of Presets in DxO.
Tom
Hi, as always nice to read your articles. Can I suggest that you do an article with your typical approach with what you do in Photoshop and Color Efex Pro. I realize that every image needs different final touches, but still………
Goran
Hi Goran,
Thanks for your comment and suggestion. I have written a few articles that provide some general guidance on working with images in post. Here is one example: https://smallsensorphotography.com/dealing-bright-sunlight-post .
There are quite a few articles on the web site under post processing (32 articles currently) that address a wide range of issues and scenarios. Since everyone has their own objectives when it comes to the ‘look’ of their images I think it is important for folks to have a vision in their minds, then couple that with a basic understanding of what various adjustments do so they can use those adjustments to bring their vision to life.
What I do with my images utilizing the three pieces of software that I use (PhotoLab, CS6, Nik Collection) may not be what other people want to do with their photographs. I will think about your request to see if I can augment some of the current information on my website with additional topics that may be of assistance to readers.
Tom