
During our recent trip to Ireland, my wife and I ventured down the Mullet Peninsula to visit Deirbhile’s Twist and a few other spots in the area. This article features some Deirbhile’s Twist composition choices.
While the structure evokes thoughts of ancient locations like Stonehenge, Deirbhile’s Twist is actually fairly recent. It was created in 1993 by artist Michael Bulfin. Existing granite stones were raised and placed in an ascending spiral configuration.
NOTE: Click on images to enlarge.

As you can see, the landscape in this area of Ireland is relatively flat and barren. The challenge when photographing Michael Bulfin’s creation was choosing how to compose images to best portray his artistic work.

My first thought was to accentuate the overall size and expanse of the structure by photographing it from a distance. To give it a more elevated appearance, I held my camera close to the ground and composed my photograph by flipping out the rear screen on my camera. I used the rock footpath as a leading line and chose a mid focal length to compress the photographic elements to some degree.

I also tried some vertical compositions with my camera held low to the ground. This time, I used a wider angle focal length. This had the visual effect of pushing the artistic structure further away. Using the rock pathway was an obvious composition choice. So, I looked around for something else I could incorporate into an image.

I noticed a small pile of boulders and moved in behind them. By placing the boulder pile in the bottom right of my image it served as a corner anchor. To give this element a good sense of balance I made sure to use equidistant composition from the bottom and right hand edges of the frame.

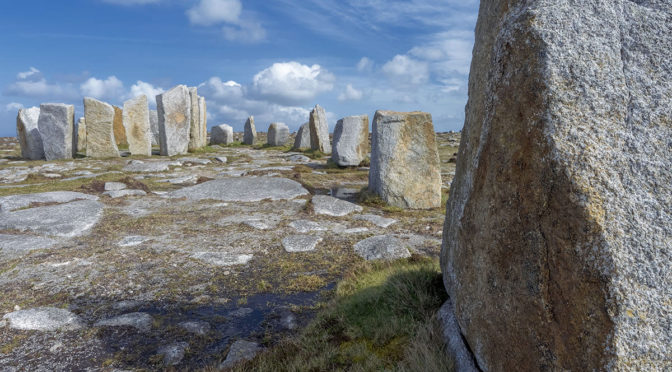
Making the main subject of a photograph the ‘hero’ by having it fill the frame is a tried-and-true approach. For the image above, I used a long focal length to help visually compress the elements. I shot from a lower position, making sure that the stones of the structure would only have sky behind them. This helped give them visual emphasis.

As I got in closer, I looked for individual stones and shooting angles that would emphasize various parts of the structure. In the image above, I used a triangular stone as a corner anchor. It also served as a subtle leading line that pointed to other components of the structure.
You’ll notice equidistant composition technique used in three different ways with the triangular rock. This helps create a good sense of balance on that side of the photograph. (Hints: look in the bottom left-hand corner; the distance from the top and bottom of triangular rock in the frame; and the lengths of the horizon breaks on the left-hand side).

Looking for some dramatic lighting, I moved to the inside of the twist. I captured the image above while positioned in dark shade. I used a subject bleed on the right hand side of the composition to force a viewer’s eye to the left. This helped create reader eye flow.

It is always a bonus if we can find a corner anchor that also serves to launch a strong leading line. We used this technique as one of our Deirbhile’s Twist composition choices.

As seen in the above photograph, a subject bleed can also serve to launch a leading line.

If we get in really close to a corner anchor and apply a subject bleed, it can act as a partial reveal. This can create some additional drama and interest in a photograph. A strong feeling of intimacy can also be created when using this approach.
By keeping a few, simple ideas in mind we can add some interest and variety to our photographs even in some challenging situations. The Deirbhile’s Twist composition choices noted in this article provide some examples.
If you enjoyed the photographs in this article you may want to check out our Images of Ireland eBook. This 209 page eBook features over 400 original photographs and is available for purchase and download at a cost of $12.99 CDN.
All of the photographs in this article were captured hand-held using Nikon 1 equipment. If you would like to find out more about the Nikon 1 system, you may find our eBook The Little Camera That Could of interest. The eBook is available for purchase and download. It is priced at $9.99 Canadian. Readers interested in purchasing a copy can use the link below.

Technical Note:
All photographs were captured hand-held using camera gear as noted in the EXIF data. All images were produced from RAW files using my standard process.
How you can help keep this site advertising free
Our intent is to keep this photography blog advertising free. If you enjoyed this article and our website, and would like to support our work, you can purchase an eBook. Or, you can make a modest $10 donation through PayPal. Both are most appreciated. You can use the Donate button below. Larger donations can be made to tom@tomstirr.com through PayPal.
Word of mouth is the best form of endorsement. If you like our website please let your friends and associates know about our work. Linking to this site or to specific articles is allowed with proper acknowledgement. Reproducing articles, or any of the images contained in them, on another website or in any social media posting is a Copyright infringement.
Article and images are Copyright 2019 Thomas Stirr. All rights reserved. No use, duplication or adaptation of any kind is allowed without written consent. If you see this article reproduced anywhere else it is an unauthorized and illegal use. Posting comments on offending websites and calling out individuals who steal intellectual property is always appreciated!
I understand what you say, Thom. My question is born since I am applying a technique that I have been able to verify, is not entirely accurate. This is the technique that involves focusing twice the distance of the object that is our foreground subject, so sharpness extends from there to the “infinity”. (I read it in photographylife).
At least with a standard zoom lens, it doesn’t work. The focus must be placed before, not twice the distance of the foreground object.
However, your explanation is clear to me. Your approach is different, and as you say, everyone finds it through experimentation with their own equipment.
Thanks you!
Hi Motografia,
It is always a good idea to test out things that we read to find out if the technique will work for us.
Tom
Thomas, thanks for the article and the explanations behind each photo. No doubt these are techniques that helps a lot when composing a scene and deliver a certain meaning.
I would like to ask where are you placing the focal point in your photos in order to maximize sharpness. In all these photos the sharpness goes from the foreground to the bottom and emphasizes much more the composition you achieved in each one. (Of course sensor size is a factor, but placement also)
I will practice this as soon as I can.
BTW, my favorite was the last one!
Regards,
Hi Motografia… glad you enjoyed the article!
I will try to answer your question…
Trying to achieve an extended amount of depth of field is a combination of factors: camera distance to subject, lens focal length, aperture, and auto-focus point placement.
If you have a look at the EXIF data, you’ll see that I captured many of the images using a wide angle focal length (e.g. 6.7 mm). Wide angle focal lengths will produce more depth-of-field at any given aperture when compared to longer telephoto focal length lenses shot from the exact same spot, at the same subject, using the same camera body.
In terms of the last image in the article… I used a focal length of 6.7 mm with an aperture of f/8. I would have focused on the back edge of the rock in the foreground. The combination of a very wide angle focal length, an the aperture of f/8, and being in close to the subject all would have helped create deep depth of field in the photograph.
There are depth-of-field calculator apps that can be useful when experimenting with where to place an AF point, what focal length to use, as well as aperture. It really comes down to experimenting with your camera gear and learning how your specific gear performs. It is always easier to achieve deep depth-of-field when using the widest angle lenses possible.
To achieve deep depth-of-field there are some general guidelines that can be useful:
1) Use the widest angle focal length possible
2) Get in fairly tight to your important foreground element
3) Use an aperture that will produce depth-of-field to ‘infinity’ when your AF point is placed about 2 to 3 metres away from you
When I use the 1 Nikkor 6.7-13 mm zoom I know that using an aperture of f/5.6 or f/8 will give me depth-of-field to ‘infinity’ as long use a wide angle focal length and get in tight to my foreground element, placing my AF point about 1.5-2 metres into the scene.
Tom