
This article shares a selection of digital teleconverter test images that were captured handheld today at 40 Mile Creek in Grimsby, using an E-M1X and M.Zuiko 100-400 zoom lens. During the 4 years that I’ve been using Olympus gear I haven’t paid too much attention to the digital teleconverter technology in my E-M1X.
NOTE: Click on images to enlarge.

I have gone out on a few occasions to do some test images in the past without much success. In these previous attempts I tried using the digital teleconverter when trying to photograph birds-in-flight.

A few days ago I watched a YouTube video by Andy Rouse that provided some practical information about when to use, and when not to use, a digital teleconverter.

Andy’s video made a lot of sense to me. So, I decided to heed his advice and went out today to create some additional digital teleconverter test images.

Rather than try to use my E-M1X’s digital teleconverter on moving subjects like birds-in-flight as I had in the past, I concentrated my efforts on perched birds and a couple of squirrels that were reasonably stationary.

In order to make it easy to toggle in and out of the digital teleconverter I set up my AEL/AFL button to handle this function.

While many photographers use back button focus, this is a shooting approach that I have never used with any camera that I’ve ever owned.

Assigning the digital teleconverter to the AEL/AFL button made perfect sense for my shooting style and made it incredibly fast and easy to engage this technology with my thumb.

The camera’s output when using the digital teleconverter is a jpeg which is one of the reasons that I hadn’t paid much attention to this capability in the past. I thought it would be good to investigate this technology further after watching the YouTube video by Andy Rouse.

For readers who relate to full frame equivalencies, using the digital teleconverter with an Olympus camera provides an additional 2 X crop. So… using a digital teleconverter at 400 mm with a M4/3 camera creates an equivalent field of view of 1600 mm (i.e. 400 x 2 x 2). Unlike using a physical 2X teleconverter there is no loss of light with the digital version.

I wasn’t sure what shutter speed would be appropriate so I captured most of my images at 1/1000, then towards the end of my test I reduced my shutter speed to 1/800. My ISO values varied from ISO-125 all the way up to ISO-2500. For best results I’d suggest using ISO values at ISO-1000 or lower. This will depend on personal preference and how one deals with noise in post.
I used my standard approach in post with all of my out-of-camera jpegs and only made very minor adjustments to them. All of the photographs in this article are out-of-camera jpegs without any cropping done in post.
When using the digital teleconverter it is critical to get the correct exposure. As we all know, jpegs have less latitude in post when compared to working with RAW files.

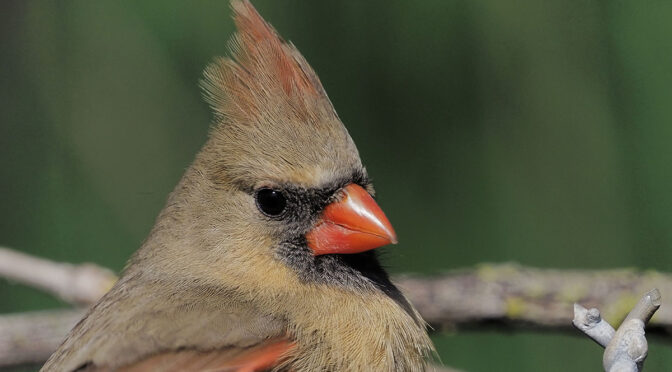
As you can see from the image above, it is critical to watch the highlight areas in a composition when using this technology. Once a highlight is overexposed in a jpeg, as was the case with the photograph above, it can’t be recovered. Another thing to consider is in-camera jpeg sharpening. Once an image is over-sharpened in jpeg format it can’t be corrected in post.

This was my first attempt using the digital teleconverter with still subjects, so I’m still experimenting with my in-camera jpeg settings. Yeah… I couldn’t help myself and tried a few bird-in-flight images… I won’t bother doing that anymore in the future.

My E-M1X’s digital teleconverter function showed sufficient promise that I have programmed my Custom Mode C2 accordingly. I anticipate using this in specific situations when photographing perched birds along forest trails and similar environments. I think this technology also has potential for use in captive environments like zoos and indoor displays of various types. I’ll be doing more testing in the future.
Technical Note
Photographs were captured handheld using camera gear as noted in the EXIF data. Images were produced from out-of-camera jpegs using my standard process. All images were captured using my E-M1X’s Digital Teleconverter technology, with a single AF point engaged.
For those readers who are interested in calculating equivalent field-of-view, multiply focal lengths for Olympus M4/3 cameras by a factor of 2. Using a digital converter adds another factor of 2. This is the 1,274 article published on this website since its original inception in 2015.
How you can help keep this site advertising free
My intent is to keep this photography blog advertising free. If you enjoyed this article and/or my website and would like to support my work, you can purchase an eBook, or make a donation through PayPal. Both are most appreciated.
Our eBooks…

The Finding Visual Expression eBook is designed to provide readers with some photographic inspiration and composition ideas. The Little Camera That Could details our extensive experience using the Nikon 1 system. Our eBooks also include a number of travel photography publications including Images of Ireland, New Zealand Tip-to-Tip, Desert & Mountain Memories, Images of Greece, and Nova Scotia Photography Tour. We also have a business leadership parable… Balancing Eggs.
Donations support this website…
If you click on the Donate button below you will find that there are three donation options: $7.50, $10.00 and $20.00. All are in Canadian funds. Plus, you can choose a different amount if you want. You can also increase your donation amount to help offset our costs associated with accepting your donation through PayPal. An ongoing, monthly contribution to support our work can also be done through the PayPal Donate button below.
You can make your donation through your PayPal account, or by using a number of credit card options.
Word of mouth is the best form of endorsement. If you like our website please let your friends and associates know about our work. Linking to this site or to specific articles is allowed with proper acknowledgement. Reproducing articles, or any of the images contained in them, on another website or in any social media posting is a Copyright infringement.
Article and images are Copyright 2023 Thomas Stirr. All rights reserved. No use, duplication or adaptation of any kind is allowed without written consent. If you see this article reproduced anywhere else it is an unauthorized and illegal use. Posting comments on offending websites and calling out individuals who steal intellectual property is always appreciated!
Hi Thomas, I also use the DTC feature of my E-M1X with my Panasonic 100-300 Mk II with great success in good or low light (during the crepuscular period) and then the cropped images are both up scaled using Reshade Pro (a free super resolution upscaler for the PC only) with great results. In fact, one of the shots of a Heron that I sold to the city and printed on Canvas @ 30”x80” was done using DTC with my E-P5! Some pro photographers even commented at the detail and sharpness of the photo, not knowing that it was upscaled from a cropped 16MP file!! The trick is not to use JPEG that the camera spits it out, but rather to use Olympus Workspace and process the RAW files to JPEG. You see, when you use DTC, it will show the actual crop on a white box of the entire image in OM Workspace. And then I simply do basic adjustments that OM Workspace and then save the cropped file to TIFF for further editing or to JPEG for upscaling. This way, you get to retain more of the furry detail (for birds) if you convert from RAW to TIFF or JPEG rather than just get a straight JPEG file. And if you make a mistake in exposure during the shoot, you can always process the RAW file again and make exposure adjustments. Whereas with JPEG, you can’t. OM Workspace replicates truthfully what the TruePix engine of each Olympus and OMDS body do internally, so this is a win win to use Workspace.. And then for noise control past ISO 800, I use OM Workspace Denoise AI as my first stage noise reduction and then onto Topaz Denoise AI to make it look cleaner. Using this DTC technique, I don’t even need a real TC. Can’t anyways, because my Panasonic 100-300 won’t allow me to attach one. Anyhow, I just wanted to say that there is a better way to do this than what Andy suggested for better quality.
Btw Thomas, thank you for your great insights on the E-M1X. It was from your insights, that I am now a proud owner of an E-M1X, or have been for a few months now. Now only if I can get a spare battery cartridge for it somehow. :). Cheers!
Hi David,
Thanks for sharing your experiences and approach… I’m glad that the website has been beneficial for you. Perhaps I’m missing something since I’ve never used OM Workspace… but I’m not understanding why one would use the Digital Teleconverter if the RAW file is going to be processed. Why not just shoot in RAW in the standard manner?
Tom
Hi Thomas,
Good question. If I use my other RAW converter such as DXO PhotoLab 5, I would have to do a bit more work to make the TIFF or JPEG file look the same as what my E-M1X spits out out of camera as JPEG and I loose the white crop box. Whereas if I use OM Workspace, it will take in my E-M1X RAW file and the camera settings and produce a TIFF or a JPEG file that is identical as what would come out of my E-M1X’s JPEG engine. And that is because, OM Workspace emulates the TruePix engine of each OM/Olympus camera faithfully. Also, in lower light situations, pushing the shadows in RAW using DXO PL5 can result in some hideous color cast such as magenta or green with some OM bodies. Whereas with OM Workspace, it remains somewhat neutral and if the cast shows up globally, it can be corrected easily with its own HSL based on OM Workspace. In the end, using the OM Workspace is like having an E-M1X on my PC to help correct minor exposure errors if I didn’t get quite correctly in the field from the RAW file and then spits it out exactly like it would be if I got the exposure correctly with the best camera settings on my camera in the field . In essence, a convenient time machine. If you don’t care about preserving the color science and the TruePix rendering of the OM body, then yes, you can simply process the RAW as is and crop. But I found the results from OM Workspace to be, at least, pleasing to my eyes compared to DXO PL5 for wildlife.
Hi David,
Thanks for the additional information. I’ve never used OM Workspace so your clarification was helpful.
Tom
Adding to my previous thoughts in “ducks with 40-150” article, I’m enjoying this feature very much with the 60mm macro, 40-150 & 12-40 lenses. Pseudo and real macro on insects, flowers, etc, if needed with just a button press for quality 2x extension. So fun. Haha.
Hi Eugene,
I tried a few test images a while back with my 60 mm f/2.8 macro and I felt that using Handheld Hi Res was a better option for me… but we’re all different.
Tom
I agree the hires mode is better option for the added resolution & flexibility for post cropping if needed, but only for still subjects, I believe. Nevertheless along with the DTC, two useful features are available.
I agree Eugene… having useful options is great.
Tom
Hi, Thomas.
After reading your article, I watched Andy’s video. I’m not convinced that this approach yields better results than I could get with cropped RAW files that are up-rezed in PS or Topaz. In the side by side bird shot Andy showed, he said that the jpeg was sharper, which was true, but it also had a fair bit of detail smeared away. I’ll have to experiment to see which is better. Thanks for the article.
Hi Brian,
It is always a good idea for each of us to do our own experimentation to determine if a particular feature meets our needs or not. I anticipate that I will use the Digital Teleconverter on a selective basis when it suits my purposes. What I love about Olympus/OM System is that we have a lot of technical options available to us.
Tom