
During an early morning visit to Hendrie Valley last fall I was fortunate to come across an egret preening in some softer light. Lighting like this is helpful when photographing white birds in terms of capturing more feather details. This article discusses some of the decisions that I made when capturing these photographs, and also when I was working on them in post.
All of the images in this article were captured handheld using an E-M1X, M.Zuiko 100-400 mm f/5-6.3 IS zoom lens with an M.Zuiko MC-14 teleconverter, using a focal length of 560 mm (efov 1120 mm).
NOTE: Click on images to enlarge.

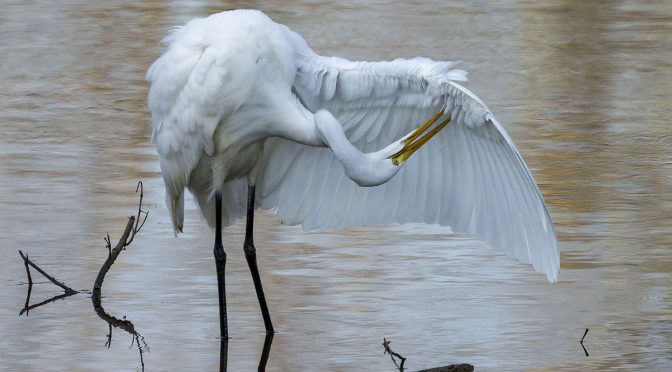
The photograph above is a full frame capture without any cropping done to the image. I initially tried a vertical composition in order to capture some of the egret’s reflection across the bottom of the frame. As you can see I used ‘rule of thirds’ composition technique with the egret’s legs and head positioned about 1/3 in from the left and right sides. It’s outstretched wing is roughly 1/3 down from the top of the composition.

Whenever I photograph static birds I capture short image bursts to get a selection of photographs with subtle differences in body position. Having a selection of images helps to reduce the risk of capturing an image when a bird’s reticulating membrane may be covering its eye, or other distracting issues are present. In the image above we can see that the egret pulled its left wing in slightly which was more conducive to a vertical composition. Unfortunately its eye is not visible which would be a deal breaker for most photographers.

The egret moved the position of its head which made its eye fully visible, and also created some nice contrast of its bill against the white feather details on the underside of its wing. I used the lasso tool in PhotoShop to remove some small twigs on the left-hand edge of the photograph. To help focus eye flow on the egret’s head and wing I cropped the top of the photograph slightly.

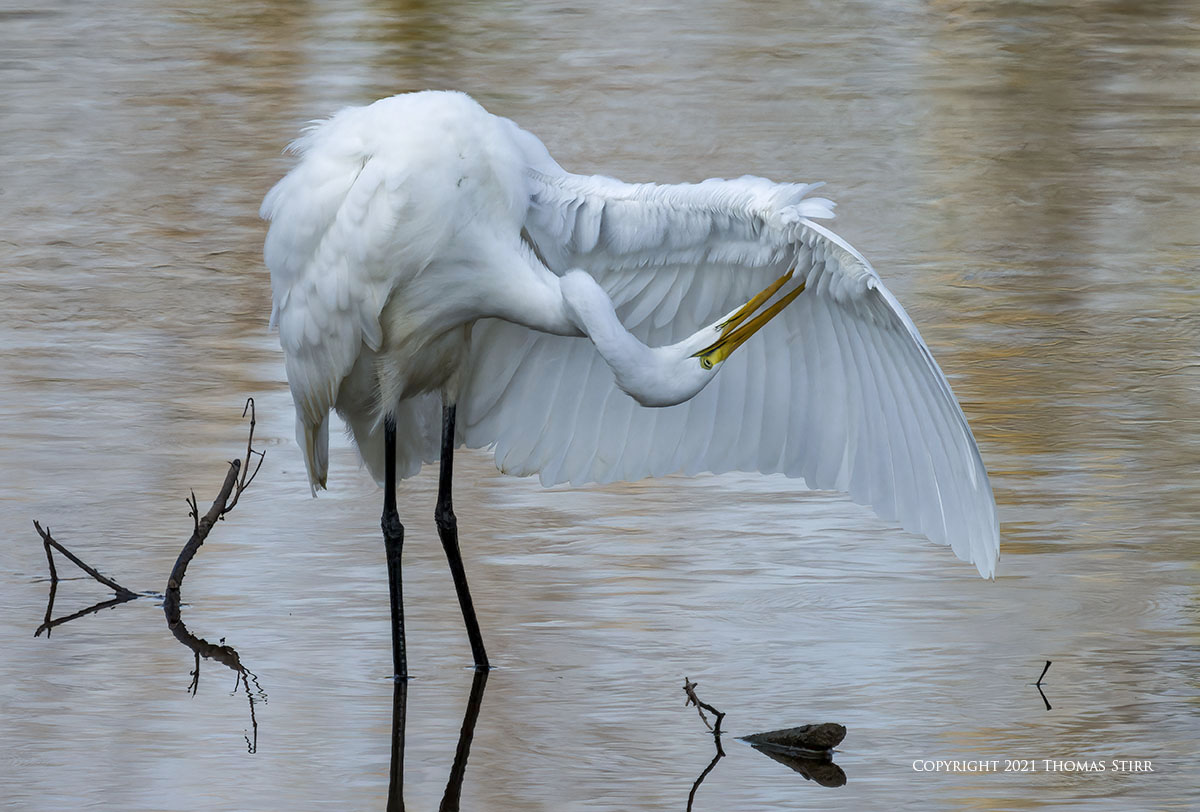
After capturing a small assortment of vertical compositions I switched to a landscape orientation. My goal was to commit more pixels to the feather details on the underside of the egret’s outstretched wing. As with the previous image, I used the lasso tool to remove some twigs from the composition. In this case they were along the bottom edge, as well as a triangular twig reflection on the left hand side. I was then able to use the thicker branch on the left hand side to help direct eye flow towards the egret’s right wing.

In the photograph above the egret’s head is focused down towards the bottom right hand corner of the frame. Leaving the reflecting twigs in the composition made sense to me in this instance as they provided a target for the egret’s gaze. Choosing to remove elements in a photograph comes down the personal taste of a photographer and how they want to interpret their image.
The next two images show two consecutive images that are almost identical. The first one contains a small amount of wing and body reflection at the bottom of the composition.

If a photographer finds some elements to be distracting in an image, using the lasso tool in PhotoShop (I’m sure other software would have similar functions) enables a photographer to get in very tight to remove the distractions. When we compare the image above to the one that follows we can see the differences between the two photographs.

Creating the photographs in this article under softer, diffused light helped to avoid blowing out details on the egret’s white feathers. I used one of my custom pre-sets in DxO PhotoLab 4, then added a touch of micro-contrast to help enhance feather details.
I always use the DxO Smart Lighting Spot Weighted tool with all of my photographs. In the case of the photographs in this article, I placed a good sized box over the egret’s body and wing and used a ‘slight’ strength setting. This helped to balance out the exposure on the egret and uncover slightly more feather details.
I exported a DNG file into PhotoShop CS6 and made some minor adjustments in that program. The most important ones were to darken the highlights and the black in the image. Then, I used the white slider to brighten up the bird’s body and wing. I took the white level to just below where a highlight clipping warning would appear.
The photograph above was my favourite egret preening image captured during that visit. By utilizing pulse shooting I was able to capture an image with the egret’s bill open while it was in the act of preening. I find small details like this can help add interest to a photograph.
I left all of the twigs in the composition visible as they helped to add some contrast and formed a base for the photograph. To my eye, they also help to create some triangular shaping to help direct a viewer’s eye upward towards the head and outstretched wing of the bird. Since these photographs were captured earlier in the morning I didn’t mind the slight bluish cast on egret’s body and feathers.
Technical Note:
Photographs were captured handheld using camera gear as noted in the EXIF data. Images were produced from RAW files using my standard process. Crops are noted. This is the 1,123 article published on this website since its original inception in 2015.
How you can help keep this site advertising free
My intent is to keep this photography blog advertising free. If you enjoyed this article and/or my website and would like to support my work, you can purchase an eBook, or make a donation through PayPal. Both are most appreciated.
If you click on the Donate button below you will find that there are three donation options: $7.50, $10.00 and $20.00. All are in Canadian funds. Plus, you can choose a different amount if you want. You can also increase your donation amount to help offset our costs associated with accepting your donation through PayPal. An ongoing, monthly contribution to support our work can also be done through the PayPal Donate button below.
You can make your donation through your PayPal account, or by using a number of credit card options.
Word of mouth is the best form of endorsement. If you like our website please let your friends and associates know about our work. Linking to this site or to specific articles is allowed with proper acknowledgement. Reproducing articles, or any of the images contained in them, on another website or in any social media posting is a Copyright infringement.
Article and images are Copyright 2022 Thomas Stirr. All rights reserved. No use, duplication or adaptation of any kind is allowed without written consent. If you see this article reproduced anywhere else it is an unauthorized and illegal use. Posting comments on offending websites and calling out individuals who steal intellectual property is always appreciated!
Good to know, thanks Tom.
Ever consider an ebook on bird/bif photography with the current gear? Your results are impressive and I would certainly buy one!
Stay Well,
Jeff
Hi Jeff,
I do have a number of eBooks under various stages of development. One of those eBooks is about handheld bird photography.
Tom
Hi Thomas,
I love your work and consider your 100-400 + 1.4x photos to be canonical and about as good as it gets (certainly better than my current results with same kit) so I am curious about one detail: shutter speed 1/1600. I would consider that high for a bird not in flight but is that what I’m missing when it comes to getting really good detail like this with the 1.4 tc?
I’m always focused on minimum needed SS in the effort to keep ISO down but also always worrying that SS gets too low.
Jeff
Hi Jeff,
I totally agree that in the case of these particular images that I could have used a slower shutter speed. Something like 1/800 or 1/500. I doubt that I would have used anything slower in this particular situation photographing birds handheld at 1120 mm efov. I use 1/1600 as a default setting with my C1 and C4 custom modes as I find this to be a practical shutter speed for a wide range of fast breaking bird image opportunities. Reacting quickly to opportunities is more important to me than using a lower ISO value.
Both of my custom modes noted incorporate Bird AI, with C1 also using Pro Capture L. What likely happened was that I was in C1 mode scanning for birds-in-flight like ospreys, bald eagles, egrets, herons etc., and happened to see the egret preening. So, I switched to C4 and grabbed some very quick images. I captured over 60 images of that egret preening. These took about 2 minutes. Then I switched back to C1 to continue watching for birds-in-flight. So, I likely didn’t give my shutter speed much thought as I knew I was shooting at my default shutter speed.
I don’t often capture images of birds that aren’t in flight and usually end up deleting the vast majority of my static/perched bird images. To be honest, I captured these egret preening images about 3 1/2 months ago and forgot that I even had them on one of my hard drives. If I would have checked all of the images from that session on the day they were created I may have deleted these egret preening images without giving them a second thought. I often capture several thousand bird images when I’m out for an extended bird photo session so my culling process can be brutally fast.
Overall, I probably use a faster shutter speed than many photographers would in similar bird photography scenarios. When choosing between shutter speed and a lower ISO for bird photographs I normally prioritize shutter speed to help ensure sharp images with live subjects.
Using higher ISO values with smaller sensor cameras has never bothered me. Since I use a dual stage noise reduction approach in post I can usually quickly and easily deal with the noise associated with higher ISO values. With my Nikon 1 gear I never hesitate to shoot handheld up to ISO-3200, and regularly go up to ISO-5000 or ISO-6400 with my Olympus kit when needed. In specific situations I will push my E-M1X to ISO-10000, and the odd time perhaps a bit higher.
As photographers we all have our own approaches when it comes to how we create our images. What works for one photographer may not be a good fit for another. While I do rely on IBIS performance and slow shutter speeds with landscape and other subjects where dynamic range is very important, I tend to choose shutter speed over a lower ISO value when photographing live subjects like birds.
Tom
Thanks Tom
I will grit my teeth and up my SS.
One more question. Do you use IBIS and Lens OS or one or the other?
Just wondering what you find best with the 100-400mm
Jeff
Hi Jeff,
You should do whatever feels comfortable and meets your shooting style/objectives. Keep in mind that my approach considers both physically capturing the image as well as working with it in post. Your situation and needs may be different than mine.
In terms of image stabilization with the M.Zuiko 100-400 mm, I usually have the IS turned off on the lens and only use the IBIS in my E-M1X. I find this settles down faster and seems to provide better stabilization under most photographic situations. The only time that I may turn the lens IS on is when I’m attempting to use it at very slow shutter speeds, i.e. 1/30 of a second or lens.
Another thing to keep in mind that when using the MC-14 there is a one-stop IBIS penalty, and 1.5 stop IBIS penalty when using the MC-20.
Tom