
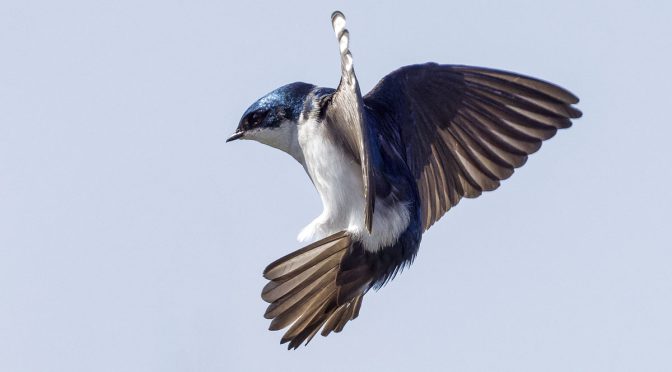
This article shares my first swallow images of 2022, all of which were captured handheld at Windemere Basin Park in Hamilton Ontario. It was a very blustery afternoon with wind gusts of about 70 kilometres per hour which made photographing swallows in free flight even more challenging.
I quickly came to realize that my handheld skills with this particular species were in definite need of some serious practice. So, I focused my photographic efforts with the use of Pro Capture H for all of the images in this posting. These photographs were all captured in about 90 minutes.
NOTE: Click on images to enlarge.

My goal was to create some images of swallows with interesting in-flight wing positions showing them after they had launched into flight. This meant that I had to adapt my typical use of Pro Capture H with my E-M1X.

I used a single auto-focus point and after acquiring focus and half-depressing my shutter release, I recomposed my image with the swallow barely visible on the extreme right hand edge of my frame. Birds typically take flight into the wind and this was the case with the pair of swallows I chose to photograph.

This re-composition approach allowed me to get more images of the swallows after their launching into flight movements had been completed.

As I got more comfortable I recomposed my frames with the swallow completely out of the frame. In order to get my shutter timing correct I used ‘both eyes open’ technique so I still watch the swallow taking flight even though it was not in my composition and not viewable in my EVF until after it took flight.

Rather than try to photograph a range of different birds I selected a specific nesting box that was being frequently visited by a pair of swallows.

This allowed me to observe the specific flight paths that these two birds were using when they took flight, as well as their approaches to the nesting box.

Their take-off flight paths were reasonably predictable which allowed me to recompose my images with the birds not visible in my viewfinder. I would wait for them to fly through my frame before I fully depressed my shutter release.

I was shooting Pro Capture H at 60 frames-per-second with my Pre-Shutter Frames and my Frame Limiter both set to 15. That meant I had 1/4 second of shutter release response time which proved adequate for my purposes.

Depending on the individual Pro Capture H image run and my shutter release timing, I usually ended up with between 3 and 5 potentially useable photographs per Pro Capture H burst.

I purposely did not use my M.Zuiko MC-14 teleconverter as I wanted to limit my focal length to 400 mm to help maximize my depth-of-field. Using an aperture of f/8 also helped in this regard. When shooting with M4/3 gear using a 400 mm focal length with an aperture of f/8, at a distance of 8.4 metres from a subject bird delivers about 4 inches of depth-of-field. Anticipating the flight path of a swallow is an important factor to get birds in focus when using Pro Capture H.

I initially was using f/6.3 and 1/4000 settings with my E-M1X, but changed that to f/8 and 1/5000 to help ensure adequate depth-of-field and to help reduce wing blur. You can see some minor wing blur with the right wing of the bird in the above image. I plan to increase my shutter speed slightly with future swallow in-flight photography this season.
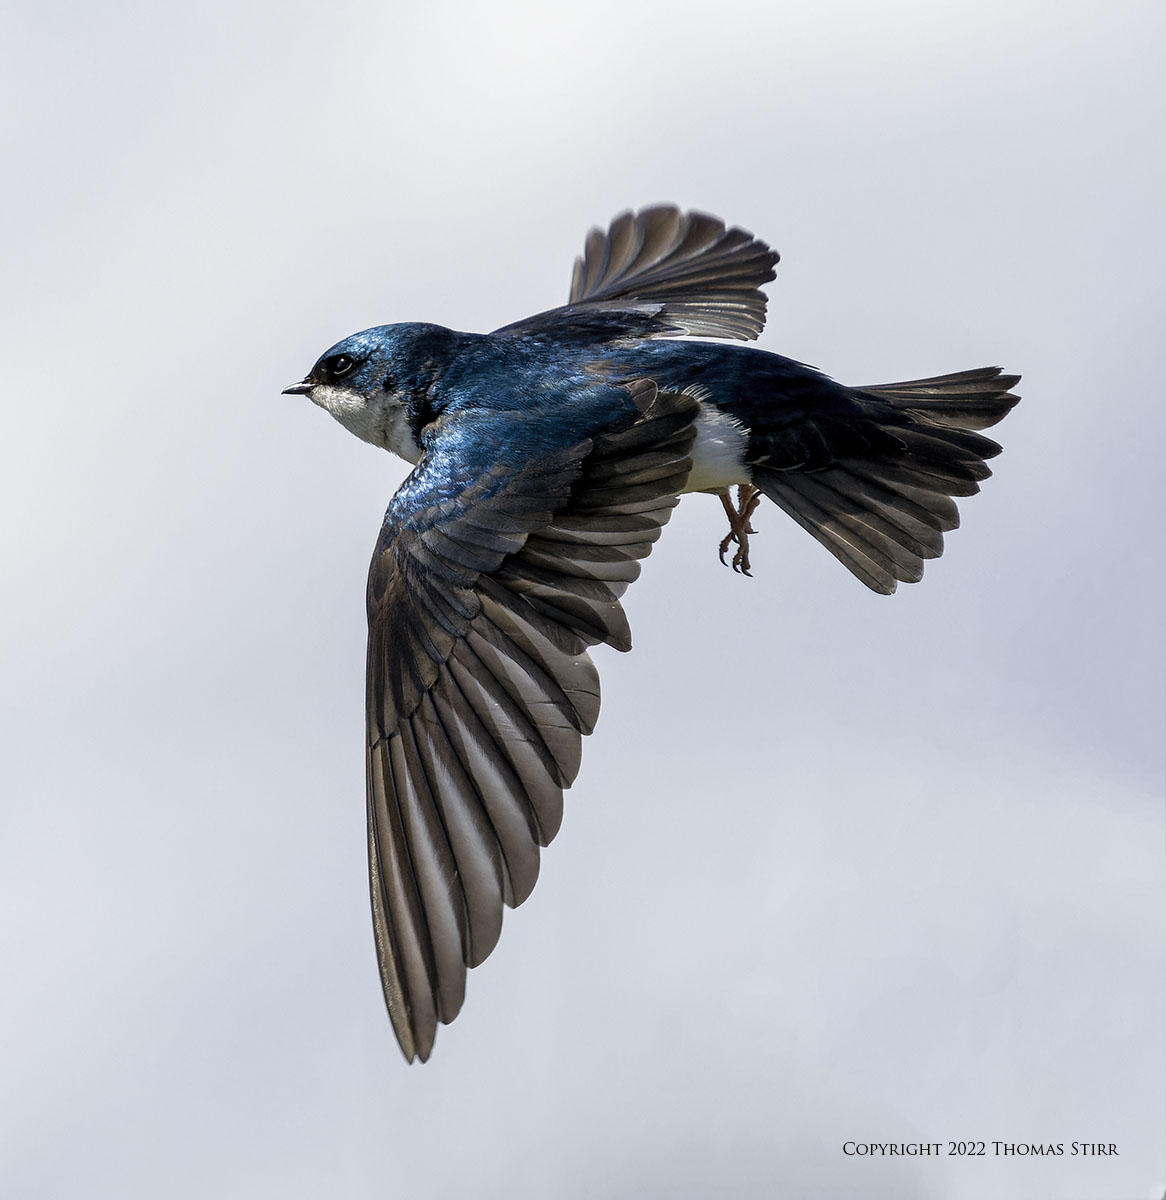
One of the benefits of using Pro Capture H for these images was being able to get more pixels on the subject birds as I could shoot from a predetermined distance of a little over 8 metres (~26 feet).

Given the erratic wind conditions there was no discernable flight path the birds would use when returning to the nesting box. I was able to capture a few swallow images of the birds approaching to land. Hopefully future shooting conditions will create more predictable bird approach paths for my follow up visits.

As regular readers know I hate using tripods and always photograph birds-in-flight handheld. Since my Pro Capture H swallow technique will focus on pre-selecting a nesting pair of swallows, I’ll be bringing my photographer’s ladder with me for subsequent visits. This will allow me to comfortably sit from a somewhat elevated position.
When photographing specific birds-in-flight it can be beneficial to adapt your shooting approach based on weather and observed bird behaviours.
Technical Note:
Photographs were captured handheld using camera gear as noted in the EXIF data. Images were produced from RAW files using my standard process. Crops are noted. Photographs were resized for web use. This is the 1,155 article published on this website since its original inception in 2015.

How you can help keep this site advertising free
My intent is to keep this photography blog advertising free. If you enjoyed this article and/or my website and would like to support my work, you can purchase an eBook, or make a donation through PayPal. Both are most appreciated.
If you click on the Donate button below you will find that there are three donation options: $7.50, $10.00 and $20.00. All are in Canadian funds. Plus, you can choose a different amount if you want. You can also increase your donation amount to help offset our costs associated with accepting your donation through PayPal. An ongoing, monthly contribution to support our work can also be done through the PayPal Donate button below.
You can make your donation through your PayPal account, or by using a number of credit card options.
Word of mouth is the best form of endorsement. If you like our website please let your friends and associates know about our work. Linking to this site or to specific articles is allowed with proper acknowledgement. Reproducing articles, or any of the images contained in them, on another website or in any social media posting is a Copyright infringement.
Article and images are Copyright 2022 Thomas Stirr. All rights reserved. No use, duplication or adaptation of any kind is allowed without written consent. If you see this article reproduced anywhere else it is an unauthorized and illegal use. Posting comments on offending websites and calling out individuals who steal intellectual property is always appreciated!
Hi Tom,
Very impressive!
I just purchased OM-1 and M.ZUIKO 100-400mm, hope you can help my beginner’s questions for BIF.
1. Do you recommend to turn 100-400mm Lens I.S. on or off when BIF?
2. Do you recommend to enable Lens I.S. Priority is On or Off in OM-1 setting when BIF? (If I turn 100-400mm Lens I.S. on)
Thanks!
Kai
Hi Kai,
Whether a photographer uses the IS of the M.Zuiko 100-400 is a personal choice. I have the lens IS turned off almost all of the time. It is only when I am shooting at shutter speeds of 1/30 or less that I turn the lens IS back on. When using the M.Zuiko 100-400 I basically rely on the IBIS of my E-M1X.
Since I have never used the OM-1 I really can’t suggest any settings on that camera.
Tom
Stunning set of pictures ,especially considering how fast and erratically these birds fly.
Clever use of the amazing olympus pro-capture.
I have had some success using pro-capture high and low mainly thanks to your articles on them.
Thanks for that.
Hi Stephen,
Good to hear that you are having some success with Pro Capture H and L.
Tom
Hi Tom,
I always enjoy looking at your images. It gives me encouragement to understand how you approach your shooting technique . Thanks again.
Hi Brian,
I’m glad the article and images were of benefit.
Tom
Hi Tom,
Excellent shots!
I use an REI chair (#186011002) that I can carry on my back, but could use a bit higher-seated platform. What is your “photographer’s ladder”?
Warm regards,
Bill
Hi Bill,
My photographer’s ladder (Pearstone Ladder Cart) is an imperfect sitting solution as it is not as comfortable as I’d like (I need to sit on an angle when using it), but is the best option I have at the moment. In the past when I had to haul around a lot of gear when doing client video work I found this to be a good option. Having a wheeled ladder to shoot from a somewhat elevated position in industrial settings does come in handy… and having one that can also function as a gear cart made the Pearstone a good choice at the time.
Tom