
This article shares some handheld images from an M.Zuiko 150-600 focal range test done recently at Bird Kingdom in Niagara Falls. The objective of this posting is to illustrate how using the extreme focal lengths (i.e. wide and telephoto) of our zoom lenses can impact our compositions… depth-of-field… and the number of pixels on subjects.
Some people tend to focus on the potential to photograph birds at significant distances when they consider purchasing a super telephoto zoom lens like the M.Zuiko 150-600 mm f/5-6.3 IS.
The reality is that images of very distant subjects are often not useable due to particulates in the atmosphere that can significantly soften an image. Or, photographs of this type can suffer distortion from heat haze which can render them useless.
This article features 8 pairs of bird images captured from the same vantage points using 150 mm and 600 mm focal lengths (efov 300 mm to 1200 mm). Sometimes it can be difficult to imagine the practical differences between shooting at these focal length extremes. Being able to see these differences allows folks to better understand how a lens like the M.Zuiko 150-600 mm could impact their photography.
All of the featured photographs are full frame captures without any cropping done to them.
NOTE: Click on images to enlarge.

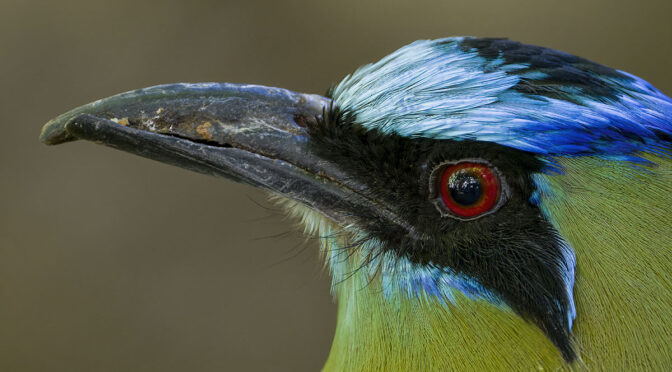
Bird photographers often consider a focal length of 300 mm to be an absolute minimum to use in the field. As we can see in the above image a subject bird 8 metres (~26.3 feet) away photographed at an efov of 300 mm is likely not all that useable.

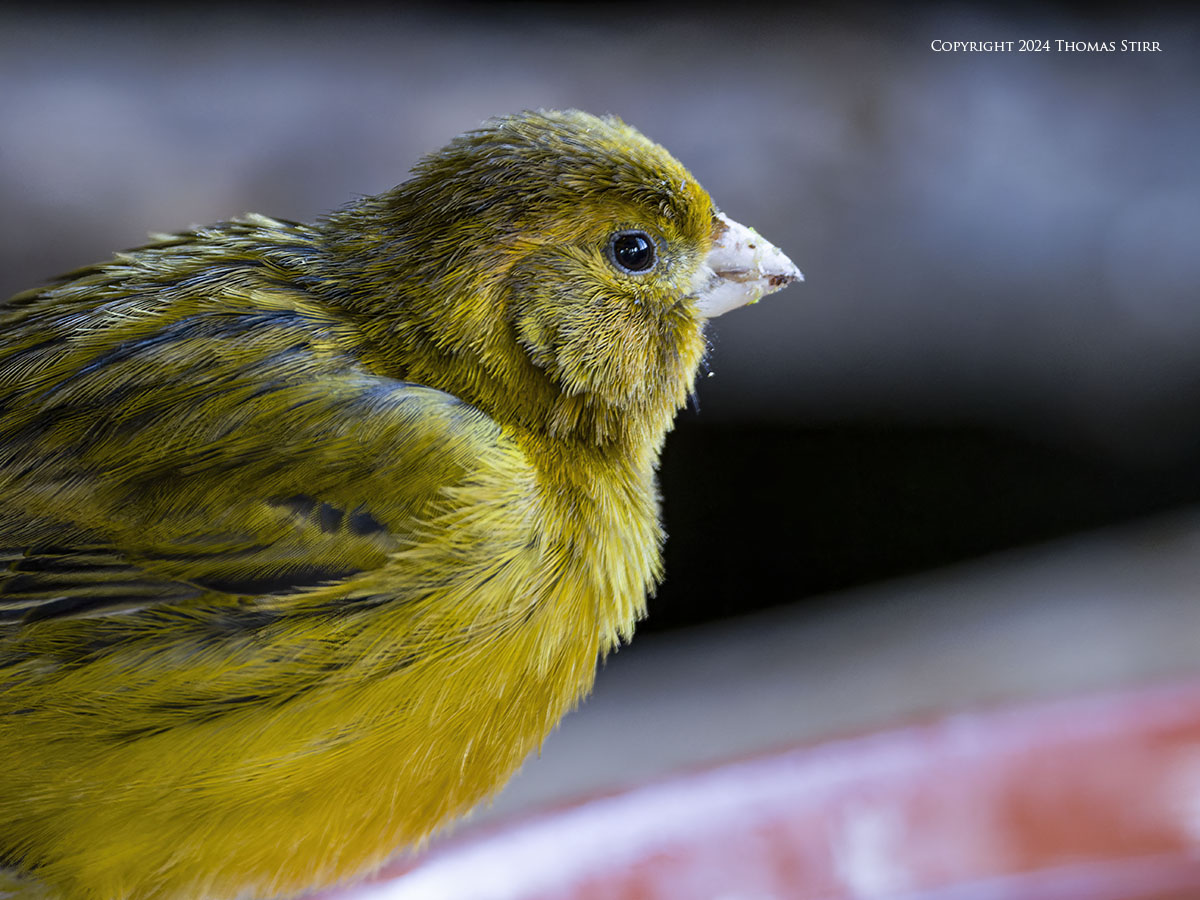
Photographing the same bird from approximately the same distance with a 600 mm focal length (efov 1200 mm) puts significantly more pixels on the subject bird.
If you compare the EXIF data you’ll notice that the exposure changed between the two images from ISO-1000 to ISO-2500. This happened because I used matrix metering for both images. I shoot in Manual mode with Auto-ISO for my bird photography… and I expect some potential shifting with my ISO values from time to time. Getting in tighter to the subject bird eliminated the light coming in from the windows that are visible with the first image. Some variations in overhead cloud cover could also have had an impact.
Folks who like to set their ISO value manually may have to adjust their shutter speed when using the telephoto end of their zoom lens in these types of situations. Slower shutter speeds can reduce the potential of achieving a sharp image, depending on the handheld skill of a particular photographer.

At 16 metres the Laughing Kookaburra is quite small in our composition. Its light coloured body is one of the few brighter spots in the composition, yielding an exposure of ISO-4000.

When using a focal length of 600 mm (efov 1200 mm) the Kookaburra fills more of the frame. This larger light area of its body caused the ISO value to improve slightly to ISO-3200.
This pair of images also helps illustrate how using very long focal lengths can allow us to get more pixels on our subject birds, while staying far enough away so we don’t flush them out.

Sometimes using the wide angle end of a zoom lens can lead to us incorporating uneven lighting, and other distractions, into a composition.

By zooming into our subject we are often able to eliminate distracting elements and achieve more balanced lighting in a composition.
If you check the EXIF data between the two images above you’ll notice that I had to take a 1/2 step backwards, away from the subject bird, in the second image.
This increased my distance to subject from 2.5 metres to 3 metres. I needed to do this so I would not be inside the minimum focusing distance of 2.8 metres of the M.Zuiko 150-600 mm f/5-6.3 IS when it is shot fully extended to 600 mm.

As we know, shorter focal lengths will always create deeper depth-of-field than a longer focal length when shot using the same aperture and from the same distance to subject. In the photograph above we can see the unsightly dirt and streaks on the window really detract from the image.

Using a longer focal length of 600 mm (efov 1200 mm) has much shallower depth-of-field. This completely eliminates the unsightly window dirt and streaks, even with the aperture increasing to f/6.3. Being able to achieve shallower depth-of-field with longer focal lengths when using the M.Zuiko 150-600 is one of the advantages of this lens when compared to the M.Zuiko 100-400.

In the composition above we see a very busy and distracting scene. There is a leading line and a reverse ‘Magic 7’ that leads our eye to the subject bird… but those factors don’t help the overall photograph to any significant degree.

Fully extending our lens out to 600 mm (efov 1200 mm) changes the feeling of the composition completely into more of an intimate portrait of the subject bird. A more conscientious photographer may have taken the time to remove the light railing in the background in post.

Another element in our M.Zuiko 150-600 focal range test is to illustrate how we can use longer focal lengths to ‘thread the needle’ to photograph past distractions. As you can see in the above photograph, using a focal length of 150 mm (efov 300 mm) places our subject bird in amongst a lot of visual clutter.

This part of the small bird aviary at Bird Kingdom is fairly dark and is one area where the Sync-IS of the M.Zuiko 150-600 mm f/5.6-.3 IS is very useful. That, coupled with 50% more reach when compared to the M.Zuiko 100-400, helped enable me to capture the image above.

Getting in tight to a bird with a long focal length can help us separate our subject from other elements in the immediate area.

My very quick and rather crude work in post was done for illustrative purposes only.

One of the biggest benefits of the focal length range of the M.Zuiko 150-600 mm f/5-6.3 IS is being able to go from a composition showing a bird in its environment, to a close up portrait-style composition with a simple push/pull movement on the lens barrel.

If we are contemplating the purchase of the M.Zuiko 150-600 mm f/5-6.3, or other long telephoto zoom lenses, it is important for us to consider how an extensive focal length range can add drama and variety to our photographs. This extends our photographic potential well beyond simply trying to capture images of birds at a distance.
Technical Note
Photographs were captured handheld with the equipment noted in the EXIF data. All images were created from RAW files using my standard process. This is the 1,364 article published on this website since its original inception in 2015.
How you can help keep this site advertising free
My intent is to keep this photography blog advertising free. If you enjoyed this article and/or my website and would like to support my work, you can purchase an eBook, or make a donation through PayPal. Both are most appreciated.
Sometimes all we need as photographers is a bit of inspiration. We hope you can find some of that inside Finding Visual Expression II.

Finding Visual Expression II is available for download for an investment of $11.99 CDN. The best viewing experience of this eBook will be at 100% using Adobe Acrobat Reader.
You may be interested in all of the 30 concepts covered in both of these related eBooks. If so, you may want to also consider Finding Visual Expression.

Finding Visual Expression is available for download for an investment of $11.99 Cdn. The best viewing experience of this eBook will be at 100% using Adobe Acrobat Reader.
Our other eBooks include Images of Ireland, New Zealand Tip-to-Tip, Nikon 1: The Little Camera That Could, Desert & Mountain Memories, Images of Greece, Nova Scotia Photography Tour, and a business leadership parable… Balancing Eggs.
If you click on the Donate button below you will find that there are three donation options: $7.50, $10.00 and $20.00. All are in Canadian funds. Plus, you can choose a different amount if you want. You can also increase your donation amount to help offset our costs associated with accepting your donation through PayPal. An ongoing, monthly contribution to support our work can also be done through the PayPal Donate button below.
You can make your donation through your PayPal account, or by using a number of credit card options.
Word of mouth is the best form of endorsement. If you like our website please let your friends and associates know about our work. Linking to this site or to specific articles is allowed with proper acknowledgement. Reproducing articles, or any of the images contained in them, on another website or in any social media posting is a Copyright infringement.
Article and images are Copyright 2024 Thomas Stirr. All rights reserved. No use, duplication or adaptation of any kind is allowed without written consent. If you see this article reproduced anywhere else it is an unauthorized and illegal use. Posting comments on offending websites and calling out individuals who steal intellectual property is always appreciated!
Amazing photographs, well done on this post Thomas!
Thanks Randy… glad you enjoyed them!
Tom
You mention “push-pull” method of adjusting zoom range. I have heard mention that using that technique puts additional strain on the internal gears etc..and you would be better off using the zoom ring for adjustments. Have you information that counters that statement? I use the em1x as well with the 300/4, 100-400, and 40-150/2.8. That camera combo works great for me. I enjoy reading all the good information that you put out. Thank you.
Don
Hi Don,
I have no information regarding the use of a ‘push-pull’ method of adjusting the zoom range. Some of the videos put out by OM Ambassadors about the lens have suggested/mentioned using this approach.
Tom
Hi Don,
I had a look at the mini manual that comes with the lens. Here are the instructions for the Zoom Ring: “Zoom by rotating the zoom ring or holding the front (a) of the lens and moving it forward or backward.”
I can’t imagine that OMDS would recommend a push-pull zoom action if was going to be detrimental to the lens.
Tom
Good to hear that you followed up on this issue and I’m glad to hear that the manufacturer ok’s that technique. Evidently the mechanism is well designed and pretty strong to resist any flexing that may occur by exerting force in push and pull.
don
I remember once you going through your “standard process” for post. Could you remind me of where the article is or share what you use now?
Hi Reno,
I recently purchased DxO Mark PhotoLab 7 so I could take advantage of the lens module for the OM 150-600. The balance of my software remains the same.
My basic process is as follows:
– PhotoLab 7 for initial processing of RAW files. I typically use DeepPRIME set to 15, basic camera and lens corrections, micro-contrast if needed, Smart Lighting Spot Adjustment
– Export a DNG file into PhotoShop CS6, and made some basic slider adjustments as needed
– Depending on the needs of a specific image I may use Topaz Sharpen AI, Topaz DeNoise AI, or some features from an old copy of the Nik Collection
I don’t do any batch processing and do my files individually.
Tom