
Macro photography opens up a whole new world for us as photographers. We get to see and capture images of things around us in ways that bring us new perspectives. This article demonstrates three basic macro shooting angles for insects. Our subject for this article is a grasshopper.
NOTE: Click on images to enlarge.

Shooting Down on a Subject
When we first start photographing insects with a macro lens or extension tubes we are excited about getting in close to our subject. We often have concerns about the insect getting spooked, then flying or running away before we have a chance to capture our image. As a result we often use a ‘looking down’ shooting angle on our subject. Its fast and its easy. It is also a flexible angle as we can quickly change our subject framing… either showing the entire insect or using subject bleeds to come in closer. We can also adjust the angle of the insect’s body as it appears in our image. With the image above we have positioned the grasshopper to create a corner exit.
There is nothing wrong with using this shooting angle. It is simply a personal choice. This angle does have some challenges. If we look at the image above we can see one of the grasshopper’s antennae is pointed directly at the camera and thus goes out of focus quickly. It is difficult to avoid this when ‘shooting down’ on insects. We also have some pronounced shadows visible under the grasshopper which can be distracting.
Examining the EXIF data also shows us another thing we commonly do when first starting out… we use a faster than necessary shutter speed. Often we do this to help avoid image blur caused by our hand-holding technique when shooting high magnification images.
In breezy conditions a faster shutter speed will be necessary to avoid subject blur. We also may need a faster shutter speed if our subject is actively moving. So, we need to find the best combination of aperture and shutter speed to get the depth-of-field, motion detail, and exposure we want in our image.
Using a lower ISO value will allow us to minimize the noise in our images. It also helps to get the best performance out of our camera’s sensor in terms of more dynamic range and colour depth. Depending on how our camera’s sensor responds, we can choose to underexpose an image then lighten it in post. Not all sensors respond in the same manner to this approach. So, testing your camera and your post processing skill should be done prior to taking this route. If you want some additional information about ‘ISO invariance’ here is a link to an article that our friends at Photography Life wrote. And, here’s a link to an F-Stoppers video on this subject.
On a personal basis, I don’t muck around with purposely underexposing images captured with my 1″ sensor cameras. This never worked well with my Nikon 1 gear. I haven’t tested this with my E-M1X yet, so I can’t comment on the potential value of using this approach with that camera or M4/3 in general.

Subject at Eye Level
Macro shooting angles for insects create varying degrees of intimacy. As we can see with the above image, photographing a subject insect at eye level creates a more intimate feeling. We can still get some shadows, but they usually are not as distracting. Using this shooting angle tends to make antennae less of an issue as they are often pointed towards the side of an image, rather than directly at our camera.
We still have a lot of latitude with how we compose our image in terms of how much of it we want to show. We can come in tighter as with the image above, and only show a portion of the subject.

Or we can pull back and capture the entire body of the insect as illustrated with the image above. Again, there is no right or wrong approach. It is a personal decision that a photographer makes.
Even if we choose to photograph our subject at eye level there are macro shooting angles that can create issues with antennae. For example, shooting an insect at eye level using a head-on perspective can create antennae issues.
The photograph above was one of my earlier attempts at doing a Hand-held Hi Res macro image.

The image above is a 100% crop of the grasshopper’s rear leg. Using the E-M1X’s Hand-held Hi Res mode for macro photography fascinates me because of the amount of detail that can be captured without needing a tripod.
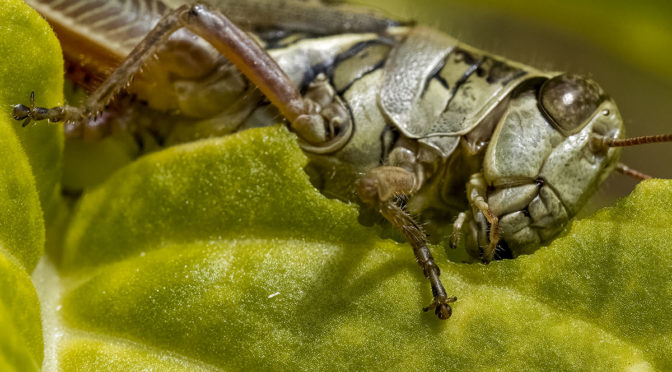
Shooting up at a Subject
Macro shooting angles can also help create a feeling a drama. Shooting up at a subject is one such angle.
This angle is often the most difficult to achieve as our camera’s lens needs to be underneath the subject insect to some degree. Doing this often means having our camera gear brushing up against foliage which can disturb our subject insect. It also may limit the amount of the insect’s body that we can capture in our image. Often macro shooting angles like this means that we have to compose from the rear screen of our camera. If our gear doesn’t have a fully articulating screen this can be difficult… and sometimes impossible.

When we are able to capture an insect image using a ‘shooting up’ orientation it can create a significant amount of drama in our photograph.
When I want to use a ‘shooting up’ macro shooting angle, I’ve found it is best to decide that right up front. This angle usually means I have to flip out the rear screen of my camera and approach the insect from a low camera angle right from the start. Insects often do not stay in one place too long. Sometimes you’ll only have an opportunity for one image. If you capture one image from ‘looking down’ or at ‘eye level’ by the time you re-position your camera down low for a ‘looking up’ image, the insect could be gone.
If you checked the EXIF data for the image above you may be wondering why I used a shutter speed of 1/1000. The grasshopper was aggressively feeding on the leaf which caused significant head movement. I used a shutter speed of 1/1000 to help ensure I ‘froze’ the grasshopper’s head motion.
When photographing insects remember to consider macro shooting angles and how they can impact the visual feel of your images.
Technical Note:
Photographs were captured hand-held using camera gear as noted in the EXIF data. All images were produced from RAW files using my standard process.

How you can help keep this site advertising free
My intent is to keep this photography blog advertising free. If you enjoyed this article and/or my website and would like to support my work, you can purchase an eBook, or make a modest $10 donation through PayPal. Both are most appreciated. You can use the Donate button below. Larger donations can be made to tom@tomstirr.com through PayPal.
Word of mouth is the best form of endorsement. If you like our website please let your friends and associates know about our work. Linking to this site or to specific articles is allowed with proper acknowledgement. Reproducing articles, or any of the images contained in them, on another website or in any social media posting is a Copyright infringement.
Article and images are Copyright 2019 Thomas Stirr. All rights reserved. No use, duplication or adaptation of any kind is allowed without written consent. If you see this article reproduced anywhere else it is an unauthorized and illegal use. Posting comments on offending websites and calling out individuals who steal intellectual property is always appreciated!
Tom,
Clearly, this is a case where a camera’s feature (IBIS) vastly helps in capturing such exquisite details sans a tripod. The speedlight/flash was helpful where you used it though the shake compensation of the Olympus cam makes the big difference especially where no flash was used.
The details of the grasshopper’s body (the hind legs and the wings in particular) are interesting. They can almost be taken super-closeup and tightly framed so as to form an almost abstract image.
Oggie
http://www.lagalog.com
Hi Oggie,
Without question the IBIS performance of the E-M1X does help when doing macro photography handheld. This is especially true when doing Handheld Hi Res macro images… which was the case with the second image in the article. All of the grasshopper images in this article were captured in natural light… no flash was used. The grasshopper was on the front porch of my home.
Tom
Tom,
My bad, I presumed that the last image (butterfly) was part of the series.
Oggie
http://www.lagalog.com
Hi Oggie,
It was “my bad”… I totally forgot that the butterfly image was even in this article. I added the butterfly image as a visual break after the fact. Sorry for the confusion.
Tom