
This article discusses planning Pro Capture images. It shares three short Pro Capture H runs of nuthatch photographs to help illustrate the planning technique.
Photographers who have tried to reliably capture images of small birds taking flight can attest to the challenge. The Olympus Pro Capture H feature is an incredible tool to use to photograph small birds taking flight. This feature stores pre-shutter release images in temporary memory, making photographing precise moments a practical reality.
The first step in planning a Pro Capture series of images is to watch the behaviour of subject birds. Being creatures of habit, birds will often use the same branches and follow roughly the same approach and departure flight paths.
By watching a bird’s body position and head movement we can learn to anticipate its behaviour. For example, when many small birds look downward on an angle they often don’t take flight, but rather hop to another branch. These types of movements do not typically create the most interesting photographs as birds will have their wings drawn in tight to their bodies.
Birds about to take flight will typically be looking directly forward in the direction of their intended travel. These subject birds represent the best opportunities to use Pro Capture.
Depending on the Olympus camera owned, a photographer has a range of customized settings for the Pro Capture mode. You can burn through more frames than needed if you don’t plan your Pro Capture image run.
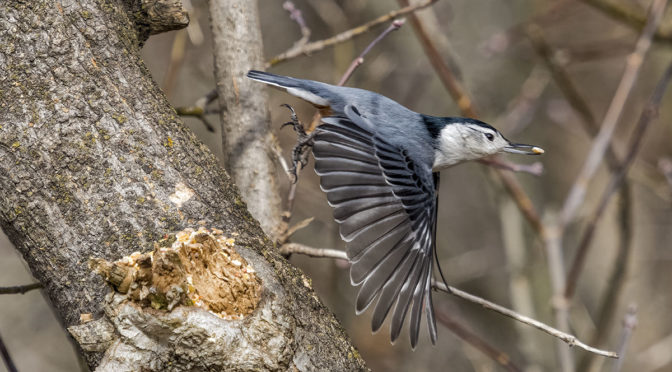
It is critical that we understand how many frames it takes in a Pro Capture run to photograph dramatic or pleasing wing and body positions. Let’s examine a test Pro Capture run that I recently did with a nuthatch to see what it reveals.


This short test image run gives us some important information we can use in planning Pro Capture images of nuthatches. The first critical point is that we get the most dramatic wing position in the third frame after launch in the Pro Capture H run.
We can also see that the nicely spread wing position of the nuthatch happens very close to its launch point. This tells us that when planning Pro Capture images of a nuthatch we can get in fairly tight to the bird.
The third critical thing that we learned from this test run is that we have a repeating wing pattern every third frame. There is little point in planning an extended Pro Capture run when photographing nuthatches. We will get our ‘money shot’ in frame three after launch.
Planning Pro Capture images can help us get our desired results using the least number of frames. Let’s have a look at two additional Pro Capture H image runs of nuthatches taking flight from the same tree. Keep in mind that all of the images featured in this article are shown as 100% captures without any cropping done to them.

Here is the launch position image in our second short Pro Capture H run. You can see that I framed the subject bird towards the left hand side of the frame. This allows for left to right movement of the bird as it takes flight.

Frame two shows us wing extension happening very quickly.

Frame three is our ‘money shot’ with the nuthatch displaying a beautiful, spread wing position and the bird’s downward pointing wings in centre frame.

As expected, frame four shows an unattractive wing and body position with the bird about to exit the frame. All four of these photographs would have been captured in a total of 1/15 of a second.
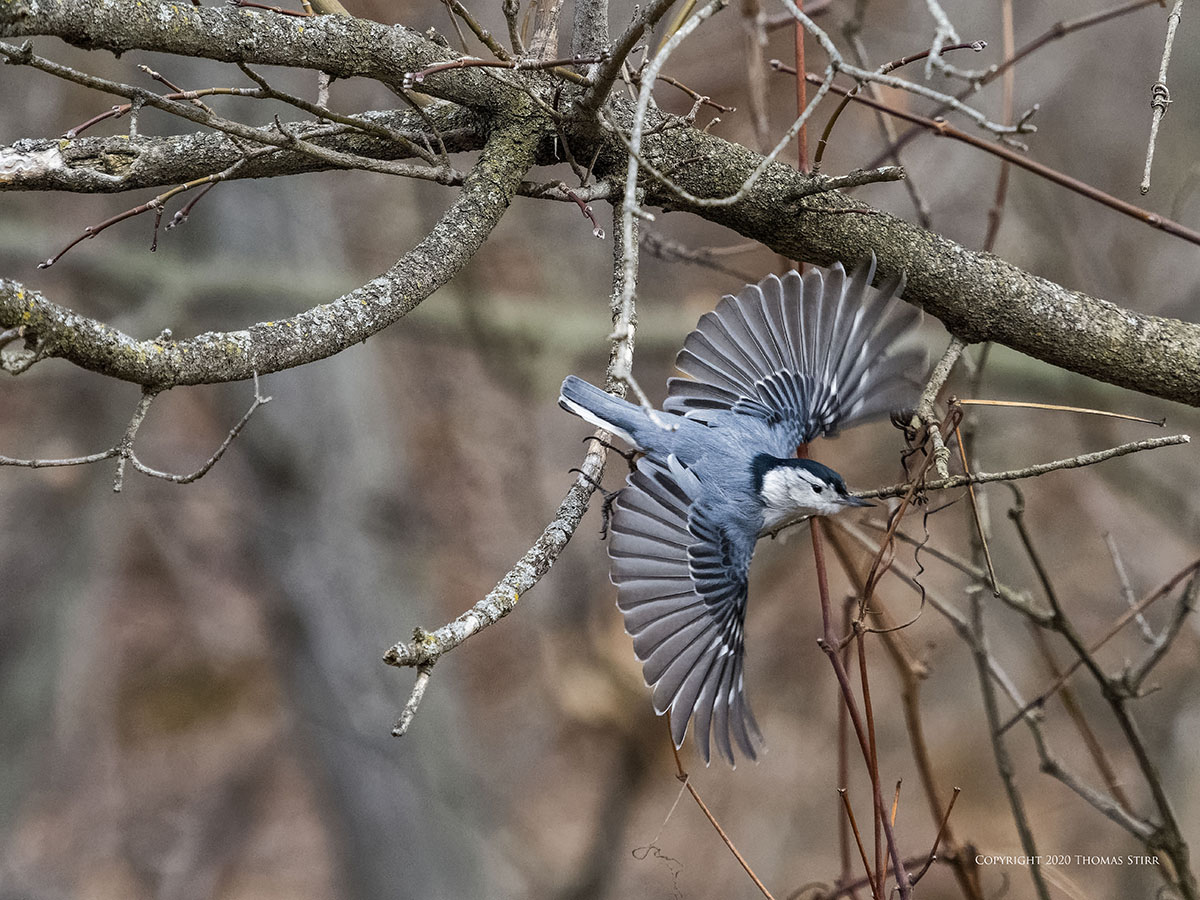
Planning Pro Capture images can help us capture desired precise moments in the movements of subject birds. To illustrate that the previous image run wasn’t a ‘fluke’ let’s look at a third Pro Capture H run. Another nuthatch is taking flight from the same tree, albeit from a slightly different position on the trunk.

As planned, frame one is our launch position.

Once again frame two shows us wing extension quickly occuring.

As expected frame three is our ‘money shot’. This Pro Capture H run has a more dramatic frame three scene in terms of wing and body position.

Frame four shows the nuthatch about to leave the frame. This particular Pro Capture H run captured a more interesting image in frame four.
Planning Pro Capture images allows a photographer to get their desired action images more efficiently, and often can reduce the need to crop in post.
Technical Note:
Photographs were captured handheld using camera gear as noted in the EXIF data. All images were produced from RAW files using my standard process. Photographs are displayed as 100% captures without any cropping.
How you can help keep this site advertising free
My intent is to keep this photography blog advertising free. If you enjoyed this article and/or my website and would like to support my work, you can purchase an eBook, or make a modest $10 donation through PayPal. Both are most appreciated. You can use the Donate button below. Larger donations can be made to tom@tomstirr.com through PayPal.
Word of mouth is the best form of endorsement. If you like our website please let your friends and associates know about our work. Linking to this site or to specific articles is allowed with proper acknowledgement. Reproducing articles, or any of the images contained in them, on another website or in any social media posting is a Copyright infringement.
Article and images are Copyright 2020 Thomas Stirr. All rights reserved. No use, duplication or adaptation of any kind is allowed without written consent. If you see this article reproduced anywhere else it is an unauthorized and illegal use. Posting comments on offending websites and calling out individuals who steal intellectual property is always appreciated!
Another very educational article for those of us who are bird shooters and have the M1X. Thank you.
Thanks for your comment Joel…much appreciated!
The technique can be applied to any of the Olympus cameras that have the Pro Capture feature. The number of frames before a repeating wing position may vary depending on the frame rates available and the species of bird.
Tom
Have you used the 300mm f4? It seems you use the teleconverter a lot with birds.
Hi Ed,
I have never used the M.Zuiko 300 mm f/4. My Olympus birding kit is the M.Zuiko PRO 40-150 mm f/2.8 with the MC-20 teleconverter. I have never liked shooting with prime lenses so the M.Zuiko 300 mm f/4 isn’t of any interest to me. If I need extra reach I typically reach for my Nikon 1 kit with the CX 70-300 mm f/4.5-5.6.
Tom
Are these photos with continuous autofocus, or focus locked on the first image?
Hi Ed,
These images were captured with Pro Capture H… so focus is locked on the first frame.
Tom