
This article features some pond photography done with the M.Zuiko MC-20 teleconverter during a recent visit to the Royal Botanical Gardens. One of the reasons that I purchased the MC-20 2X teleconverter was to increase my reach when doing pond photography, and capturing images of frogs, dragonflies and blossoms.
Some photographers enjoy using teleconverters, while others avoid them like the plague. It is important to remember that not all camera gear is created equal. I had some experience using a teleconverter with a different camera system and was not impressed with the results.
Since moving over the Olympus/OM System back in June 2019 I have come to rely on my MC-14 and MC-20 teleconverters for a range of subject matter. I use them on a regular basis as I find the resulting image quality more than meets my needs.
NOTE: Click on images to enlarge

No pond photography would be complete without some images of dragonflies. Rather than focus my efforts on capturing dragonflies in flight, I decided to do some testing and photograph perched dragonflies with the MC-20.

Obviously one needs very good light to do pond photography using an aperture of f/13. I used handheld shutter speeds from 1/500 to 1/1250 for most of the images in this article.

The comparatively short minimum focusing distance of 1.3 metres of the M.Zuiko 100-400 mm f/5-6.3 IS zoom lens is extremely useful when doing pond photography. Using the MC-20 provides additional capability in terms of added reach.

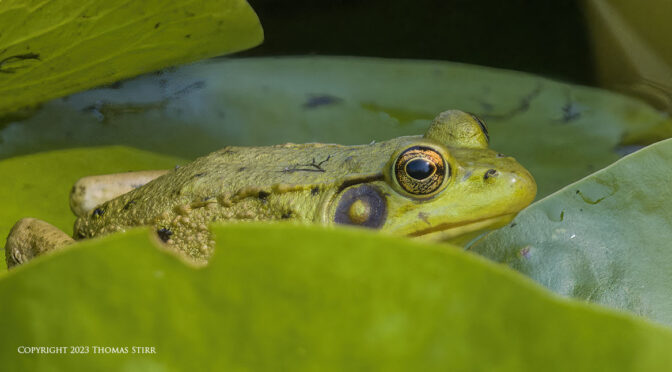
I found a cooperative frog in the pond and managed to capture a few images of it. I even went so far as to use my MC-20 in combination with the Digital Teleconverter on my E-M1X. This combination created a focal length of 1600 mm, or an efov 3200 mm. There may be more on this handheld photographic approach in a future article.

There were a few blossoms in the pond which made for some interesting compositions.

Regardless of the camera equipment that we may own, it is always a great experience to experiment with it to see what can be accomplished.

Over the years I’ve met a number of photographers who dismiss all 2X teleconverters out of hand.

Certainly there are some teleconverters in which an investment is difficult to justify given their less than stellar optical performance.

Borrowing or renting a teleconverter before spending your hard earned money on one is a pragmatic thing to do.

Right from day one, I found my M.Zuiko MC-20 teleconverter to be a great addition to my kit for specific subject matter… in appropriate lighting. If may, or may not be, a good addition to your kit depending on your needs and priorities.

If you spend some time during a pond photography visit there’s a good chance you’ll find a few different insects to photograph. Using a teleconverter can help provide the additional reach needed to photograph them.

During my pond photography visit I tried a few Handheld Hi Res flower images with my M.Zuiko MC-20 teleconverter just for the fun of it.

Using the M.Zuiko MC-20 teleconverter with a long telephoto zoom lens like the M.Zuiko 100-400 mm f/5-6.3 IS does take some practice. Depending on the specific needs of a photographer, this combination is capable of producing some good quality images.

If you have a teleconverter that has been collecting dust… pull it out and give it another try. To me… photography is all about having fun and experimenting to see what is possible. My MC-20 definitely helps expand my photographic potential.
Technical Note
Photographs were captured handheld using camera gear as noted in the EXIF data. Images were produced from RAW files using my standard process. This is the 1,295 article published on this website since its original inception in 2015.

How you can help keep this site advertising free
My intent is to keep this photography blog advertising free. If you enjoyed this article and/or my website and would like to support my work, you can purchase an eBook, or make a donation through PayPal. Both are most appreciated.
Our eBooks…

The Finding Visual Expression eBook is designed to provide readers with some photographic inspiration and composition ideas. The Little Camera That Could details our extensive experience using the Nikon 1 system. Our eBooks also include a number of travel photography publications including Images of Ireland, New Zealand Tip-to-Tip, Desert & Mountain Memories, Images of Greece, and Nova Scotia Photography Tour. We also have a business leadership parable… Balancing Eggs.
Donations support this website…
If you click on the Donate button below you will find that there are three donation options: $7.50, $10.00 and $20.00. All are in Canadian funds. Plus, you can choose a different amount if you want. You can also increase your donation amount to help offset our costs associated with accepting your donation through PayPal. An ongoing, monthly contribution to support our work can also be done through the PayPal Donate button below.
You can make your donation through your PayPal account, or by using a number of credit card options.
Word of mouth is the best form of endorsement. If you like our website please let your friends and associates know about our work. Linking to this site or to specific articles is allowed with proper acknowledgement. Reproducing articles, or any of the images contained in them, on another website or in any social media posting is a Copyright infringement.
Article and images are Copyright 2023 Thomas Stirr. All rights reserved. No use, duplication or adaptation of any kind is allowed without written consent. If you see this article reproduced anywhere else it is an unauthorized and illegal use. Posting comments on offending websites and calling out individuals who steal intellectual property is always appreciated!
Hi Tom,
I have been “on the fence” regarding the purchase of the MC-20 until I read this article. I have had good results with the MC-1.4 on my 100-400 and 40-150 Pro on my Om-1, but shied away from the MC-20 due to a lot of negative comments. I am going to give it a try for those times where just a little more reach is required.
Thank you for all of your articles. You have helped me immensely with my BIF photography.
On a side note, I notice that all of your EXIF date shows the distance to the subject. How does one set this up in camera?
Thanks again. Chuck
Hi Chuck,
I’m very glad to see that the website has been of benefit to you with your photography.
I don’t spend any time in photography chat rooms so I don’t know what the negative comments have been with regards to the MC-20. I suspect that some folks are trying to use shutter speeds that are too slow for their handholding capability which can cause some image softness. It is also possible that some people don’t realize that using a 2X teleconverter reduces IBIS performance, or lens IS, by 2 stops, which can also lead to image softness. Unfortunately many photographers blame their gear rather than investigate their own skill set.
The MC-20 isn’t as sharp as the MC-14, but this is to be expected. Shooting in RAW and doing some simple adjustments in post with a program like Topaz Sharpen AI can sharpen things up sufficiently for most people. Pixel peepers will never be happy of course… but that too is to be expected.
The distance to subject is already in the EXIF data for camera like the E-M1X and E-M1 Mark III. The RAW file needs to be processed for it to become visible. I store my photo files in Windows explorer and after processing the distance to subject is found by right clicking on a finished file… then left clicking on Properties… then left clicking on details.
A few years back one of my readers suggested using a tool called ExifToolGUI. You may want to do a search for this online to see if it is still available. I’ve never used this so I can’t vouch for the program in any way.
Tom
You can use Picture Information Extractor (PIE):
https://www.picmeta.com/products/picture-information-extractor.htm
Thomas, thank you for another informative article filled with beautiful images. Your work really squashes all the negative rumors about the micro 4/3 format and systems.
How much do you rely on image stabilization and how would you set up the 100-400 lens on the EM1-X? Do you use synched stabilization (if it really exists with this lens), just stabilization in the lens, or just the stabilization in the camera body?
Thanks…Ed S.
Hi Ed,
The IS in the 100-400 isn’t true Sync-IS, and if my memory serves provides about 3 stops of stabilization. I think for someone who owns a Panasonic camera this may be useful. For folks who own Olympus/OM System bodies like the E-M1X, E-M1 Mark III, OM-1 or OM-5 the in-lens IS is likely not that important.
When using the M.Zuiko 100-400 mm zoom I typically have the IS on the lens turned off almost all of the time as I find relying on the IBIS in the E-M1X is more effective. There are occasions when I may be trying to use the 100-400 at quite slow shutter speeds, e.g. 1/10 of a second, when I may engage the lens IS. Having said that, I don’t remember trying to use the 100-400 in this way for at least a couple of years.
I don’t typically use slow shutter speeds for birds and insect photography so I don’t rely on IBIS or lens IS to any great degree for this subject matter. There is more risk of subject movement causing blur than blur from handholding in my experience. I would rely on IBIS to a great extent when shooting handheld macro or doing handheld in-camera focus stacking at slower shutter speeds. Under the correct conditions, i.e. no wind, I will shoot lenses like the PRO 7-14 f/2.8, PRO 12-40 f/2.8, and sometimes the PRO 12-100 f/4 IS zoom lenses at quite slow shutter speeds of up to 4 seconds handheld. This is typically at the wide end of the focal length ranges with those lenses.
Tom
Another question: how would you compare the outcomes of using the 100-400 vs the 40-150 with and MC for close ups. And why would you choose one over the other?
Hi Dave,
In my experience the PRO 40-150 f/2.8 is optically superior to the 100-400, so the overall quality of the images is better with the PRO 40-150. A little bit of work in post with 100-400 images helps to equalize the outcomes to a decent degree. As noted in a previous article… https://smallsensorphotography.com/favourite-m-zuiko-lens , the PRO 40-150 f/2.8 is my favourite lens.
I typically like to get as many pixels on my subject as possible. That is the primary factor when I decide on which lens to use for a specific photographic opportunity. When I go out with the specific intent of doing close up photography I will take my 60 mm macro, the PRO 40-150 and the 100-400 as these three lenses allow me to adjust to various subject distances. I will also take a set of extension tubes and the MC-14 and the MC-20 teleconverters, as using these accessories provide additional in-field flexibility.
Tom
Great. Thanks
Hello Tom,
Last week I took my EM1X to the Olbrich Botanical Garden in Madison WI. I used the MC14 and 40-150 for some flowers and insects and utilized the built in focus stacking based on your post from a few weeks back. I loved the results!
I noticed this time you used a small aperture for close ups. Why didn’t you use focus stacking in this outing? Dave
Hi Dave,
I often go out with my camera gear to push it and myself in specific ways to see what will happen. Like other photographers, if I’m familiar with a specific location I will take gear that will allow me to work around the physical limitations that may be present.
One of my primary objectives at the time these images were created was to experiment using the MC-20 in combination with the E-M1X’s digital teleconverter at extended focal lengths. The images in this article were produced from the RAW versions of my extreme digital teleconverter testing. I haven’t yet decided how to proceed with those extreme digital teleconverter test images. At some point I’ll likely go out with the specific intent of experimenting with in-camera focus stacking using the MC-20 and/or MC-14 with the 100-400 zoom.
I have published some articles that demonstrated the use of in-camera focus stacking with long focal lengths… so I have dabbled with this approach in the past.
If terms of using f/13 this was simply a function of using the the MC-20 with the 100-400 fully extended. The minimum aperture of that lens fully extended is f/6.3… adding the MC-20 pushes that to f/13. If it would not have been so breezy I may have tried in-camera focus stacking with dragonflies, but given the breeze I would not have been able to get any useable images from that approach during these particular outings.
Tom
Thank you
You write at the end of each entry: “Images were produced from RAW files using my standard process.” Could you sometime soon give us a detailed step-by-step account of this “standard process,” perhaps using a couple of your recent photos as the test bed?
Hi Bill,
This has been mentioned in a number of articles in the past. I’m happy to provide an outline for you in this reply.
The first thing that I need to state is that all of the software that I use is non-current. In my mind this makes step-by-step details somewhat meaningless… although some of my articles under the Post Processing category do have some step-by-step details.
Anyway… here is my standard process (such as it is):
1) I start by running my RAW files through DxO PhotoLab 4. I have over 4 dozen custom pre-sets that I’ve developed over the years. These pre-sets are typically camera and lens specific and often also include subject matter and/or lighting. For example I have presets such as E-M1 Mark III 14-150 landscape, E-M1X flower macro, E-M1X HHHR landscape, E-M1X 7-14 landscape, and so on. Each of these pre-sets could include the amount of PRIME noise reduction, adjustments to highlights/midtones/shadows as well as other considerations. When I open a RAW file in DxO I apply a pre-set, use Spot Adjustment with Smart Lighting, and may/or may not add some micro-contrast based on the image. I spend very little time in DxO as those three adjustments are three basic clicks (and drawing a box or two with Smart Lighting). I then export a DNG file into an old copy of PhotoShop CS6 (the last boxed copy Adobe sold).
2) I open the DNG file in PhotoShop CS6 and typically make some small adjustments with basic sliders. Then I open the file and decide what else the image may need. This typically could be an adjustment(s) to Curve, Levels, Brightness, and perhaps Hue/Saturation. I use the Lasso tool, Spot Healing, and Dodge/Burn as necessary.
3) I then give the image a quick look over to see if I need to do anything in the Nik Collection. If so, I typically use Viveza 2 or Color Efex Pro 4 as needed. These adjustments are fully dependent on the needs of a specific image.
4) I then open up either Topaz Denoise AI or Topaz Sharpen AI (both are older versions) and determine if the image needs any tweaking with one of these programs. I almost always will use one of these programs to finish an image. In rare instances I may use both if the image requires it.
5) I put in my Copyright and save my finished file as a full sized jpeg as well as a 1200 pixel version for the website. I save my DNG files but do not save any changes to my base RAW file just in case I need to go back to it and start completely fresh, or try a different approach in post.
It typically takes me about 3 minutes to process a single RAW file into a finished jpeg. This includes computer processing time. I never do any batch processing of my images.
Here are links to some of my old post processing articles:
https://smallsensorphotography.com/multiple-programs-in-post
https://smallsensorphotography.com/overcast-landscape
https://smallsensorphotography.com/muckross-house-post-processing
https://smallsensorphotography.com/surfer-wiping-out
https://smallsensorphotography.com/working-with-a-sample-landscape-image-in-post
https://smallsensorphotography.com/dealing-bright-sunlight-post
At the time of this response I have 58 articles under the Post Processing heading… so there is likely a lot of information in that collection of articles that you may find useful.
Hope this has helped…
Tom