
Lately I’ve have some interesting email exchanges with readers, as well as some comments on this website, about my Pro Capture H settings and the rationale for them. It occurred to me that perhaps the best way to demonstrate why I do what I do, is to show Pro Capture in reverse.
By that I mean showing a Pro Capture H run in reverse order from the last frame to the first. Before we get into a sample Pro Capture H run, let’s review why a photographer would choose to use Pro Capture H in the first place.
Why use Pro Capture H?
The main reason why a photographer would use Pro Capture H is to photograph an action sequence that is typically very difficult to obtain due to rapid subject movement. These are quite different situations than those where regular continuous auto-focus with a fast frame rate would be commonly used.
Pro Capture H is particularly well suited to situations when a static subject rapidly transitions into movement. Think of a bird taking flight, a batter swinging at a pitch, or a tennis player completing a serve. These are instances when shutter release timing can be critical to capturing the precise moment a photographer has in their mind. These are critical moment images, or ‘money shots’ as some pro photographers call them.
Why use 60 frames-per-second?
I use 60 frames-per-second because my interest is in capturing as many images as possible with small, incremental differences in motion, giving me the best chance to photograph a unique aspect of a subject’s movements. This can be especially important when photographing very fast moving subjects like small birds taking flight or landing.
Why do you set your E-M1X for 15 Pre-shutter frames?
There’s two basic reasons for this… photographic efficiency and buffer management. When I first started out using Pro Capture H I had my E-M1X set for 20 Pre-shutter frames and my Frame Limiter set to 35 frames. So, every Pro Capture H run would generate 35 images. I found that the bulk of those photographs ended up being wasted as the subject bird had left the frame for most of them.
With 20 frames stored in temporary memory (i.e. Pre-shutter frames), as well as my E-M1X needing to process 15 additional ‘new’ images, it would take some time for the camera to process all of those photographs. I still had some buffer left, but I couldn’t shoot a number of successive Pro Capture H bursts and still have sufficient buffer with those settings.
The number of Pre-shutter frames that a photographer chooses really depends on their objective for the Pro Capture H run, and their reaction time. I’ve found that 15 Pre-Shutter frames gives me 1/4 second to capture my desired action images which is appropriate given my current physical capabilities. It also gives me a sufficient number of frames to capture the key critical moment images I want. I tried to take my Pre-shutter frames down to 10 or 12, but my response time just wasn’t quick enough. Using 18 Pre-shutter frames created too much image waste.
Why don’t you program your E-M1X to capture any post shutter images?
With small birds in flight there is simply no reason for me to want any post shutter frames. The subject bird would have exited the composition long before those post shutter frames were captured.
I could program some post shutter frames and press my shutter release earlier in the Pro Capture H run. All this would do is generate more early frames that would not show much actual subject movement in them. These types of images would not be particularly usable and would waste my available buffer space, and cause more work in post deleting these files.
My standard Pro Capture H settings for small birds are 15 Pre-shutter frames and 15 for Frame Limiter. There may be situations where I may change this when photographing larger birds if I was planning to pan with the bird after it launched into flight. Using the 15/15 settings allows me to shoot a number of successive Pro Capture H runs while still maintaining fast image processing to my UHS-II memory cards, and not filling the buffer of my E-M1X.
Pro Capture in reverse.
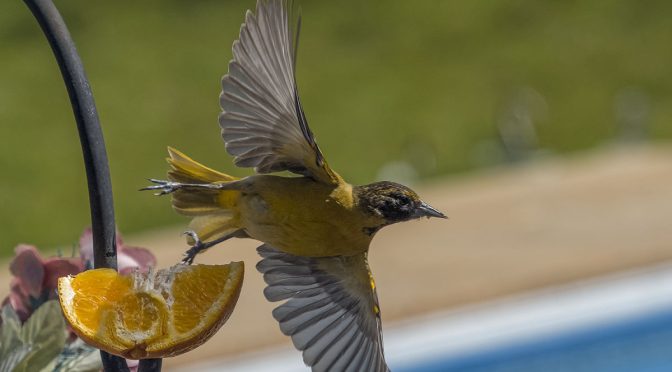
Let’s have a look at a sample run of images illustrating Pro Capture in reverse. These photographs are of a female Baltimore Oriole launching into flight from an orange we had mounted on a shepherd’s hook in our backyard. These images were shot through my kitchen window. All photographs are shown as 100% captures without any cropping.
NOTE: Click on images to enlarge.

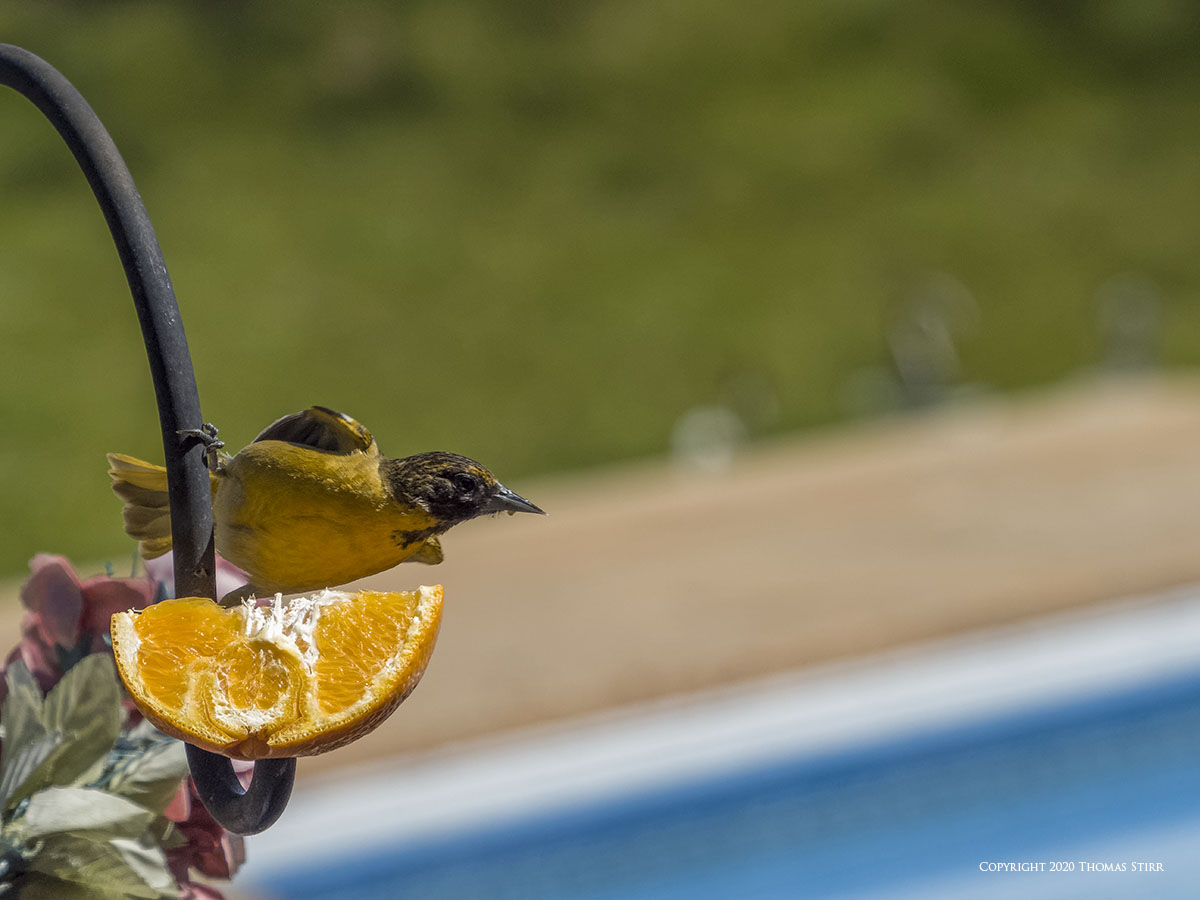
The frame above illustrates when I actually fully depressed the shutter release on my E-M1X. We can see that the oriole had already left the composition.
Now, let’s look at four earlier photographs to arrive at the frame where I made the mental decision to fully depress my shutter release.


As the Baltimore Oriole was starting to leave the frame in the photograph above, is the moment at which I decided to fully depress my shutter release. It took five frames for me to actually complete that brain to hand response, or a total of 1/12th of a second.
We’ll now have a look at the middle 5 frames of our Pro Capture in reverse image run. This mid section of a Pro Capture H run is where I would intend to capture all of my potential ‘money shots’.

Without the clipped wing the image above could have been a potential keeper.


This is the ‘money shot’ out of this Pro Capture in reverse sequence. Beautiful wing extension. The bird is nicely framed in the composition. Imagine this same pose with the Baltimore Oriole leaving a tree branch in a more natural setting.

Frame 6 of our Pro Capture in reverse image run shows our subject bird just as it is taking flight. Depending on wing position this moment can often yield an appealing image, although not in this instance.
The first 5 frames of our Pro Capture in reverse image run are simply lead ins to the potential ‘money shots’. Sometimes these initial images can be usable if part of the intent of a photographer is to capture a bird’s launching into flight body movements.


These last 5 photographs of our Pro Capture in reverse series are not particularly appealing. These demonstrate why I don’t typically program my E-M1X with any post shutter release frames. As soon as a small bird has executed the desired action, I fully depress my shutter release, confidently knowing that I have the action images I want.
It is important to mention that the number of potential ‘money shots’ with a Pro Capture H image run is directly affected by your proximity to a subject bird and its perched position. The tighter in you are to a bird, the fewer the number of potential ‘money shots’ that will be created. The upside is that the subject bird will fill more of the frame so you can avoid cropping.
A bird perched on an angle (like the Oriole in this sample image run) will tend to take flight faster with more abrupt wing movements when compared to a small bird launching from a typical standing position. The number of potential ‘money shots’ will typically be higher when photographing birds taking flight from a normal standing position.
Technical Note:
Photographs were captured hand-held using camera gear as noted in the EXIF data. Image were produced from RAW files using my standard process.
How you can help keep this site advertising free
My intent is to keep this photography blog advertising free. If you enjoyed this article and/or my website and would like to support my work, you can purchase an eBook, or make a modest $10 donation through PayPal. Both are most appreciated. You can use the Donate button below. Larger donations can be made to tom@tomstirr.com through PayPal.
Word of mouth is the best form of endorsement. If you like our website please let your friends and associates know about our work. Linking to this site or to specific articles is allowed with proper acknowledgement. Reproducing articles, or any of the images contained in them, on another website or in any social media posting is a Copyright infringement.
Article and images are Copyright 2020 Thomas Stirr. All rights reserved. No use, duplication or adaptation of any kind is allowed without written consent. If you see this article reproduced anywhere else it is an unauthorized and illegal use. Posting comments on offending websites and calling out individuals who steal intellectual property is always appreciated!
Setting the Pre to 15 and capping it at 15 for the H leaves you with no post frames, if you have a fast bird darting from standstill I would expect the 15 frames will remain close to the original takeoff point and will deprive the shooter from the possibility of seeing some wing’s spread in the background that could be cropped nicely away form the jumping point, we have to keep in mind the amazing 20 mega sensor on MFT is equivalent to 40 mega FF sensor, plenty of lee way to crop and get in mid air posing beautiful shots…
Hi Mohammad,
Everyone needs to use Pro Capture H settings that suit their particular needs. Using settings of 15/15 may not work for everyone. I fully depress my shutter release just as the bird is leaving the frame of my composition, so I no problems capturing very interesting images of the bird in full flight. I typically do not have many frames at all of the bird in a crouched or launching position. It really depends when a photographer chooses to fully depress their shutter release. If you look at other articles under the Pro Capture heading on the menu, you’ll see a wide range of examples of my Pro Capture H results.
Tom
I really like your idea of thinking in terms of elapsed time, i.e. pre-capturing for 1/4 second before my full shutter depress and 0 seconds after. With that concept in mind, it’s easy to come up with equivalent frame count settings for different frame rates. For example, if I’m shooting ProCapture L at 15 fps, then the same 1/4 second reaction time translates to 4 Pre-shutter frames instead of 15.
Hi Colin,
Thanks for adding to the discussion!
As you know, Pro Capture is a very powerful technology that allows a photographer to customize it to their specific needs. When I use Pro Capture L I have my Pre-Shutter Frames set to 10 and my Frame Count Limiter turned off. I typically only use Pro Capture L when panning with birds-in-flight and waiting for an interesting mid-air movement of some sort… a change in direction, switching to a dive or a hover etc. I turn off my Frame Count Limiter as I may want to continue capturing images after the start of a unique in-flight movement as I pan with a bird-in-flight.
Tom
Thanks for your thoughtful reply. In terms of elapsed time, I think your response translates to wanting to capture about 1/2 second-worth of Pre-Shutter images when panning birds in flight and a potentially unlimited number of post-shutter frames, as long as the bird continues to make interesting moves and you are able to track it. Makes sense. I hadn’t even considered the possibility of setting the Frame Count Limiter to “Off”.
Hi Colin,
You are spot on with your assessment that I would be planning to capture about a 1/2 second of Pre-Shutter frames, then continuing to pan with a bird-in-flight if it kept giving me some interesting wing and body positions. I arrived at these settings when considering how I’d need to set up my E-M1X to capture a tern doing a mid-air shake.
Once I’m able to get out in the field again (we’re in the early stages of another 4 week COVID-19 lock down) I will likely use Pro Capture L as my standard approach with birds-in-flight. That way I can pan with a bird and if nothing ‘special’ happens I don’t have to commit any shutter count or memory card space.
Tom
Another super informative article, sir. Question- when anticipating the bird taking flight do you simply half press the shutter release, perhaps repeatedly as the bird keeps delaying the launch? If found some birds have strong “tells” and others not so much. The not so much variety have me half pressing the shutter release for long periods. What’s your approach?
Thanks a bunch!
Hi Dan,
I’m glad you found the article informative!
I typically half-depress the shutter numerous times, especially if a bird has moved its position, or signalled a flight launch then changed its mind. It is important to keep in mind that the first frame sets AF for the balance of a Pro Capture H image run. So, even if a bird has moved forward or back an inch or two it can affect how sharp images are once a bird takes flight.
Another potential issue is battery drain. The E-M1X is excellent in terms of battery life, but half depressing the shutter and cycling hundreds of images through temporary memory does take power.
Using the 15 Pre-shutter frame setting described in the article allows me to refresh images in temporary memory in only 1/4 of a second. So, even if I do this fairly rapidly I seldom lose the image opportunities… I keep my lead frame in focus… and it saves some battery power.
Tom