
As photographers we have many software choices available to us. Over the years I’ve had suggestions from readers about the advantages of moving to new, or different, programs. This article discusses the potential advantage of staying with software programs that we already own and have some experience using.
Just like buying camera equipment, our software choices are intensely personal ones. One photographer’s preferred software may not be a good fit for another photographer. And, the files from a specific camera may respond better in one program than another.
I don’t think it makes that much difference which software choices each of us makes. There are a lot of different routes that will take us to our desired destinations.
In no way should this article be interpreted as me suggesting what other folks should do in terms of which programs to use. Two of the three software programs that I use are woefully out-of-date anyway.
For the past number of years I’ve been using a combination of three different software programs: DxO PhotoLab 2 (and earlier versions), Photoshop CS6 and an old copy of the Nik Collection. The only one I update when needed is DxO PhotoLab.
Through trail and error over the years I’ve developed some understanding of what my software programs will do, and when specific features may come into play. I’m still discovering how to use my existing programs more effectively and efficiently, so I have no interest in buying something new and starting the process all over again. I’m not sure my old porous brain would be up to the challenge!
I have three pairs of images to share in this article. Each pair consists of an out-of-camera jpeg and a completed file that was processed using the RAW version of the image.
NOTE: Click on images to enlarge.

I always shoot in RAW + Jpeg Fine, even though I seldom use the jpegs for any projects or articles. Since I store all of my image files in Windows Explorer, having the jpegs makes initial sorting/culling fast and easy. Using the jpegs also helps me choose which images I’d like to work on in post. The three images in this article all suffered from some haze to varying degrees.
You can see in the jpeg above that there are some faint details in the sky that can be retrieved. The rocks abutting the road have a lot of character but lack ‘pop’, and the cliffs in the distance could use a bit more definition. This indicated that I would likely need to use the Pro Contrast tool in Color Efex 4 (part of the Nik Collection) to deal with the issue with the rocks abutting the road. The sky details would likely need some burning and perhaps some adjustment with the Polarization function in Nik.

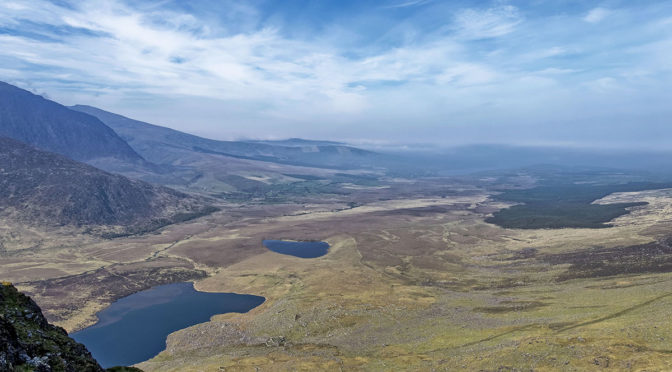
The three photographs in this article were all captured in Ireland last year. As such they were pretty simple for me to process in DxO PhotoLab 2. Last year I created a custom preset in DxO PhotoLab 2 for my “Ireland landscape” images.
So, my first step was simply to open up each image in DxO PhotoLab 2, and apply that preset. I then used the Spot Weighted DxO Smart Lighting tool with each image to adjust the dynamic range.
I don’t remember if I used DxO ClearView Plus or not with these images. If I did it would have been at a modes level and not more than at a 20 strength. I then exported a DNG file into CS6.

Like other photographs, I would have done some simple slider adjustments in CS6. These would have included Contrast, Highlights, Shadows, White and Black sliders. I also would have applied Clarity and Vibrance to help give the images a bit more definition.
Everyone deals with their images in their own way. When I have some haze issues I tend to focus on creating more contrast and more density with the colours in the photograph. Compared to a ‘standard’ image without haze, I would add more black than normal and brighten the whites to just before the ‘blown out’ stage.

After opening each image I then made some curve adjustments in CS6. These would typically be Enhance Monochromatic Contrast or Enhance Per Channel Contrast. At this point I would decide if I was going to use the Burn tool in CS6 to help bring out more details in the sky… which I did with each of these photographs. I usually only adjust the midtones in the sky.

At this point the images would be getting close to a finished state, so it would be time to use Pro Contrast and Polarization in Color Efex 4. Depending on how the files shifted when using those two functions I may have to go back into CS6 to do some minor hue adjustments.

At this point each of my files would look a little dark. I do this purposely throughout my approach in post with Nikon 1 files as part of my “TAB” process (i.e. thicken, adjust, brighten). My final adjustment in CS6 would be with the brighten tool… typically in the 10-20 range depending on the image.
I appreciate that these steps may seem a bit convoluted as I jump back and forth between programs. Including burning in the sky, all of the other adjustments, and computer processing time, each completed file takes about 3-4 minutes.
Regardless of our software choices, the key is for each of us to be able to recognize what an image needs when we initially examine it. For me, that is best done by looking over an out-of-camera jpeg. Other folks may prefer to open up a RAW file to develop their game plan.
The software that we use isn’t nearly as important as having a specific game plan for our photograph before we start working on it in post. Unless we have a predetermined game plan for each image we risk spending a lot more time in post than is probably needed.
If you enjoyed the photographs in this article you may want to check out our Images of Ireland eBook. It is available for purchase and download at a cost of $12.99 CDN.
Technical Note:
Photographs were captured hand-held using camera gear as noted in the EXIF data. All images were produced from RAW files using my standard process.
How you can help keep this site advertising free
My intent is to keep this photography blog advertising free. If you enjoyed this article and/or my website and would like to support my work, you can purchase an eBook, or make a modest $10 donation through PayPal. Both are most appreciated. You can use the Donate button below. Larger donations can be made to tom@tomstirr.com through PayPal.
Word of mouth is the best form of endorsement. If you like our website please let your friends and associates know about our work. Linking to this site or to specific articles is allowed with proper acknowledgement. Reproducing articles, or any of the images contained in them, on another website or in any social media posting is a Copyright infringement.
Article is Copyright 2020 Thomas Stirr. Images are Copyright 2019 Thomas Stirr. All rights reserved. No use, duplication or adaptation of any kind is allowed without written consent. If you see this article reproduced anywhere else it is an unauthorized and illegal use. Posting comments on offending websites and calling out individuals who steal intellectual property is always appreciated!
I’m constantly tempted by new photo editing software. Your results are a good reminder that, if you know what you’re doing, it’s not always necessary to have the latest and greatest tools.
Thanks for adding to the discussion Colin!
Tom
1) Sorry if this is a dumb question, but if you were buying software today, would the references above to CS6 now be references to Photoshop?
2) I imagine you have checked out DxO Photo Lab version 3 which was recently released. Could it be used in place of CS6 in your workflow?
Hi Kevin,
1) No such thing as a dumb question! Your first point made me realize that I should have stated Photoshop CS6 in the article to provide better clarity. I have made this change… thanks for the help! I believe the boxed version of Photoshop CS6 that I use has been replaced by a subscription to Photoshop CC which is now a cloud based program.
2) PhotoLab 3 would not replace CS6 in my workflow. While I use DxO PhotoLab as my main RAW processor I find that there are some types of adjustments that I like doing much more in CS6. I ‘double bump’ highlights and shadows with all of my Nikon 1 files and often with my Olympus files as well. I can sometimes be very aggressive when doing this. For example I may make some basic level adjustments in PhotoLab with these factors (i.e. keeping these adjustments in the -20 to +20 range in PhotoLab) then occasionally push Nikon 1 highlights to -100 and shadows to +100 in Photoshop. Only using PhotoLab would not give me the same degree of overall adjustment. I’ve never liked how my Nikon 1 files react in PhotoLab when I push them too hard in that program. As a result I tend to keep my adjustments in PhotoLab to moderate levels and make additional adjustments in CS6 and the Nik Collection. Overall I need to make far fewer adjustments to my Olympus files when compared to Nikon 1.
The primary reasons I use DxO PhotoLab as my main RAW processor are the program’s automatic camera/lens adjustments, PRIME noise reduction, and Spot Weighted DxO Smart Lighting. I use these adjustments with all of my files. I also create custom presets for each of my cameras based on subject matter. Sometimes these presets include lighting conditions. Other adjustments that I regularly use in PhotoLab include DxO Viewpoint, Microcontrast, and Horizon. From time to time I may use DxO ClearView Plus to a modest degree. Other than these adjustments noted there’s not much else that I ever use in PhotoLab.
I tend to be in and out of PhotoLab very quickly with my files. If I find that my RAW files need more than these base adjustments in PhotoLab it usually indicates that I did a poor job capturing my image upfront. Rather than waste time on it I usually just move on to another file.
Tom