
Before getting into this short article, I’d like to thank one of our readers, William Jones, for sharing his experiences with me and being the creative spark for this article. Using the Spot Weighted tool in DxO Smart Lighting when working with landscape images is something I hadn’t really considered in the past.
NOTE: Click on images to enlarge.
Since the Spot Weighted tool was promoted by DxO as something that could enhance facial details in a photograph I didn’t originally give this feature too much thought. It wasn’t until William shared his success using this tool with landscape images that I became intrigued and investigated it further.
This article is just a simple example using one landscape image. I wanted to give readers a quick peek at this tool. After I’m more familiar using it I may write a more detailed follow up article.
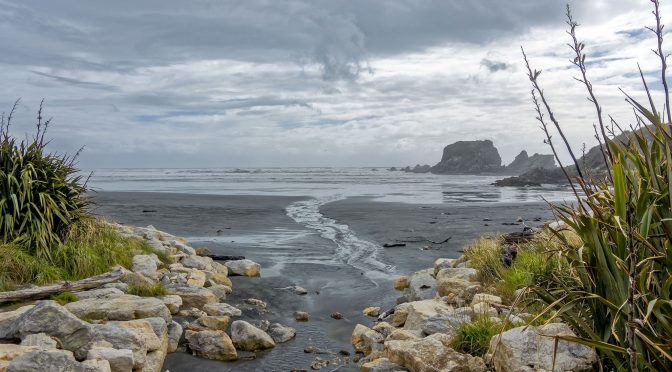
First let’s look at an out-of-camera jpeg, complete with the crooked horizon. It was captured hand-held during quite inclement weather at Cape Foulwind on the South Island of New Zealand.

It was captured with a Nikon 1 J5 fitted with a 1 Nikon 10-100mm f/4-5.6 zoom lens @ 10mm, f/5.6, ISO-160, +0.3 step, 1/640.
You can see the dark shadows on either side of the image and the rather dull, grey sky really make this jpeg look quite flat and lifeless. The out-of-camera jpeg just couldn’t capture the somewhat ominous feeling of the moment, nor the colour details in the vegetation.
The next image was produced from the corresponding RAW file. After exporting the file out of OpticsPro11 into CS6 I used the following slider settings:
Contrast +10
Highlights -100
Shadows +65
Black -20
Saturation +20
Clarity +15
I also used the ‘Enhance Per Channel Contrast’ Curve setting in CS6, After a couple of small tweaks in Nik Suite the image came out as follows…

This was a noticeable improvement over the out-of-camera jpeg and was much closer to the actual moment when the image was captured. It still lacks a bit of pop from the foliage. I could have gone into Hue adjustments into CS6 and worked on those, as well as doing some time consuming spot adjustments to lighten up areas of the images. Instead I wanted to see what the Spot Weighted tool would do in this situation.
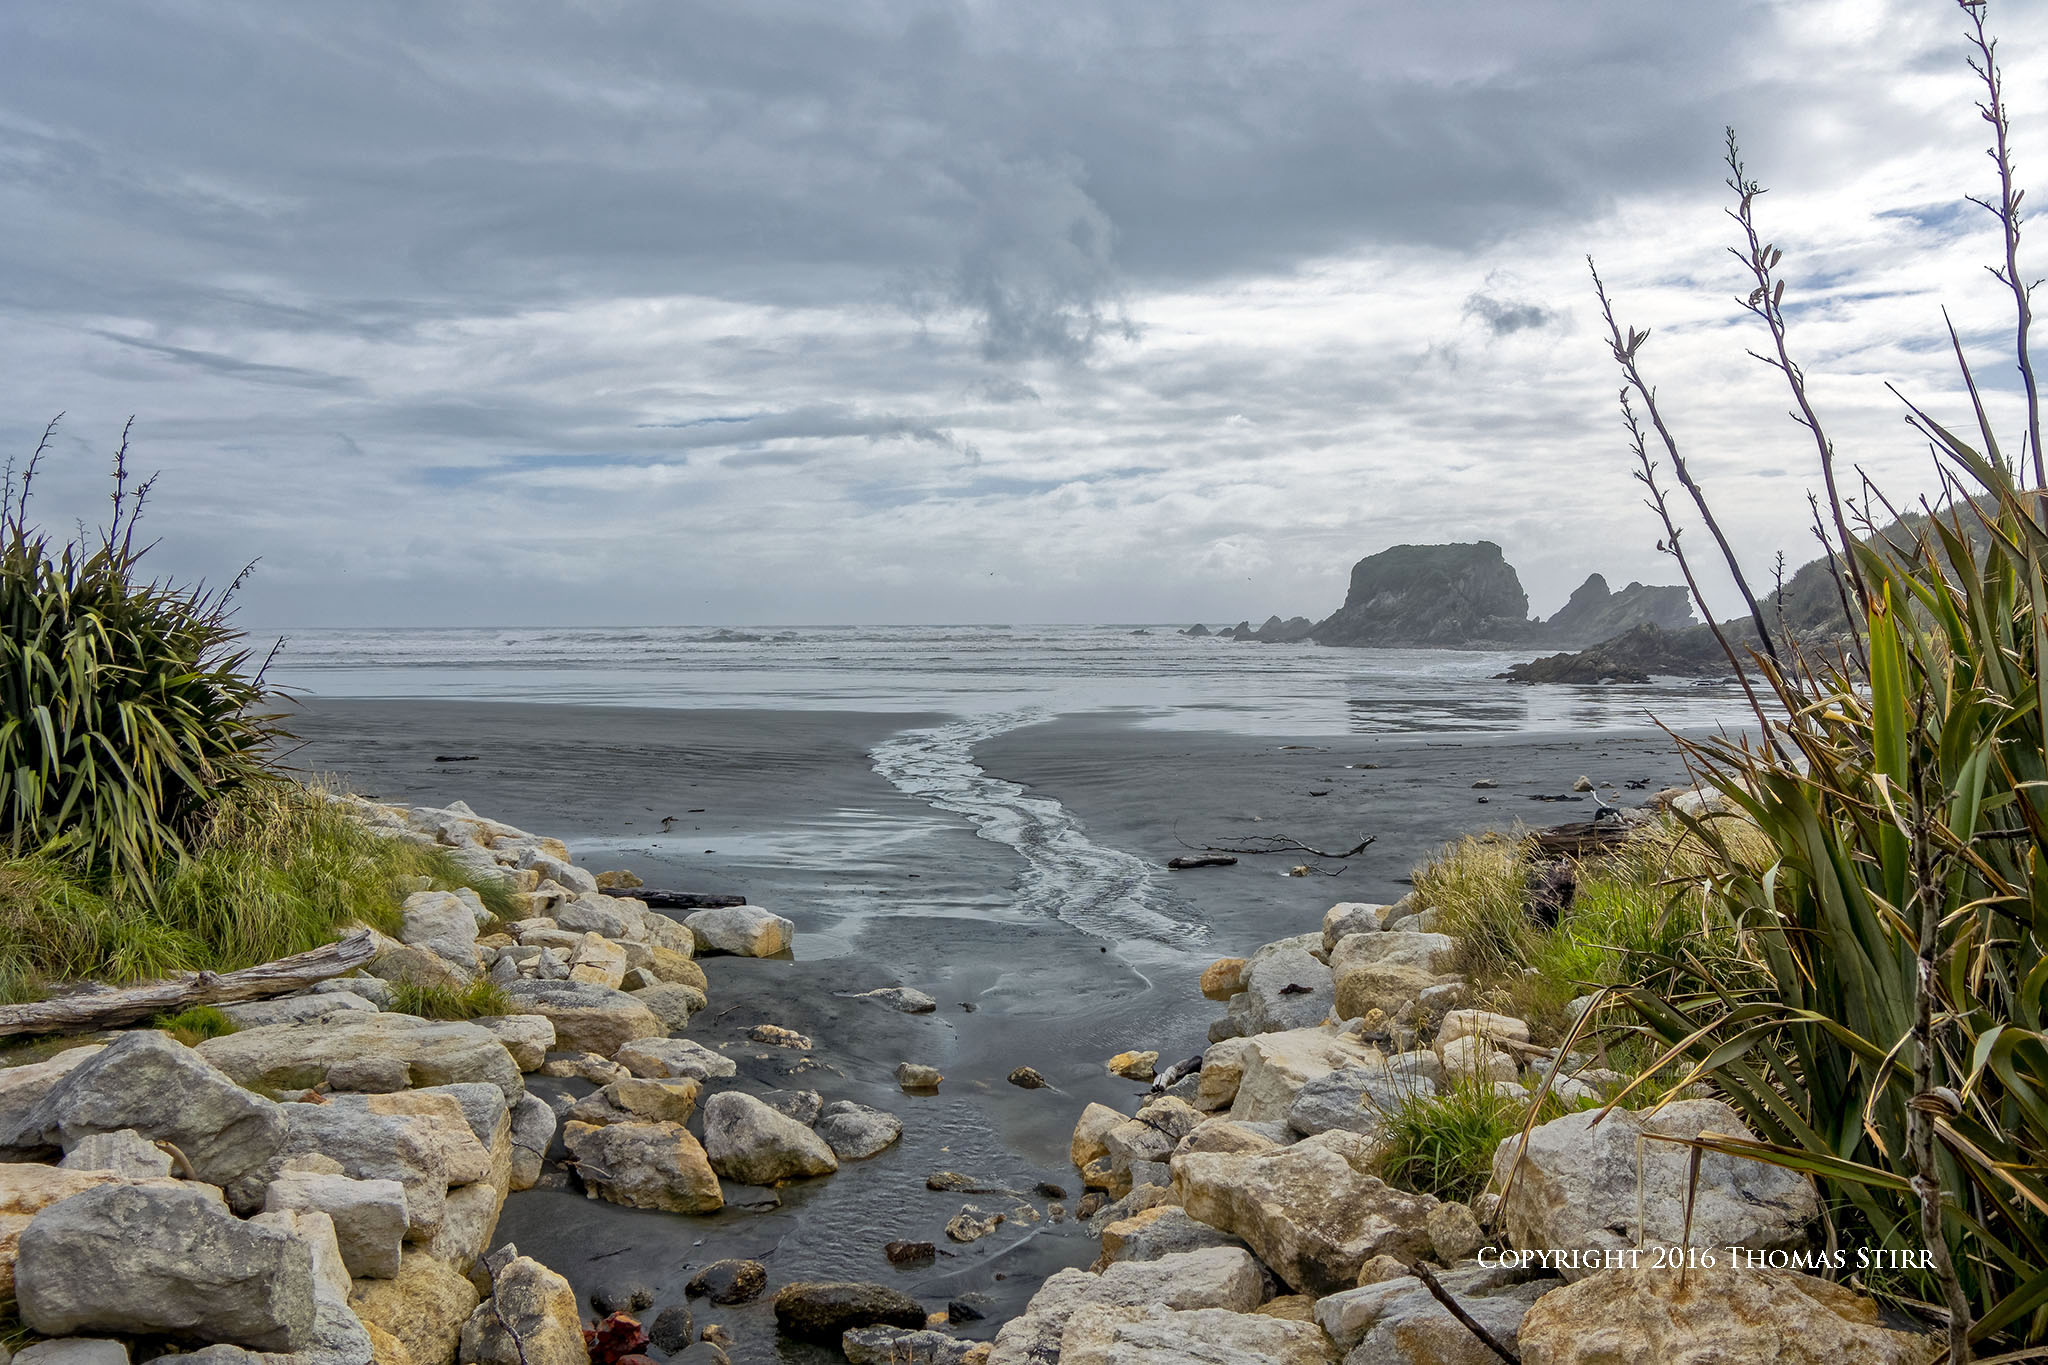
I ran the same RAW file through the entire process again, but this time I used the Spot Weighted tool in DxO Smart Lighting. I did this by creating a small box with the tool and placed it over the dark foliage on the right hand side of the image. I then used the ‘Medium’ setting (a custom slider is available to use with this adjustment). I then applied all of the same adjustments in CS6, except the Black slider. I was able to be more aggressive with it and took it to -65 from -20. I used the same Curve adjustment in CS6 and identical tweaks in Nik Suite. Here is the resulting image…

This version of the image is closer to the moment. There is more colour in the foliage and the sky is a bit more ominous and detailed.
I did one final tweak to the image, taking the Brightness to +15 in CS6 which helped give it a bit more life and pop.
Obviously this is just one quick example of using the Spot Weighted DxO Smart Lighting tool, but I can say that I will be experimenting with this quite a bit more as I really like the additional flexibility that it helps create with high contrast RAW files. Especially since it is so simple and quick to use.
My intent is to keep this photography blog advertising free. If you enjoyed this article and/or my website and would like to make a modest $10 donation through PayPal to support my work it would be most appreciated. You can use the Donate button below. Larger donations can be made to tom@tomstirr.com through PayPal.
Article is Copyright 2017 Thomas Stirr. All images are Copyright 2016 Thomas Stirr. All rights reserved. No use, duplication or adaptation of any kind is allowed without written consent. If you see this article reproduced anywhere else it is an unauthorized and illegal use. Posting comments on offending web sites and calling out individuals who steal intellectual property is always appreciated!
Sometimes I see a photo online that I like but there is just something missing, and then I think, I bet is photo would be a winner with image editing like Thomas Stirr can do.
Thank you for your very generous comment Joni!
Tom
Thank you Thomas. I use Dx0 10, so your article on the Spot Weighted tool helps me to evaluate whether to upgrade.
May I ask why you also used CS6? I think you could get an equivalent result using only Dx0 11
Hi Mike,
I use three programs in my post process. OpticsPro 11 is my main RAW processor, I then export a DNG file to CS6 for some additional work, then often finish my files off in Nik Suite. I like the added control with CS6 sliders as well as some of the adjustments such as clarity. With my Nikon 1 files I ‘double bump’ the highlights, taking them down initially in OpticsPro, then again in CS6. I do not like the level of control in OpticsPro for these type of fine adjustments. Plus, there are also some functions that I really like in Nik Suite such as the polarization function which works as a plug in to CS6.
Tom
Thank you for your reply Thomas. It is interesting to see the many different approaches to post-processing. Keep up the articles on Dx0.
Thanks
Mike
You’re welcome Mike! When it comes to post processing there are many roads that lead to the same destination!
Tom
Hi Tom,
As a DxO-OP (now PL) user myself, I was curious to see in this article that you seem to be using OP/PL only as your RAW processor (and, I’m sure, for PRIME noise reduction) – and then you go straight to CS6 to apply adjustments.
I note your comment, in reply above, you say you; “like the added control with CS6 sliders as well as some of the adjustments such as clarity”.
Q: Is it just the “added control” you like in CS6 – or is it that same/similar controls in OP/PL don’t achieve what you want them to ?
Note: If you’re meaning you’d like finer control over movement of OP/PL sliders then try this; Click on the slider (to get focus) – then you can use up/down arrow keys to make very fine increments/decrements.
Also, my understanding is that OP/PL’s “ClearView” control does a significantly better job than CS6’s “Clarity” … or, is that not so (for you, at least) ?
Regards, John M – Melbourne, Australia
Hi John,
The short answer to your question is that although I love OpticsPro/PhotoLab to the point that I would not buy a camera that wasn’t supported by the program, I don’t necessarily like all of the OP/PL adjustments and how my files react to them.
I guess a lot of this is personal preference and how different people ‘see’ adjustments made to their files.
I have quite a few custom presets that I have programmed in OpticsPro 11. These tend to be subject and lighting specific. Typically my files have one of my custom presets applied to them in DxO. After that, I make some additional adjustments in CS6, then finish my files off with the Nik Collection.
Although I love OpticsPro I just don’t like taking my adjustments beyond certain levels in that program as I find it gets too aggressive for my tastes. I simply don’t like how my files look when they are pushed too far in OpticsPro (at least to my eye).
For example, I would almost never take highlight or shadow adjustments in DxO past the -20/+20 range, as I don’t like how my files react beyond those levels. Since I always do need to make further adjustments with my Nikon 1 files with shadows and highlights beyond the +20/-20 DxO range noted earlier, I make those further adjustments in CS6.
I find ClearView is a very different adjustment than Clarity… to my eye it is much more aggressive and I don’t like using it very much.
In the past, I used Clarity quite often with my Nikon 1 V2 files. Since I no longer use my V2’s for still photography I almost never use Clarity any more. I recently made a decision to stop using Clarity with my J5 files. I should note that I approach my Nikon 1 files shot with Aptina sensors differently that those shot with the J5’s BSI sensor.
Tom
Thank you, Tom … Gotta say, I’m very impressed with the speed and detail of your responses !
John
Thanks John – I’ve always believed that if a reader takes the time to post a comment, I should take the time to respond.
Tom
That is one heck of a difference between the out-of-camera JPG and the final product. I like how even the color of the stones is now apparent. I found it easy to be on image 1 and use the back arrow to jump to the final image, and then the forward arrow to go back to image 1, making the comparison of the differences easy to see. Thank you for the inspiration credit. WEJ
Hi William,
Thank you for the creative spark – much appreciated! I also really like how the details in the rocks came out – they really help to give the image some interest.
Tom