
This article features a photograph of a squirrel at ISO-16000. The RAW file was processed using both DxO PhotoLab 4 DeepPRIME and Topaz Denoise AI.
The objective of the article is not to suggest that we should go out and use very high ISO values haphazardly. This is not recommended as image quality will suffer as a result.
From a reality perspective, there may be occasions when we have no choice but to use a high ISO value or miss a photographic opportunity completely. So, rather than miss our shot altogether, I’m suggesting that we capture it, then do the best we can with post processing. This applies regardless of the camera equipment and format that we may happen to own.
I appreciate that there has been a lot of recent debate about which noise reduction program is best. Some of these discussions can get needlessly animated and sometimes aggressive. I find these debates rather pointless.
Fact is, each of us should use the software with which we are most comfortable, and which can best help us create images that meet our expectations.
As regular readers know, I hate working in post. If I can’t get an image to look the way I want after 3-4 minutes, including computer processing time… I usually just move on to a different photograph.
Over the years I’ve come to appreciate and value DxO Optics Pro and its recent iteration as PhotoLab. I use this program as my main RAW processor for all of my images.
I also appreciate some of the functions in my old, out-of-date copies of PhotoShop CS6 and the Nik Collection. So, these programs are also integrated into my process in post. Recently I added Topaz Denoise AI to the end of my process. Using a combination of 4 programs likely appears cumbersome to most people. I find it very efficient as I may only use one adjustment in Nik for example, but it is precisely what I want for a particular image.
That’s not to say that the same effect may not be able to be achieved in another program, or by only using one program. It likely could. My goal is to get from A to Z as quickly as possible. If a particular adjustment is faster, or a bit better in another program that I own, that’s the route I take. Other folks may choose to use a single program. One approach isn’t better than another… just different.
So, It would be good if everyone simply calmed down and stopped trying to convert other photographers to the software program(s) that they happen to use. There are many routes to the same destination. My approach using 4 programs is likely not a good fit for most people.
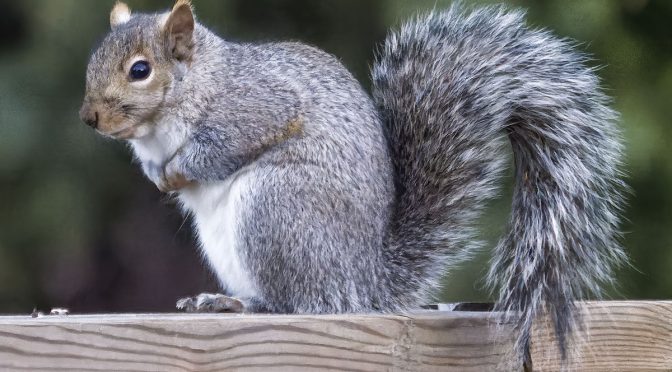
Let’s have a look at a photograph of a squirrel at ISO-16000 that I captured very early this morning. Here is an out-of-camera jpeg, then followed by a 2600 pixel crop resized for web use.

As can be expected we can see a lot of noise, some loss of detail, as well as reduced dynamic range and colour depth with this squirrel image at ISO-16000. These issues are more apparent when we view a 2600 pixel crop.

My first impression when I viewed this out-of-camera jpeg was that it was actually better than I was expecting given that the background in the image was reasonably dark, and that the photograph was captured with a smaller sensor camera. Having said that… it still is not particularly usable as an out-of-camera jpeg.
Let’s have a look at another jpeg. This one was created from the corresponding RAW file.

When running this RAW file through DxO PhotoLab 4 I used one of my custom presets, then increased my typical DeepPRIME Luminance setting from 15 to 40. This removes more noise, but can smudge details a bit more. I figured the trade-off was justified at ISO-16000.

After exporting a DNG file of this squirrel image at ISO-16000 into PhotoShop, I made some very minor adjustments in CS6, including increasing the Vibrance to +15. I find this quick adjustment can often accentuate some colours in the details without me having to spend a lot of time mucking around with individual hues. We can see the effect of this quick adjustment in the face of the squirrel. I made a single adjustment in the Nik Collection, then applied Topaz Denoise AI using some Auto settings.
I was in and out of post very quickly with this squirrel at ISO-16000 photograph. The result was an image that could be acceptable for social media postings or perhaps as a smaller sized print.
When we’re faced with using using a high ISO value I suggest capturing your photograph as best you can, and if possible don’t under expose a high ISO image. This can make noise reduction more difficult. Use whatever software works best for you to process your RAW file in post.
Rather than take an ‘either/or’ attitude with noise reduction programs, using a combination of a couple of programs may prove beneficial. Experimentation with high ISO images can help us be creative in post and leverage the software we use to its best effect.
While we are typically most concerned about noise reduction with high ISO value images, it is equally important to consider edge acuity. Using whatever adjustments are available in our software that can have a positive effect in this regard are worth investigating.
Technical Note
Photographs were captured hand-held using camera gear as noted in the EXIF data. Images were produced from RAW files using my standard process.
How you can help keep this site advertising free
My intent is to keep this photography blog advertising free. If you enjoyed this article and/or my website and would like to support my work, you can purchase an eBook, or make a modest $10 donation through PayPal. Both are most appreciated. You can use the Donate button below. Larger donations can be made to tom@tomstirr.com through PayPal.
Word of mouth is the best form of endorsement. If you like our website please let your friends and associates know about our work. Linking to this site or to specific articles is allowed with proper acknowledgement. Reproducing articles, or any of the images contained in them, on another website or in any social media posting is a Copyright infringement.
Article and images are Copyright 2020 Thomas Stirr. All rights reserved. No use, duplication or adaptation of any kind is allowed without written consent. If you see this article reproduced anywhere else it is an unauthorized and illegal use. Posting comments on offending websites and calling out individuals who steal intellectual property is always appreciated!
I wouldn’t have tried that, but I guess I should in the future!!!
Hi Jim,
I’ve always enjoyed pushing my gear to see what will happen. Sometimes it works… and sometimes not!
Tom
Very well done, Tom.
Can you share what you did in NIK, and your settings in De-Noise?
Warm regards,
Bill
Hi Bill,
Since I had lost some details by using DeepPRIME Luminance set to 40, I went into Viveza 2 and set Structure to 20. That was the only thing I did in Nik. With Topaz Denoise AI I used the Denoise function and clicked on ‘Auto’. When I tried to replicate this again so I could answer your question, it gave me a Remove Noise setting of 11 and an Enhance Sharpness setting of 41.
Typically when I use Denoise AI I start by clicking the ‘Auto’ setting, then examine my photograph. If everything looks OK I just let it go. I do have to adjust the Noise or Sharpness settings on a reasonably frequent basis depending on how the image has reacted.
As I’ve gained more experience with my E-M1X I’ve learned that my upper limit with ISO is around ISO-16000, as long as I have done a reasonable job with the initial image capture. Other folks may have different experiences than I’ve had, but typically I find it is better for me to use a slightly higher ISO to get a good, balanced exposure, than using a lower ISO setting and under exposing a photograph.
Tom
Thanks very much, Tom!
Always a pleasure to be of assistance when I can Bill!
Tom