
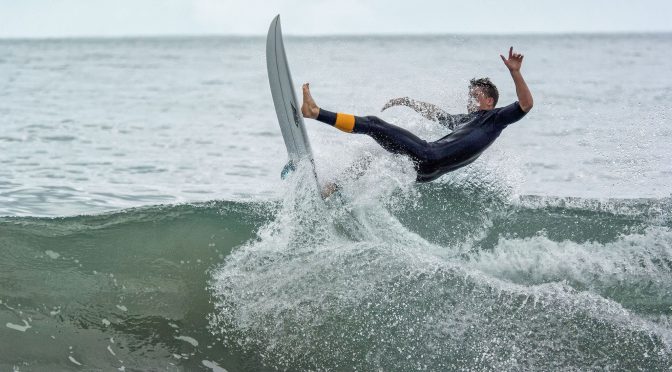
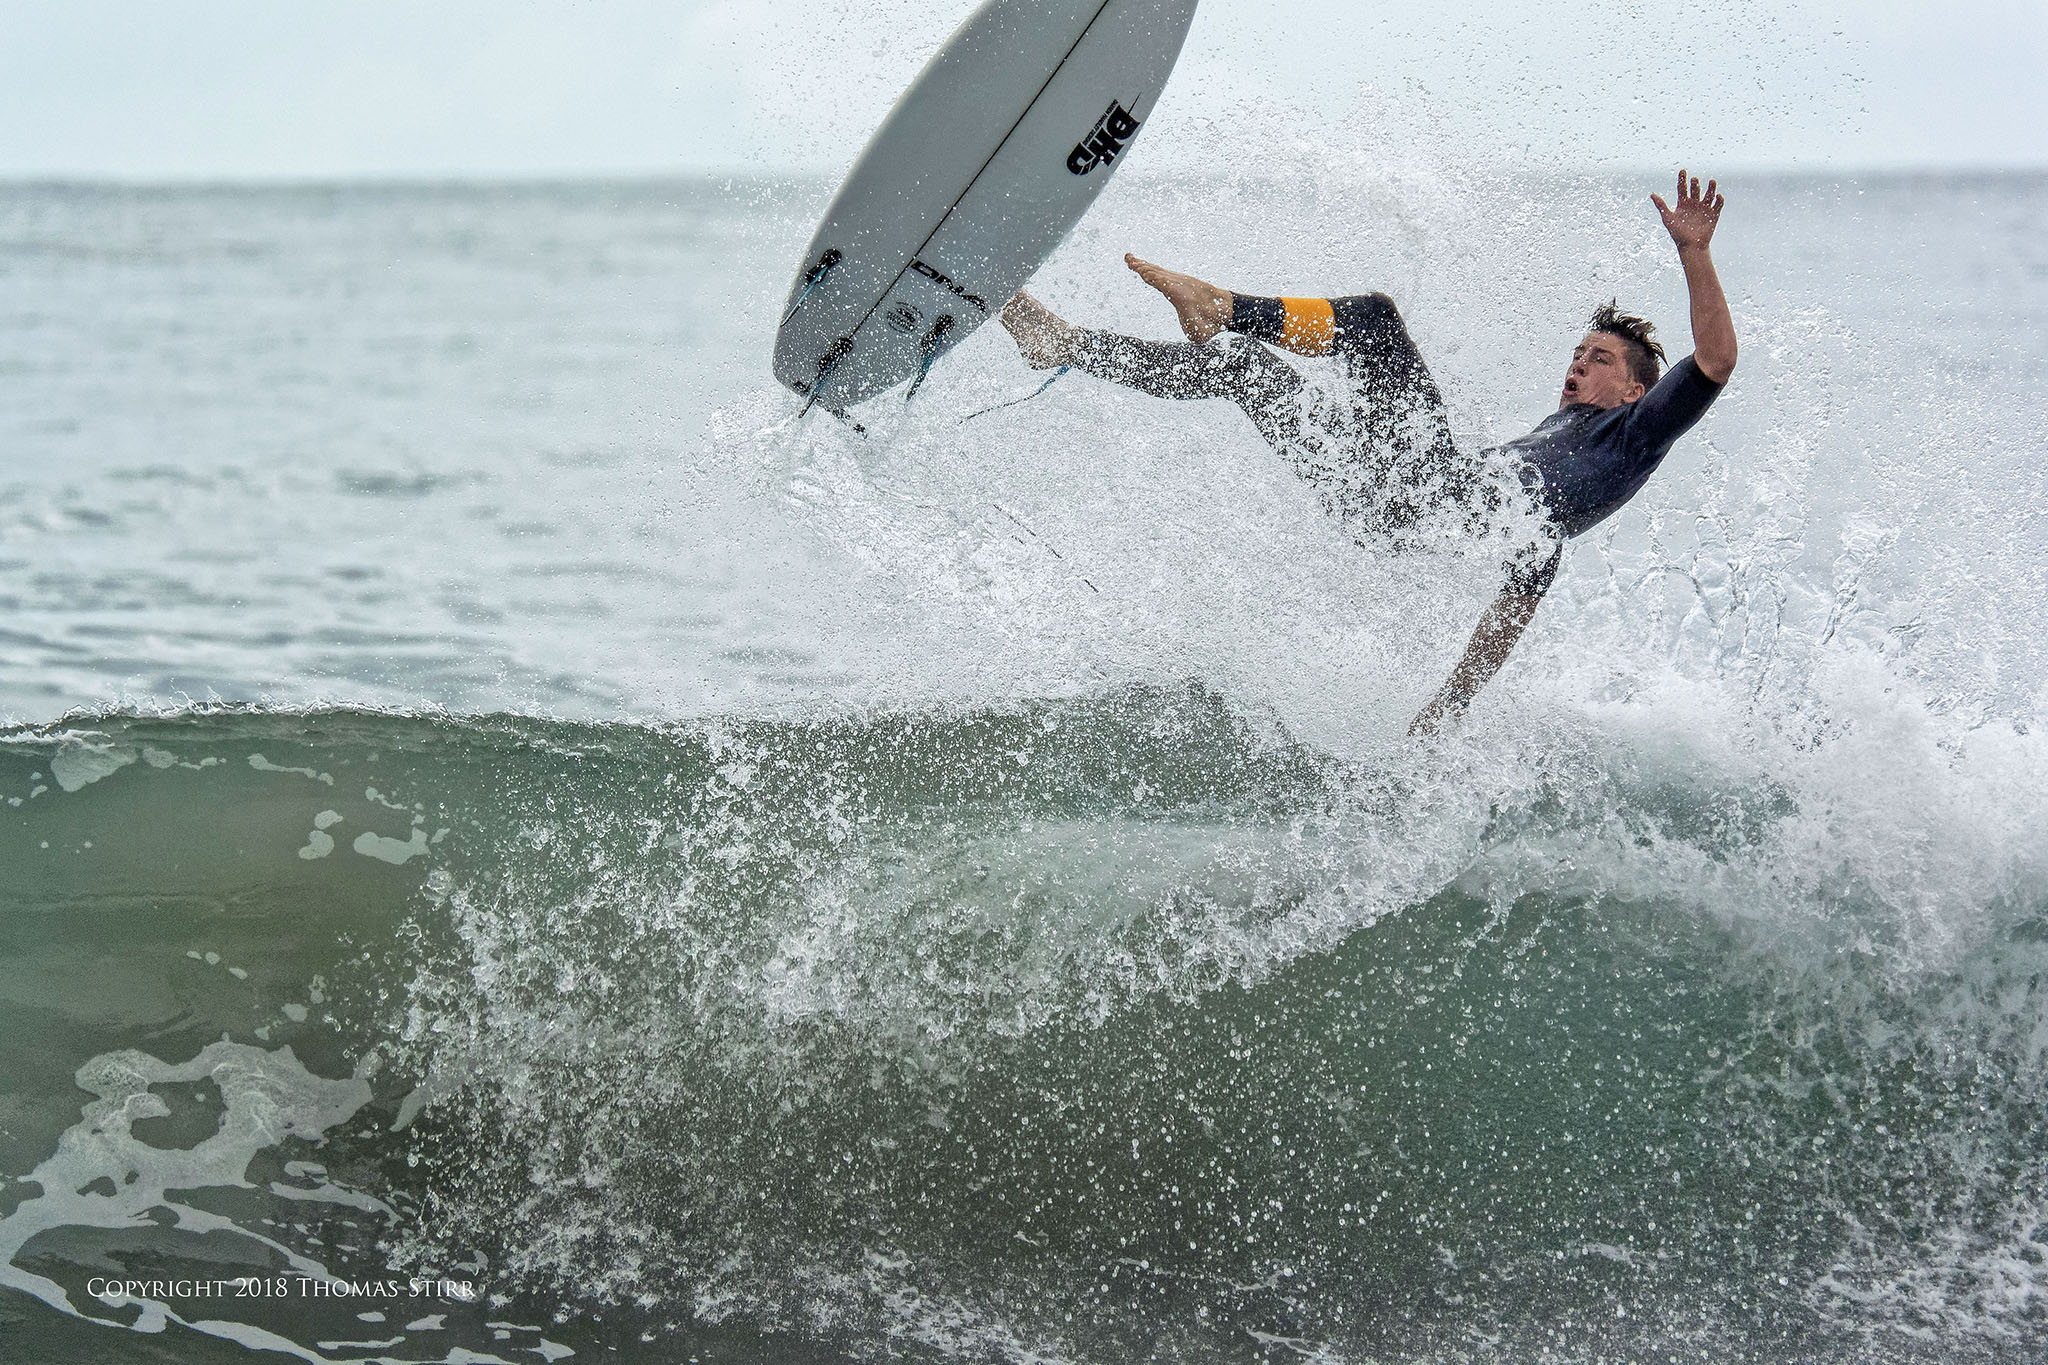
Most of us have had situations where we’ve captured an interesting set of action images but the exposure of the series was less than ideal. This article features a set of surfing images and discusses working with a surfer wiping out in post.
This series of images was captured hand-held with a Nikon 1 V3 fitted with a 1 Nikkor CX 70-300 mm f/4.5-5.6 zoom lens. I shot in Manual using a shutter speed of 1/2500, f/5.6, with an AutoISO setting. ISOs varied from ISO-360 to ISO-200 depending on the frame (ISOs decreased as the series progressed). The images were captured at 300 mm, an equivalent field-of-view of 810 mm. I used Continuous Auto-Focus with Subject Tracking, shooting at 10 frames per second.
All images are shown as 100% captures without any cropping. You’ll notice that I did not correct the horizon as this tended to take some of the action details out of the frame.
Let’s have a look at some comparison images… an out-of-camera jpeg. An uncorrected jpeg made from the RAW file. A jpeg made from the RAW file using standard DxO auto corrections. And finally, a jpeg made from the RAW file after a series of corrections were done in post.
NOTE: Click on images to enlarge.


Let’s state up front that I’m not claiming that the results I achieved were the ‘best possible’ with this series of images. I spent about 3 minutes on each image in post (including computer processing time) as I usually do. From a continuity standpoint I made all of the same corrections to each image in the series. The objective of the article is simply to demonstrate how some basic adjustments can bring an image into a usable state.
Looking at the out-of-camera jpeg I think most of us would agree it would be a bit disappointing to view that result on the back screen of our cameras immediately after capturing an action series.
Viewing an out-of-camera jpeg can indicate the basic strategy that we should use in post processing. When examining the out-of-camera jpeg above we can see that the image looks flat and dull, with muted colours, and a lack of detail in the water. This indicates that much of the work in post will be to draw out the opposing factors in the image i.e. shadows versus highlights, white versus black, and dealing with low contrast issues.
Since there is a person in the image, I used Vibrance rather than Saturation to bump up the muted colours. Vibrance prevents skin tones from becoming overly saturated and looking unnatural.
Here’s a quick summary of what I did to the images in post.
- I enabled DxO PhotoLab auto corrections and used one of my Nikon 1 V3 presets.
- I applied an auto correction for microcontrast in DxO PhotoLab, then exported a DNG file into CS6.
- In CS6 I took Highlights to -50, Shadows to +70, White to +45, Black to -40, and Vibrance to +15.
- I opened Viveza2 in the Nik Collection and applied 6 to Contrast and 20 to Structure.
- I then opened Color Efex Pro 4 in the Nik Collection and used the Pro Contrast Control, taking both Correct Contrast and Dynamic Contrast to 10%.
- My final correction was back in CS6, taking Brightness to +8.
Again, the final results may not have been the ‘best possible’. The adjustments were done to demonstrate how a few, quick changes in post can bring an image into a usable state.
Here is the complete series of photographs of a surfer wiping out…


Before starting any work in post it is important to examine an out-of-camera jpeg or your base RAW file so you can determine an appropriate game plan. Diving right in and making adjustments without having a game plan can often lead to high levels of frustration and image ‘do-overs’.
Technical Note:
All photographs in this article were captured hand-held in available light using Nikon 1 gear as outlined in the article. Most of the images were produced from RAW files using my standard process of DxO PhotoLab, CS6 and the Nik Collection.
Word of mouth is the best form of advertising. If you like our website please let your friends and associates know about our work. Linking to this site or to specific articles is allowed with proper acknowledgement. Reproducing articles or any of the images contained in them on another website is a Copyright infringement.
My intent is to keep this photography blog advertising free. If you enjoyed this article and/or my website and would like to support my work you can purchase an eBook, or make a modest $10 donation through PayPal, both are most appreciated. You can use the Donate button below. Larger donations can be made to tom@tomstirr.com through PayPal.
Article and all images are Copyright 2018 Thomas Stirr. All rights reserved. No use, duplication or adaptation of any kind is allowed without written consent. If you see this article reproduced anywhere else it is an unauthorized and illegal use. Posting comments on offending websites and calling out individuals who steal intellectual property is always appreciated!
If it’s not disclosing too much, I think folks would love to see you do a step by step walk through in PhotoLab and Nik. In any event, great insights and your work is much appreciated.
Hi Preston,
Thank you for you comment and support of my work!
Since I have an unorthodox approach to post processing I’ve never felt that a step-by-step article would be of much value to readers. Plus, I use some old, out-of-date programs in post.
Under the Post Processing heading I have published a wide range of articles. A few of them do have more details in them. You may want to have a look at these two articles as they provide a good basic road map of my thought process:
https://smallsensorphotography.com/working-with-a-sample-landscape-image-in-post
https://smallsensorphotography.com/increasing-landscape-image-impact
I actually use up to four programs when doing work in post. I always start with DxO PhotoLab 4 and do very minor adjustments. These are mainly just the automatic lens corrections as well as a modest amount of DeepPRIME noise reduction and the Spot Weighted DxO Smart Lighting tool. With some images I may add a bit of micro-contrast. I typically don’t use DxO PhotoLab 4 for anything else. I then export a DNG file into PhotoShop CS6.
I probably do more adjustments in CS6 than anything else I use, but even then the adjustments tend to be pretty modest. Mainly just a few tweaks to the main sliders. On occasion I may make the odd adjustment in the Image/Adjustment area. It really depends on the photograph.
If needed I may make one or two quick adjustments using the Nik Collection depending on the photograph. Sometimes I use Nik… and sometimes not at all. I sometimes finish my images in Topaz Denoise AI… but again not all of the time. It really depends on what I see with a specific photograph and what I think it needs.
I apologize that this reply appears spotty at best. My goal with an image is to capture it as well as I can in-camera so I don’t have to spend much time in post processing. I actually hate working in post and view it as a necessary evil! I very rarely do any spot adjustment work in post as I find this type of work tedious. Typically I only spend a maximum of about 3 minutes working with a photograph in post… including computer processing time. If I can’t get a photograph to where it needs to be in that time frame, I usually just move on to a different image and just accept the fact that I didn’t do as competent a job as I could have done with my initial capture.
As I’ve gained more experience shooting with my E-M1X bodies, I’m finding it much easier working with my OM-D files in post as compared to my Nikon 1 files. I often spend very little time working with E-M1X files in post. With the occasional E-M1X image I find that I only need to to the really basic adjustments I mentioned earlier in DxO PhotoLab 4 and I don’t need to do anything else.
I really love the performance of the sensor in my E-M1X as well as the amount of upfront control I have when composing a photograph with my E-M1X bodies.
Tom
Hi Thomas
Thanks for the article & tips.
As a side note, when seeing the first Jpeg on the camera LCD (double checking then with the histogram) I personally would have taken the chance to bump the exposure, as I definitively see underexposure in all thoses shots. Yes I know there is not much latitude in dynamic for those N1 but I always ETTR and apply a lot of highlight recovery in post
Hi Bertrand,
Thanks for adding to the discussion! I agree that the images were underexposed. My V3 simply missed getting the correct exposure. I was shooting in Manual using an AutoISO setting which is typically what I do for birds-in-flight and action type images.
As you noted, Nikon 1 bodies are challenged in terms of dynamic range. When shooting with my V2s or V3s, even when the exposure looks good and balanced, I still double bump the highlights to get my images to where I like them. Perhaps you’ve had more luck using ETTR with Nikon 1 bodies than I’ve had. I’ve never been happy with my images when I’ve tried that in the past.
Tom
Hi Thomas,
Sorry for the late reply, I assumed wrongly that I would receive an email notification of your possible reply.
I suppose to each his own but I always apply positive exposure compensation whatever the camera I use (around +2/3). I’ve come to believe (through my own perception / experience) that all camera makers are very conservative with exposure, maybe to protect jpeg shooters for not burning the highlights, but as a raw player I found quiet easy to retrieve 1 el or more in post. I don’t have one anymore but Olympus offers a (unique it seems) nice option allowing to modify the exposure to the right (or to the left also for that matter) and that’s something really interesting.
As for my Nikon 1, I sold everything several years ago when I saw und understood that Nikon not only made bad choices initially (and not fully correcting them later) and that they were not fully commited (I was right since they abandoned the system). I still regret my V1, if not the best camera out there, it was certainly one of the most beautiful camera I ever had (my own and subjective opinion of course); I’ve mainly switched to Sony APS-C, another league altogether but they are ugly 🙁 they sell like hot cakes so why would they change anyway !
To complete this short note, let me say that you are a very talented N1 photographer. Have a good Christmas
Thanks for the follow up comment Bertrand!
It is always interesting how different people perceive camera gear. I stumbled into the Nikon 1 product line as a second camera for my client video projects. After using it for a while I discovered that it was (and still is) the best system for my business. Since I have always preferred shooting with zoom lenses, even during my full frame and APS-C days, I find the 6.7-13 mm, the 10-100 mm non-PD and the 70-300 mm to be a wonderfully capable and small trio to use.
I think the biggest mistake Nikon made with the Nikon 1 system was the V3. Some of the design decisions in terms of detachable grip and EVF were bizarre in my view and only served to reduce functionality, and added unnecessary costs. The J5 put the system back on track, but by then it was too late.
I also had some concerns that the Nikon 1 system may not be sustained. Many folks like you sold their gear and moved on. I decided to invest in more bodies and lenses to extend the useful life of my system. I suppose many folks perceive me as “that Nikon 1 guy”. I just see myself as a photographer who happens to use Nikon 1.
Tom
I only have PhotoLab. I typically create different presets for each lens and camera combo, and in some cases depending on the circumstances (outside & no flash or inside with flash). I will load the NEFs into folders that correspond with those circumstances, so I can make global changes to similar images, and then just have a few minor tweeks (for example: outside, but the main subject moved into shadow, or is backlite in bright sunshine). I do wish that DxO would offer the Nik Collection as a stand-alone product. In a tough circumstance as above, I would have spent extra time on the first image, including several exports, until I found the right settings, and then have copied those setting to all of the remaining images.
Thanks for adding to the discussion William! Your approach to group files captured under similar circumstances so you can batch process them would be a time saver.
Tom
William said: “I do wish that DxO would offer the Nik Collection as a stand-alone product. ”
Hi William, They do !
Color Efex, Analog Efex, Silver Efex & HDR Efex can all be used as standalone tools … Simply run one of these tools and use its menu option: File/Open images … and off you go.
Perhaps you meant this in the sense that the Nik tools cannot directly read your RAW/.NEF files (?) – – – Tho, you can always use DxO-PhotoLab to simply process your RAW file without applying any of its default corrections, if that’s what you want.
Regards, John – TKA
Hi John,
Does this work with old copies of the Nik Collection, or only the newest version published by DxO?
Tom
I downloaded the trial version last night and am currently experimenting with the Nik Collection. I see that Analog Efec Pro 2; Color Efex Pro 4; HDR Efex Pro 2 and Silver Efex Pro 2 all give me an option to load files directly. However Dfine 2; Sharpener Pro 3 and Viveza 2 do not list a “File” option. Those last three can only be accessed by doing an “Export to program” from DxO PhotoLab. When doing such an export, you can only export to one Nik option at a time; and therefore if you wish to use move than one of those last three options, you will be forced to do multiple exports from DxO PL. Not an ideal situation, however I will be testing to see what I can do/produce. The process will require more time to produce final JPGs, especially if I have to do multiple exports. I will also have to test how well Nik works with JPGs and DNGs. I see a few late nights ahead.
Just a curious thought, Tom:
To save a couple of steps you might have tried using PhotoLab’s Selective-Tone settings, for adjustments to Highlights, Midtone, Shadows & Blacks (instead of transferring to C6) – and PhotoLab’s ClearView tool, to enhance contrast & structure (rather than transferring to Viveza).
Is there a reason you prefer to take these extra steps ?
John
Hi John,
The presets that I have designed in PhotoLab do make adjustments to a range of settings in that program. My PhotoLab presets typically include Highlights etc. as noted in your comment, as well as a few others. I keep these Selective Tone adjustments in my PhotoLab presets to levels at which I am comfortable. I do not like being overly aggressive in PhotoLab with Selective Tone adjustments as I find that they are too hard to control, making it hard for me to get a specific look. I much prefer making some Selective Tone adjustments in PhotoLab, then fine tuning them in CS6. At times I will even make Shadow adjustments in all three programs in order to get a specific appearance to an image. I know this likely sounds odd, but to my eye, files react differently to similar adjustments in different programs and I would rather blend multiple adjustments than trying to do too much in one program.
Unlike many folks, I never use PhotoLab with the intent to finish an image. I use it as my basic RAW processor and often to “thicken up” my images. I prefer to fine tune them in the other two programs I use. I like using three programs as I find I can get more adjustment latitude than only using a single program like PhotoLab, or trying to do everything in CS6. For example, with Nikon 1 files I always make Highlight and Shadow adjustments in PhotoLab and with some images will double bump these same adjustments to maximum levels in CS6.
I don’t particularly like the ClearView adjustment in PhotoLab as I find it creates too much grain in my images. Since ClearView makes adjustments in a range of settings concurrently I find it hard to use to get a specific look that I may want. I would much rather tweak my images in the Nik Collection (and a bit in CS6) than using ClearView. I do use Clearview with specific images, but generally speaking it is not an adjustment that I use very often at all. Often when I use ClearView I end up in ‘do overs’ with my images.
Tom
Image 13 is my favorite on in this series. My, you can sure get it looking better in just three minutes! My first thought would be that I took the photos wrong and didn’t expose them correctly. Then I would adjust for that and then take photos with blown out highlights. 🙁
Now I know that I need to get better at post editing my camera photos! Thanks.
Thanks for the comment Joni! The more that each of us works with our images in post, and the more familiar we get with the software we use, the better and faster we get. I like to think of post processing software as part of my camera system.
Tom