
Pushing boundaries with whatever we do in life is a fundamental part of personal growth, and part of the journey of self-discovery. For many, pushing boundaries is how they evaluate success.
Photography is many things to different people. A casual hobby. Something centred on family or holidays. An ‘on-again off-again’ pursuit. A creative passion. For some it represents a business… a way to make a living.
Earning a living with our camera gear can be a multi-faceted experience. Finding clients, selling the work, ensuring payment, and keeping one’s new business pipeline full is almost a full time job unto itself. Actually doing the projects is sometimes the easiest part of the process.
We do have to push boundaries when doing client work in terms keeping our skills sharp and adapting to new needs that our clients may have. Often clients rely on us to suggest a different way to compose an image, or video clip, to better communicate the visual aspects they need for some type of business messaging.
Most folks who own dedicated camera gear aren’t focussed on making money with their equipment. For them photography is a form personal expression of visual art. They enjoy the challenge of capturing interesting and unique images. Even photographs of family and friends can represent growth opportunities when viewed as more than simply ‘family snaps’.
This article shares a few images when opportunities presented themselves for me to push my boundaries a bit. Some details on the challenges presented are included to provide context.
NOTE: Click on images to enlarge. To view this article in a range of other languages click on the Canadian flag in the upper right corner.
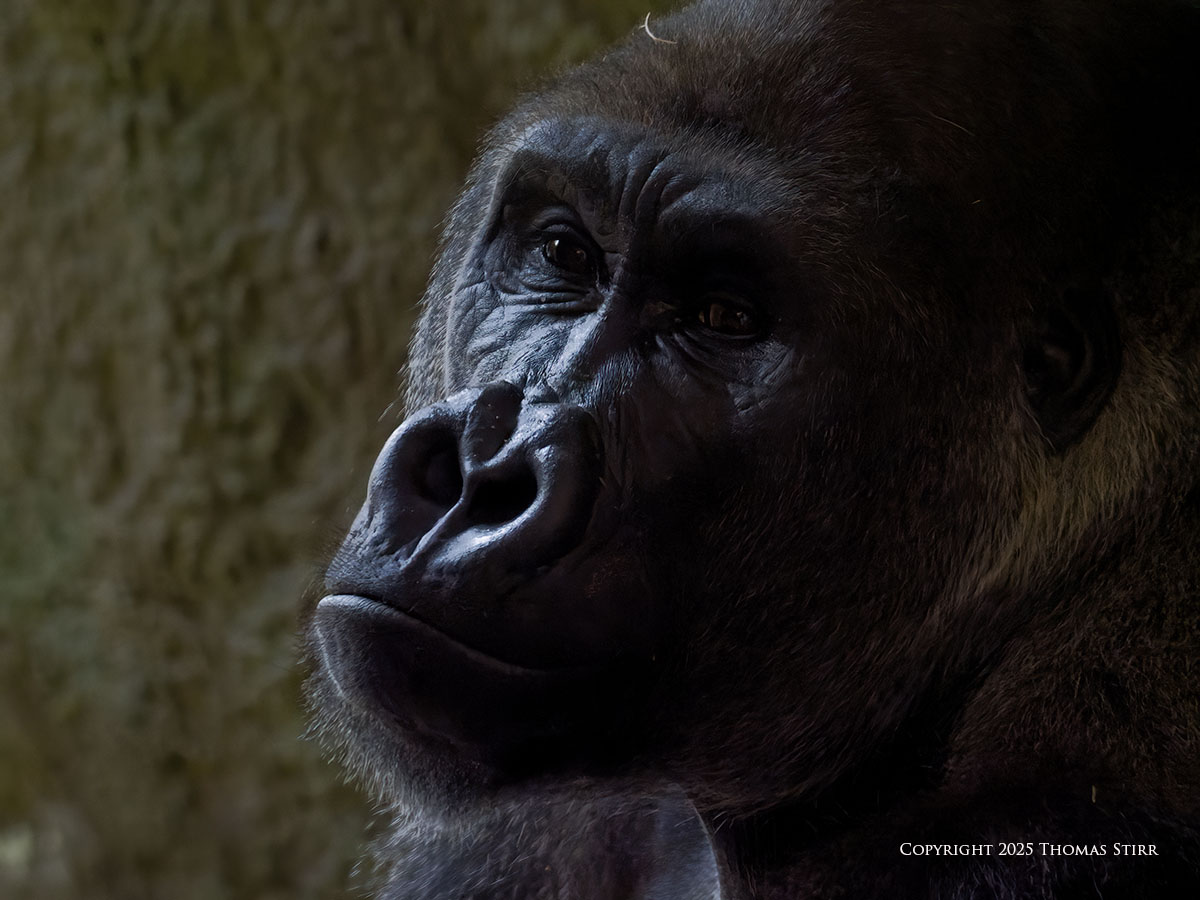
Even a controlled environment like a zoo, does not guarantee that we will be provided with a lot of photographic opportunities. Such was the case this past summer when my wife and I visited a large city zoo. For whatever reason, during the many hours we were at the facility, there seemed to a far fewer image opportunities when compared to visits in previous years.
The image above was captured handheld through a thick, plate glass viewing window. Ideally I would have preferred that my subject would have been in much better light. *shrugs* But… we need to work with whatever conditions we face.
The gorilla was still somewhat active, so I chose a shutter speed of 1/320 to help freeze its motions. Given the dark conditions, I shot with my M.Zuiko 150-600 mm f/5-6.3 IS wide open at f/5, and with my zoom fully retracted to 150 mm. This would help give me more depth of field at f/5.
I manually set my camera to ISO-10000 as this was most suitable ISO value to use so I could slightly overexpose my image, given the lighting conditions. I chose to slightly overexpose the image so I would have to darken it somewhat in post. This would help hide at least some of the noise that would be generated when using ISO-10000 for such dark subject matter.
Another challenge was to make sure I could shoot through the thick glass plate at such an angle as to eliminate the risk of having any reflections on the glass. and also to minimize any potential distortions. I used the thumb on my left hand to brace the end of my lens, and cupped the fingers on that hand to block any extraneous light entering from the left side and creating reflections on the glass.
The final consideration was to wait for the exact moment when the position of the gorilla’s head provided some dramatic side lighting. A few moments after I captured the image above, the gorilla decided it was tired and laid down to sleep, with it head no longer visible.
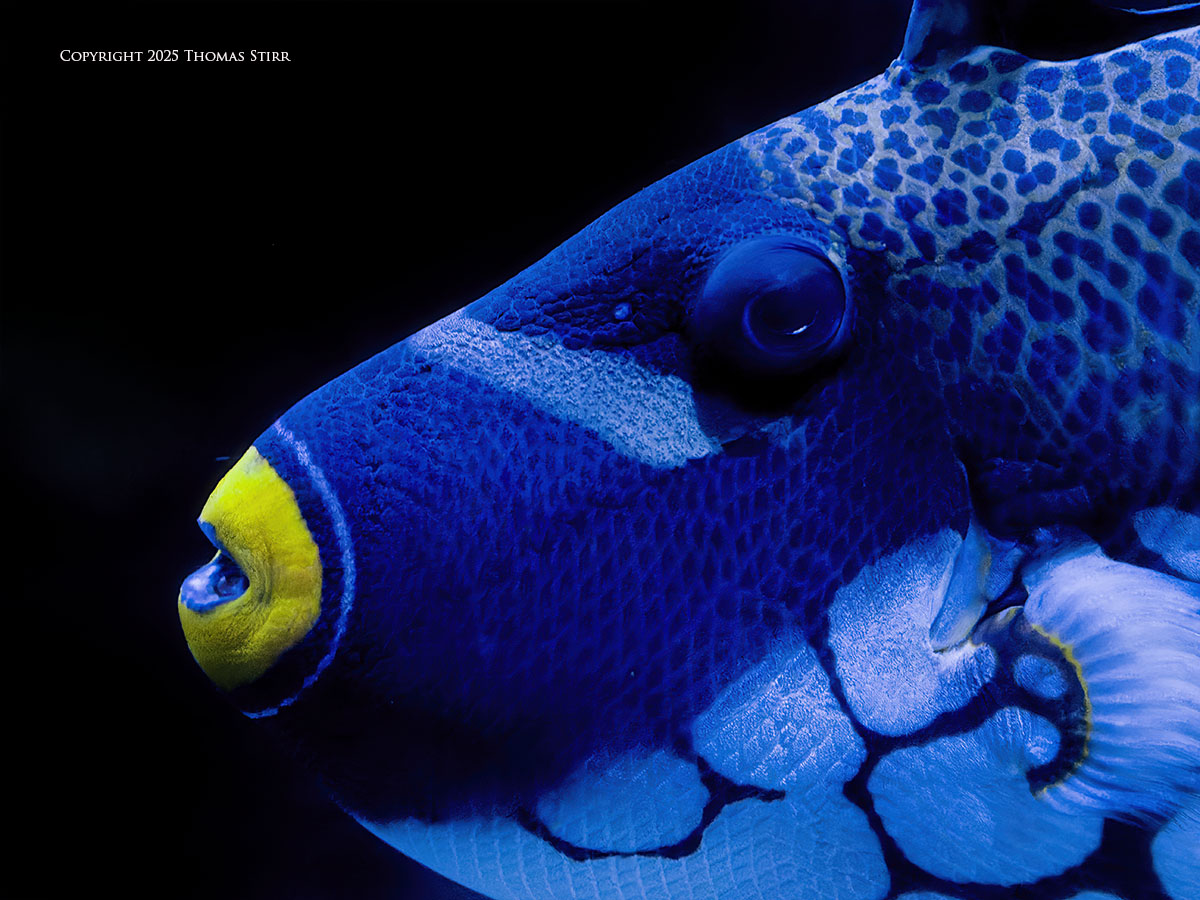
During the same visit to the zoo I decided to attempt to capture some images of fish swimming in one of the indoor aquariums. One particular bright blue specimen caught my eye. Unfortunately the lighting was quite dark and the fish was constantly swimming back and forth in the large tank in which it was housed.
I was using my M.Zuiko 150-600 mm f/5-6.3 IS zoom, so the fastest aperture available was f/5, which meant I needed to fully retract my lens to 150 mm. At that focal length I couldn’t put my lens right up against the glass of the aquarium and pan with the blue fish as it was swimming by.
Since I had to stand back a bit from the aquarium, I needed to locate a specific area in the aquarium where I could shoot through the glass without any risk of reflections. I studied the fish and identified an area of the aquarium where it would be swimming against a very dark background, and where there was no risk of a reflection. This dark background would enable me to get good subject separation.
I practiced panning with the subject fish a few times as it swam back and forth in the large tank… making sure to concentrate on keeping the fish in the exact position in my composition as it was swimming. I used the rear screen on my camera to accomplish this task.
Given the lighting conditions I used ISO-6400, an aperture of f/5, and a shutter speed of 1/100. It was also important to compose my image only including the head of the fish. This helped eliminate potential image blur which could have been caused by the fish’s body and tail movements… while still using a fairly slow shutter speed of 1/100.
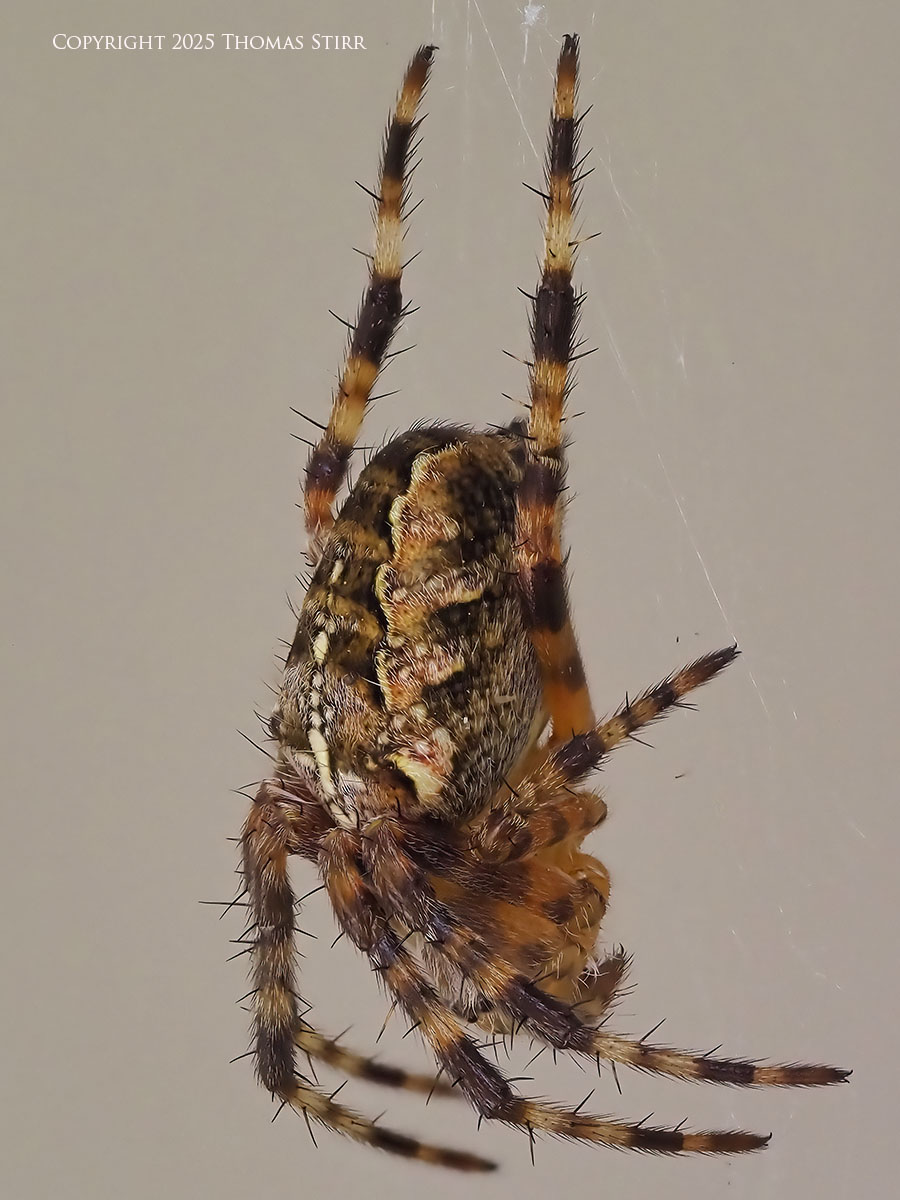
The spider in the above image had spun a web on the landing leading to the front door of my home. It was somewhat sheltered from the breeze which made it a good subject with which to experiment and push my handheld macro photography boundaries a bit.
I wanted to get in very tight to the spider… with good magnification… so I affixed my M.Zuiko MC-20 teleconverter on my M.Zuiko 90 mm f/3.5 PRO IS macro lens. This allowed me to shoot at 180 mm (efov 360 mm).
In order to get a smooth, creamy background in my composition I had to find a very precise shooting angle so none of the edges of the siding on my home would appear in the composition. This ended up being a very awkward angle which did not allow me to use my short stool. So, I had to get down on one knee on the landing, compose my image using my camera’s articulating rear screen, and brace my right hand against an outside wall of my house.
Since I was using a long focal length of 180 mm handheld I knew I’d have to stop my macro lens down to f/16 in order to get more depth of field. I also used handheld in-camera focus stacking to help create more depth-of-field for the photograph featured above. I missed getting good captures on a few attempts as the spider was not totally sheltered from the breeze and moved somewhat during a few image attempts.

Sometimes pushing boundaries means taking a quick guess at camera settings as action is unfolding in front of you. The swan above was swimming out from under a bridge at Grindstone Creek. It was going to emerge from very dark shadows into an area of brighter light, so I quickly dialed in -0.7 EV of exposure compensation to help darken the background and create more contrast.
My camera was already set using Pro Capture L with Bird Detection AI. I quickly adjusted my shutter speed down to 1/800, and began spooling images into temporary memory until after the swan had swam into the area of brighter light. I then fully depressed my shutter release and committed those frames to my memory card, as well as a few additional images.
To arrive at the swan image featured above I had to do a few simple things in post. In DXO PhotoLab I used the Smart Lighting Spot Weighted adjustment to increase contrast, and took the black slider down a bit. Then, I adjusted the overall exposure using the Levels adjustment in PhotoShop CS6, and did some very quick burning to further darken the background.
Sometimes pushing boundaries has more to do with challenging my camera gear. As a test, I captured the insect above handheld using my M.Zuiko 90 mm f/3.5 PRO IS macro set to f/22, with the MC-20 teleconverter in place for a focal length of 180 mm (efov 360 mm). I also used the handheld in-camera focus stacking technology in my E-M1X body.

While at Biggar Lagoons in Grimsby I was capturing some images of swallows in flight. After watching one specific mated pair at a nesting box I decided to try to capture one of the birds as it came into land.
Rather than keep the nesting box in my composition, I used Pro Capture H to set my auto-focus and exposure… then recomposed my photograph so I was basically spooling images of an empty sky just above the nesting box.
I waited patiently until one swallow returned and flew right into the image run that I was spooling in temporary memory. Fully depressing my shutter release wrote those images onto my memory card and produced the photograph featured above.

Pushing boundaries sometimes means being willing to take a chance with post processing. The young bird above was photographed at Bird Kingdom in Niagara Falls. It was in a composition that included some other birds.
I was very intrigued with this young bird’s partial plumage so I decided to do an extremely aggressive crop and took the image down to 1248 pixels on the width. I would not normally be this aggressive when cropping an image… although I was quite pleased with this particular outcome.

While at Bird Kingdom in Niagara Falls I had an opportunity to photograph a dark bird up against a dark background. The tricky part was getting a proper exposure. I quickly shifted to Spot Metering which helped to get the subject bird reasonably close to the exposure I wanted.
I didn’t have quite as much contrast as I wanted, so I dialed in -0.7 EV exposure compensation which gave me the exposure on the bird that I was hoping to achieve… while dropping the background into blackness. While it felt counterintuitive at the time to use exposure compensation to further darken this image capture… it turned out to be a good decision.

During that same visit to Bird Kingdom I was using my wife’s M.Zuiko 75-300 mm f/4.8-6.7 II zoom. This lens tends to get more than its fair share of criticism, even though it is a pretty decent performer given its price point.
After capturing an acceptable image of the crowned pigeon illustrated above at a faster shutter speed and a higher ISO value, I decided to try a much slower shutter speed of 1/8. I wasn’t sure how well this would work since the M.Zuiko 75-300 II zoom does not have Sync-IS, and I was shooting with the lens fully extended to 600 mm efov.
Using spot metering on the crown feathers of bird produced the exposure and contrast I wanted… and using a much slower shutter speed of 1/8 allowed for the use of a much lower ISO value of ISO-500 which helped limit potential noise.
All things considered… an image that pushed boundaries a bit and helped demonstrated the capability of the M.Zuiko 75-300 II lens.

The granddaughter of a good friend of mine rides and jumps at a high level in equestrian competitions. My friend asked me if I could come to one of her competitions and photograph her in action.
I arrived at the event early and surveyed the outdoor jumping area to determine what shooting location would give me the best opportunity to get usable photographs from each of the nine jumps.
Rather than use my M.Zuiko 12-100 mm f/4 PRO IS zoom, I used my wife’s M.Zuiko 14-150 mm f/4-5.6 II instead. This gave me additional focal range flexibility… with the trade-off of some image quality.
I was able to capture good, usable images from all of the nine jumps, with the additional focal length range being an important success factor.
I had never photographed an equestrian event before and didn’t realize until I got onsite that no practice rounds are allowed. Not only that… the action happens very quickly! My friend’s granddaughter finished the nine jump course in 42 seconds.

One of the areas that I’ve been regularly pushing boundaries is with my macro photography. Adding the M.Zuiko 90 mm f/3.5 PRO IS macro lens to my kit was one of the best purchase decisions that I’ve made. The added capability that this lens brings to my day-to-day handheld macro photography is incredible.
The image above is a good example. This was captured by using the M.Zuiko MC-20 teleconverter combined with in-camera focus stacking, at 1/80 using an aperture of f/16, ISO-560. Pushing boundaries can be flat-out fun!

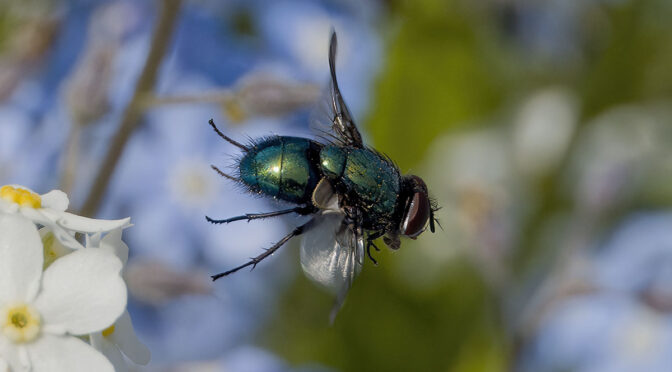
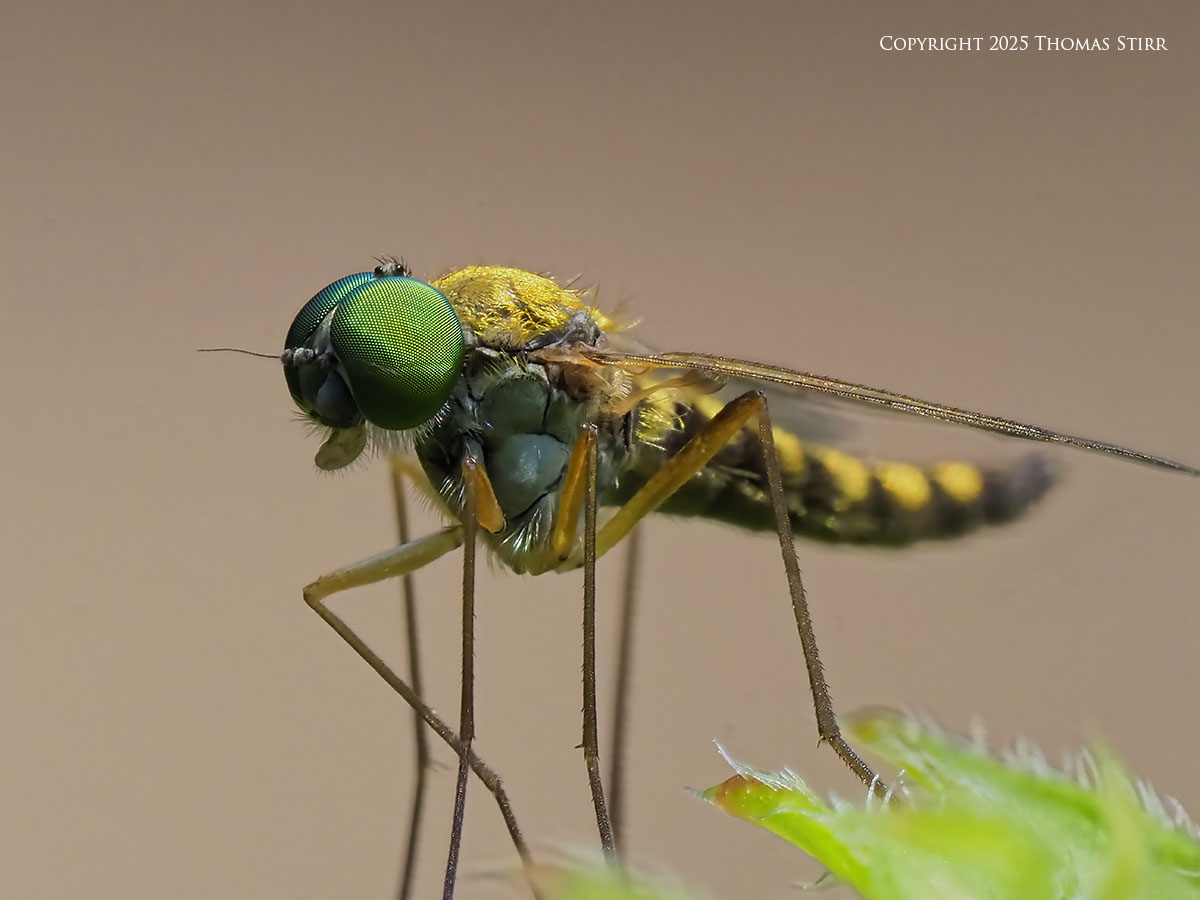
The handheld macro image of a tiny fly above is another example of pushing boundaries. This photograph was created as a test, using the M.Zuiko 90 mm f/3.5 PRO IS macro, M.Zuiko MC-14 teleconverter, along with the Digital Teleconverter in my E-M1X (i.e. 2X digital magnification), with handheld in-camera focus stacking.
I don’t remember if I dialed in S-Macro on my lens, but given the subject distance of 240 mm, this image could have also included using the S-Macro mode which provides an additional 2X magnification. The photograph featured above is a full frame capture without any cropping.

Pushing boundaries is often a result of wondering if something is even possible… like capturing a fly taking flight as illustrated in the image above. This image was captured on my back deck using the M.Zuiko 90 mm macro fitted with the M.Zuiko MC-20 teleconverter for a focal length of 180 mm (efov 360 mm).
I used Pro Capture H with Pre-Shutter Frames and Frame Limiter both set to 15… with a frame rate of 60 frames-per-second. This provided me a shutter release response time of 1/4 of a second.
This started off as a test to determine if it was even possible to capture this specific action of a fly taking flight. The wonderful thing about pushing boundaries is that it can result in adding some approaches to our standard repertoire of image making techniques.

Most photographers push boundaries when they experiment with creating images using slow shutter speeds. This is one of the fundamental boundaries that we need to establish for ourselves so we know how far we can push things to capture an image, especially under low light conditions.
Our shutter speed boundaries will depend on the specific camera body and lens that we use, as well as the focal length.
The bird portrait above was captured using a focal length of 600 mm (efov 1200) and a handheld shutter speed of 1/25.

Pushing boundaries sometimes involves using our camera gear in ways that we haven’t tried before. For example, I have used Live ND to create smooth water effects with waterfalls and streams on numerous occasions. I hadn’t tried to use this technology to create a blurred effect with other subject matter.
In the image above, a model train operating along an extensive track set up at the Royal Botanical Gardens was photographed. I used Live ND, with as setting of 5, to capture the image above. It was captured handheld with a shutter speed of 1.3 seconds. Getting my shutter release timing correct was the biggest challenge to capture this image.

Our final example of pushing boundaries is the image of the Preying Mantis above. One evening well after the sun had set, I spotted this mantis perched on the glass of my patio door leading out from my kitchen.
I had to find a good shooting angle that did not have any reflections on the glass, as I had to hold my camera away from the surface of the sliding patio door. This image was captured with an M.Zuiko 60 mm f/2.8 macro lens at f/4, 1/15, ISO-3200… using handheld in-camera focus stacking. This was one of the slowest handheld shutter speeds I had ever tried when attempting a macro image with in-camera focus stacking.
Pushing boundaries with our photography… and with a host of other things in life… are key opportunities for personal growth and self-discovery. We won’t be successful every time that we push boundaries with our photography… but it’s a heck of a lot of fun experimenting!
Technical Note
Photographs were captured handheld using camera gear as noted in the EXIF data. All images were created from RAW files and out-of-camera jpeg files using my standard process in post. This is the 1,492 article published on this website since its original inception in 2015.
How you can keep this website advertising free
My intent is to keep this photography blog advertising free. If you enjoyed this article and/or my website and would like to support my work, you can purchase an eBook, or make a donation through PayPal (see Donate box below). Both are most appreciated.

You may enjoy bird photography, and if so our 188 page eBook Handheld Bird Photography may be of interest. It is available for download for an investment of $14.99 CDN. The best viewing experience of this eBook will be at 100% using Adobe Acrobat Reader.
Sometimes all we need as photographers is a bit of inspiration. We hope you can find some of that inside Finding Visual Expression II.

Finding Visual Expression II is available for download for an investment of $11.99 CDN. The best viewing experience of this eBook will be at 100% using Adobe Acrobat Reader.
You may be interested in all of the 30 concepts covered in both of these related eBooks. If so, you may want to also consider Finding Visual Expression.

Finding Visual Expression is available for download for an investment of $11.99 Cdn. The best viewing experience of this eBook will be at 100% using Adobe Acrobat Reader.
Our other eBooks include Images of Ireland, New Zealand Tip-to-Tip, Nikon 1: The Little Camera That Could, Desert & Mountain Memories, Images of Greece, Nova Scotia Photography Tour, and a business leadership parable… Balancing Eggs.
If you click on the Donate button below you will find that there are three donation options: $7.50, $10.00 and $20.00. All are in Canadian funds. Plus, you can choose a different amount if you want. You can also increase your donation amount to help offset our costs associated with accepting your donation through PayPal. An ongoing, monthly contribution to support our work can also be done through the PayPal Donate button below.
You can make your donation through your PayPal account, or by using a number of credit card options.
Word of mouth is the best form of endorsement. If you like our website please let your friends and associates know about our work. Linking to this site or to specific articles is allowed with proper acknowledgement. Reproducing articles, or any of the images contained in them, on another website or in any social media posting is a Copyright infringement.
Article is Copyright 2025 Thomas Stirr. Images are Copyright 2023-2025 Thomas Stirr. All rights reserved. No use, duplication or adaptation of any kind is allowed without written consent. If you see this article reproduced anywhere else it is an unauthorized and illegal use. Posting comments on offending websites and calling out individuals who steal intellectual property is always appreciated!
A wonderful compendium of boundary-pushing, in circumstances, capture methods and equipment use. Very enlightening with great photographs, Tom!
Thanks for your supportive comment Terry… much appreciated!
Tom
Another good read Thomas
Loved the gorilla lighting very atmospheric.
It’s a good idea to push oneself over varied genres, I often am the family photographer the one who always brings a camera to every gathering. This in itself pushes a real photographer too, often finding the best light helps- I took around 300 photos at a recent moment of family time.
Glad you enjoyed the gorilla image Mark. I agree that the ‘family photographer’ often needs to be creative with lighting… and other things like capturing captive moments and expressions.
Tom